


The graphic process editor aims to define interactive processes used in the portal. This editor is a flash component capable of creating pages that include texts, images and animated components so as to display the user's business processes in a graphic manner.
These graphic components can feature links pointing to functions of the software package, other processes or help pages. They can also trigger animation processes (display or disappearance of parts of the process, for instance).
The editor can be used to select a range of images in a library given by default. This library is called 'Standard Sage'. It is the first item of a scroll-down list that can be found in the selection window of the graphic components:
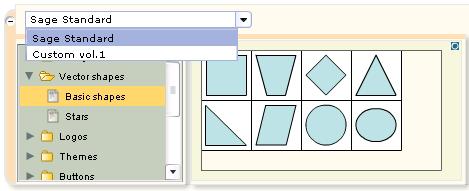
As shown in this screenshot, the available images are organized as follows:
- libraries (here, Sage standard and Custom vol 1)
- these libraries include groups (e.g. Vector shapes, Logos, Theme, Buttons, ... )
- these groups include themes (Basic shapes, Stars), i.e. collections of images displayed in a thumbnail browser.
It is possible to add other libraries, groups and themes. They will be displayed in the libraries window shown above.
This requires to perform some operations manually on the application server:
- create directories and sub-directories for the libraries, groups and themes.
- upload images in the themes' directories.
- create configuration files (written in JSON); these files describe the tree structures of the libraries (_param.txt), groups (sgx_libsinfo.txt), and themes (list.txt).
This documentation's purpose is to describe how to proceed.
NB:
- It should be noted that the manual configuration phase requires to write in JSON code, it is therefore advised to turn to someone familiar with JSON or JAVASCRIPT. Otherwise, it is advised to use an editor capable of indenting JSON code in order to see a clearer structure.
- It is important to carefully respect cases (upper/lower) of files' names as defined above.
JSON notation
JSON notation, i.e. the notation used to define structures in Javascript, uses the following syntaxes:
- a structure is composed of properties and their values, between curly brackets and looks as such:
{ "prop1" : "value 1" , "prop2" : "value2", "prop3" : 25 }
Here, the structure has 3 properties called respectively prop1, prop2 and prop3, alphanumerical values called value1 and value2 and a numerical value (25).
- a grid is written between square brackets:
[ "indice_0", "indice_1", "indice_2, "indice_3" ] being a grid composed of 4 elements.
- The two notations can naturally be merged as follows:
{ [ { "age": 25, "name" : "Martin" }, { "age": 67, "name" : "Emile" } ], "number" : 2 }
being a structure composed of a grid that has 2 structures and another value ('number'). Here, each sub-structure has two fields: 'age' and 'name'.
It should be noted that, in JSON, a string should never be cut by a line break (carriage return).
As a result, the following synthax:
{ "name" :
"Martin" }
is correct. Whereas the following:
{ "name" : "Mar
tin" }
is not.
Moreover, it is important to respect cases (upper/lower) for the properties' names, as they have great importance (properties "Name" and "name" are not the same).
Base directory
The base directory is a sub-directory of the X3_PUB directory. It contains the specific librairies and the configuration files. The X3_PUB directory can be found using the calculator via the following expression:
filpath("","","","X3_PUB")
From there, the sub-directory can be found:
X3_ROOT\X3CLI\XBLOCK\ (on Windows)
X3_ROOT/X3CLI/XBLOCK/ (on Unix or Linux)
This directory has a FLASH sub-directory which contains the standard graphic components. The specific components will be created in a directory called FLASH_CUSTOM, located at the same level (in the XBLOCK directory). It this directory does not exist yet, it must be created.
NB: there is a FLASH_CUSTOMREF directory in the sub-directory FLASH. If FLASH_CUSTOM does not exist, it is advised to copy FLASH_CUSTOMREF in th XBLOCK directory and rename it. This way, the user will have examples of configuration files as described in the following paragraph.
Here, FLASH_CUSTOM is considered as the components' base directory which contents shall be described.
Sub-directories and contents
FLASH_CUSTOM's sub-directories are the following:
- a directory called _params has the configuration file _param_main.txt which shall be left as such.
- an other directory called FlowCharting with 3 sub-directories:
- sub-directories PadDev and PadPlayer. Each of these two directories have a configuration file called _params.txt. Eventhough these two files might be technically different, it is advised to configurate them the same way. Their contents, written in JSON, give the name and location of the user's libraries (NB: each library is a folder located in the libraries_custom folder).
- the sub-directory libraries_custom contains the graphic libraries.
The directory libraries_custom contains a sub-directory for each graphic library. This sub-directory contains a sub-directory for each group (a group being a themes list) and a sub-directory per theme (a theme being a collection of images). The images can be found in this last directory. These files can have the following extensions: .jpg, .gif, .png. This directory also contains a configuration filed called list.txt which gives the list of image files in the directory.
The following presentation give the example of the use of this software for a group of companies. Such as:
- a library per company: MYCORP, MASOC... MEINGMBH
- a group list in each library: pictures, images, backgrounds, logos for instance
- and themes in each group. For the pictures group, there could be a Sites theme with pictures from different sites of the company, a People theme with pictures of different persons from the company, a Products theme with pictures of products and so on.
The tree structure should be as follows:
MYCORP |
|
|
|
pictures |
|
| |
| People |
| |
|
|
| list.txt |
|
|
| MARTIN.jpg |
|
|
| HENRY.png |
|
|
| DAVID.gif |
|
| Sites |
|
|
|
| list.txt |
|
|
| PARIS.gif |
|
|
| LONDON.jpg |
|
| ... |
|
| images |
|
|
|
| schemes |
|
|
|
| list.txt |
|
|
| MAP.png |
| ... |
|
|
MASOC |
|
|
|
| ... |
|
|
Fichier _params.txt
This file is in two directories: PadDev and PadPlayer. It contains the names and locations of the user's libraries, as shown in the following example:
{
"bibOriginsInfo" :
[ {"labels" :
[
{"lang" : "ENG" , "label" : "Company MYCORP"},
{"lang" : "FRA" , "label" : "Société MYCORP"},
....
{"lang" : "GER" , "label" : "MYCORP Gesellschaft" }
],
"originSubpath" : "../FLASH_CUSTOM/FlowCharting/libraries_custom/MYCORP",
"id" : "identificateur_1"
},
{"labels" :
{"lang" : "ENG" , "label" : "Company MASOC"},
....
{"lang" : "GER" , "label" : "MASOC Gesellschaft" }
],
"originSubpath" : "../FLASH_CUSTOM/FlowCharting/libraries_custom/MASOC",
"id" : "identificateur_2"
},
...
{"labels" :
[ {"lang" : "ENG" , "label" : "Company MEINGMBH"},
....
{"lang" : "GER" , "label" : "MEINGMBH Gesellschaft" }
],
"originSubpath" : "../FLASH_CUSTOM/FlowCharting/libraries_custom/MEINGMBH",
"id" : "identificateur_M"
}
],
"r" : 0,
"v" : 1
}
In the previous file:
- "bibOriginsInfo" is a reference to a grid which elements (between curly brackets) each contain the characteristics of a library. As for every grid element written in JSON, these are separated by commas (NB: there is no comma after the last element).
- a library can be characterized by the following information:
- "labels" - the titles that will be displayed by the process editor: the editor itself is a grid of structures (one element per connexion language code, the language code is itself followed by the entitled element)
- "originSubpath" - the path of the sub-directory where the library is stored
- "id" - a free yet unique user name
- "r" and "v" - two parameters that should not me modified.
This way, in the previous file, the base directories of the libraries are MYCORP, MASOC, MEINGMBH.
Fichier sgx_libsinfo.txt
This file is located in the base directory of the library (MYCORP in the previous example), and contains a description -written in JSON- of the library structure. Proceeding on the same example, the contents would be as follows:
{ "libsinfo" :
[
{ "biblist" :
[
{"bibid" : "mycorp_1",
"catsubpath" : "people",
"h":70,
"w":70,
"type":"file",
"labels" :
[
{"lang" : "ENG", "label" : "People" },
{"lang" : "FRA", "label" : "Personnes" },
....
{ "lang" : "GER", "label" : "Leute"}
]
},
....
{ "bibid" : "mycorp_N",
"catsubpath" : "sites",
"h":30,
"w":40,
"type":"file",
"labels" :
[
{"lang" : "ENG", "label" : "Sites" },
...
{ "lang" : "GER", "label" : "Standorte"}
]
}
],
"labels" :
[
{"lang" : "ENG", "label" : "Pictures" },
{"lang" : "FRA", "label" : "Photos" },
....
{"lang" : "GER", "label" : "Fotos" }
],
"familysubpath":"pictures",
"familyid":"pic_mycorp"
},
{ "biblist" :
[
{ "bibid" : "mycorp_2",
"catsubpath" : "schemas",
"h":70,
"w":70,
"type":"file",
"labels" :
[
{"lang" : "ENG", "label" : "Schemes" },
....
{"lang" : "FRA", "label" : "Schemas" }
]
},
....
}
],
"labels" :
[
{"lang" : "ENG", "label" : "Images" },
{"lang" : "FRA", "label" : "Images" },
....
{"lang" : "GER", "label" : "Bilder" }
],
"familysubpath":"images",
"familyid":"img_mycorp"
}
],
"oid" : "mycorp",
"r" : 0,
"v" : 1
}
In the previous file:
- "libsinfo" is a reference to a grid which elements each contain the characteristics of a group. As for every grid element written in JSON, these are separated by commas (NB: there is no comma after the last element).
- a group can be characterized by the following information:
- a list of themes that can be identified by "bibid" (the sub-directory of the theme is stored in "catsubpath"), characteristics "h" and "w" about the thumbnails' sizing, a library type called "type" that contains "file" if a list of graphic files is described in the theme's directory (NB: an other value "swf" is possible if a list of swf files is described), and a grid of labels per language in ordre to name the theme.
- a grid of descriptions per language in order to name the group.
- a path for the group ("familysubpath" - corresponds to the sub-directory path where the group is stored).
- "familyid" - a free yet unique user name
Finally, the last parameters of the file
- "r" and "v" - two parameters that should not me modified.
- "oid" - unique reference to the library.
This way, in the example, there are the pictures group (with the themes personnes and sites) and the images group (with the theme schémas).
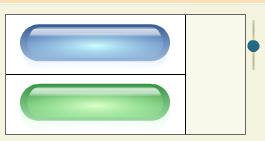
Parameters "h" and "v" define the thumbnails' size in pixel that will be displayed in the image browser for a particular theme. NB: their default value is 40.
For instance, a thumbnail list looks as follows:
- 40x40 size:
- size 180x60:
Fichier list.txt
This file is located in the base directory of a theme. It contains a list of the images. Its structure is quite simple:
{ "files" :
[
{ "name" : "MARTIN.jpg" }
{ "name" : "HENRY.png" }
{ "name" : "DAVID.gif" }
]
}
Creation of supplementary levels in the hierarchy
It is possible to add other levels in the hierarchy structure of the library, group or theme so as to have a structure with more than two levels.
For instance, based on the previous hierarchy, a Map directory could be added. This directory itself could have sub-directories for countries, regions or states, departments or counties, towns and different maps of a same town in each folder. The folders would be organized as such:
MYCORP/images/map/USA/tenessee/hamilton/chattanooga (with different maps of the town)
To achieve this, the user has to:
- create the corresponding folder hierarchy structures
- modify the two files sgx_libinfo.txt so as to modify the definition of the sub-folders and their corresponding titles:
- "catsubpath":"images/map/USA/tenessee/hamilton/chattanooga"
- "label":"images;map;USA;tennessee;hamilton;chattanooga"
- "label":"Images;Maps;US Country;Tennesse State;Hamilton County;City of Chattanooga"
It should be noted that, eventhough the user wants to multiply the number of sub-folders this way, they ought to be described them in full length in the list which could be tedious. Moreover, only the last level of the list can contain files (and the corresponding list.txt file).
Nevertheless, it is possible to have different levels of hierarchy structure per branch. This way, for instance, it is possible to have both the hierarchy structure above and the following:
MYCORP/pictures/animals/mammals/cows (the folder contains pictures of cows)
Archive generation
Once the previous modifications have been operated, it is possible to use the libraries that have been created directly on the server tree structure without any restrictions in web mode.
Nevertheless, in order to use them in client-server mode, it is necessary to create an archive file (named XCLI.tar) with all the files located in the FLASH_CUSTOM directory.
This is done for a dedicated utility.