Graphic representation of the calendar
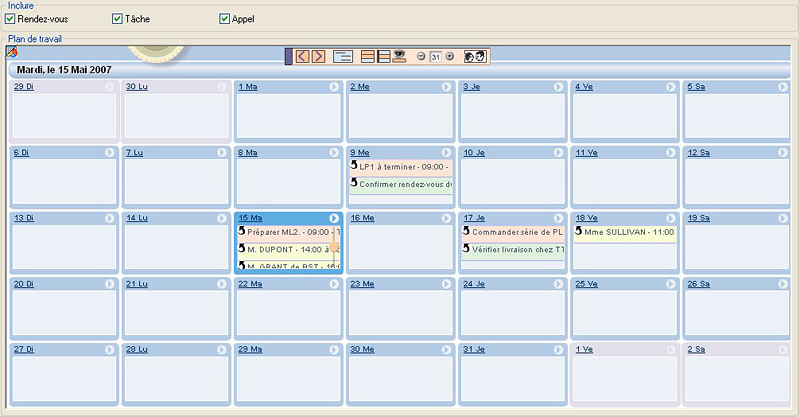
The calendar is used as a traditional calendar to manage events like meetings, tasks and CRM calls or Customer support interventions.
Upon screen opening, the calendar is displayed monthly and as follows:

The data contained in the calendar can be displayed in a grid.
To switch from the graphic mode to the grid mode, it is necessary to click on following icon: in Server client mode, or
 in Web mode, which is located in the upper left corner of the graphic. An example and additional information on the common characteristics between graphic representations can be found in the general document Graphic representations.
How to modify the calendar view?
Choice of the view and the display symbols of events
- Panoramic view of all the events.
The ranges for this view correspond to the minimum and maximum date to which the events were recorded.
Only the days on which there are events are displayed.
These events are highlighted according to their status by a color pictogram:  red when the event is late (the date is in the past but the event did not take place),
 gray, when the event is over,
 green, when the event has not yet taken place.
- View by month, by week (7 or 5 days) or by day:
Each event type is highlighted by its color:
 : Appointments,
 : Call
 : Task
The past events (that is whose status is "over" are displayed as crossed out: .
.
Event presentation mode
Depending on whether the calendar is displayed by month, by week or by day, the events can be presented:
- either in a list (see example below),
- or set on the calendar on the corresponding hour range.
In this case, the hour can be modified and adjusted by the user. 8 hours, 12 hours and 24 hours:
Event detail display
- A short description of the event is displayed when the cursor hovers over the event.
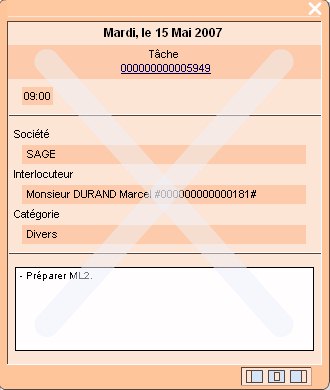
- A longer record can be obtained by clicking on the event:

- This record can be moved on the calendar with help of the mouse or it is set automatically (on the left, in the middle or on the right of the calendar) with help of the buttons available at the bottom of the record.
- In order to view the detail of another event, it is not necessary to close the record: its content is automatically updated by clicking on the title of thisevent.
- The function dedicated to the management of this event can be accessed by tunnel thanks to a link on the event reference. The access to the event in Creation/Modification mode is detailed below.
- In the example above, a cross on the record indicates that the event is over.
How to select the event to display?
The events can be displayed via a selection.
The selection can concern:
- the Type: appointment, task, CRM call
- the Status: over, pending
How to go through the calendar and select a date?
- In a "traditional" way, using the navigation buttons:
 .
.
Depending on the calendar view used, the navigation is made day by day, week by week or month by month:
- With the help of the Round Date Picker.
It is actually formed of three pickers: the year, the month and the day picker Since they rotate in one way or the other, it is possible to get quickly to the required date.
The picker rotates continuously when moving the cursor and keeping at the same time the left side of the mouse pressed, or intermittently by clicking successively on the different years, moths and days up to the required date.
The selected month is displayed in pink.
The selected date is highlighted by the vertical line crossing the three pickers in their middle.
In the following example, the current date is June 28th 2007 and the required date is April 13th 2006.
The return to the current date is made via the yellow pictogram highlighting this date:
How to create/modify an event?
The calendar itself is only used to view events.
Their modification or creation occurs via a tunnel in the function dedicated to the management of the object corresponding to the event type (appointment management, task management, etc...).
Access by tunnel upon event modification
Two possibilities:
- Either directly from the calendar via icon
 .
. - Or from the detailed record of the event by clicking on the link available on the event reference.
Access by tunnel upon event creation
Two possibilities:
- Either via a dedicated menu from the date on which the event is to create.
- Or from the creation help button used to display a window to pre-enter the event (date type, hour and description).
Note: in the event pre-entry window, the start date is represented by a blue pictogram and the end date by a red pictogram.
The modification is carried out by:
-
either moving the pictograms,
-
or clicking directly on the hour schedule. To position the start hour, just click; to position the end hour, click and keep the Shift key pressed.
