Sage X3 Services developer studio installation
You need to install the Sage X3 Services developer studio to customize or extend your GraphQL APIs. Follow this procedure to do so.
- Download and unzip the developer studio on your machine.
-
Install Visual Studio Code on your machine. You will use this integrated development environment (IDE) to build your applications, including the user interface pages.
Note - settingsFor Windows operating systems, install Visual Studio Code's system edition rather than the user edition to avoid access rights issues when developing.Note - informationYou can use another TypeScript IDE, but Sage only officially supports Visual Studio Code. -
The Extensibility framework uses Node.js. The developer studio's supported Node.js version is indicated in the .nvmrc file under the Sage X3 Services Developer studio root directory.
You need to check the exact Node.js version mentioned in this file for each update of the developer studio and use that version.
To manage Node.js installations and usage, use the nvm for Linux or nvm-windows for Windows Node version manager. Follow these steps to set your nvm up the first time:
-
Download nvm or nvm-windows and install it.
Note - warningFor Windows, nvm-windows is sensitive to directory paths containing spaces such as Program files. Install nvm-windows on a neutral, non-user directory that does not contain any spaces such as D:\Apps or C:\Tools\nvm. Directories such as C:\Users\xxx\AppData are not recommended.
For Linux, set a neutral base directory for Node.js when you install nvm. For example, D:\Apps\nodejs or C:\Tools\nodejs. Do not use directories with spaces.
-
Open a Visual Studio Code terminal and type the following commands.
nvm install [version]
nvm use [version]
Where
versionis the Node.js version specified in the .nvmrc file.This installs and uses the supported Node.js version in the directory specified in your nvm during the setup or in the configuration files.
-
- Open the developer studio's root directory in Visual Studio Code. On Windows, you can right-click the root directory and select Open in VS Code or open it directly in Visual Studio Code.
- Open the Visual Studio Code terminal and run the following command to install the developer studio.
On Windows:
npm run clean:install:win
On Unix:
npm run clean:install:unix
- At the end of the installation script, the terminal can prompt you to update other components of the developer studio, such as the npm. You can run the indicated commands to update those components.
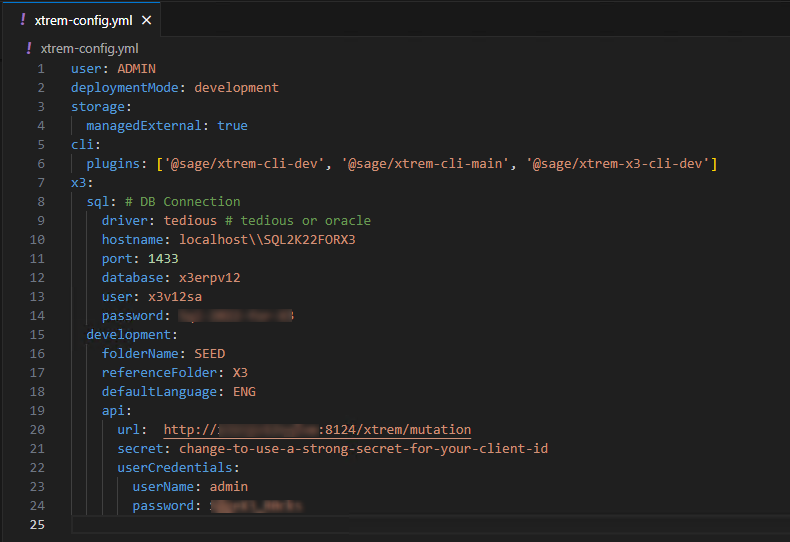
- Open the xtrem-config.yml configuration file and enter the settings to connect to Sage X3.
- driver:
tediousfor Microsoft® SQL Server ororaclefor Oracle databases. hostname: The Oracle or SQL Server hostname. For SQL Server, it can contain the server, instance, and port in the following format:
<server>\\<instance>.For example,
localhost\\SQL2K22FORX3.port: If a port is required, enter its number here.
For SQL Server, the default port is usually 1433.
For Oracle, the default port can be omitted in the connection string.
stringdatabase: The Oracle or SQL Server database name.
For example,
x3v12.- user: Specify the SQL Server account to connect to the database.
- password: The password for that user.
folderName: The name of the X3 folder to connect to.
For example,
SEED.- reference: The name of its reference folder. It is usually
X3. defaultLanguage: Use the language code from Sage X3 to specify the default language to be used for GraphQL queries.
For example, ENG, FRA, SPA, and so on.
url: Specify the Sage X3 URL to use for GraphQL mutations. It is
http://[Server]/xtrem/mutationwhere[Server]is the IP address or hostname of the Sage X3 web server (Syracuse), including the port if it's not port 80.For example,
http://x3erpv12:8124/xtrem/mutationorhttp://OneTinyPlanet.x3.com/xtrem/mutation.- secret: The Sage X3 Services secret key defined in the Global settings function.
- driver:
-
Do not add quotation marks around the secret ID in the xtrem-config.yml file.
-
The indentation is important. For example, you need to put the
apisection under thedevelopmentsection. -
Under the
apisection, use an URL with the server name. Do not uselocalhostin this URL.

