Bank register and MT940 file import
Bank operations can be registered like the Cash register process.
Use the Bank register function (GESXDE) to:
-
Create a bank register for the selected time period.
-
Create payments inside the register.
-
Post payments using the standard payment function.
-
Import MT940 files with bank statements.
Setting up bank registers
Open: A/P-A/R Accounting > Bank transactions > Polish legislation> Processes > Bank register (GESXDE).
Setting up payment entry types
In the Payment entry types function (GESTPY), apply the following settings in the entry type.
General section:
-
Sign field: Revenue or Expense.
-
Bank or Cash field: select Bank.
-
Default payment attribute:
-
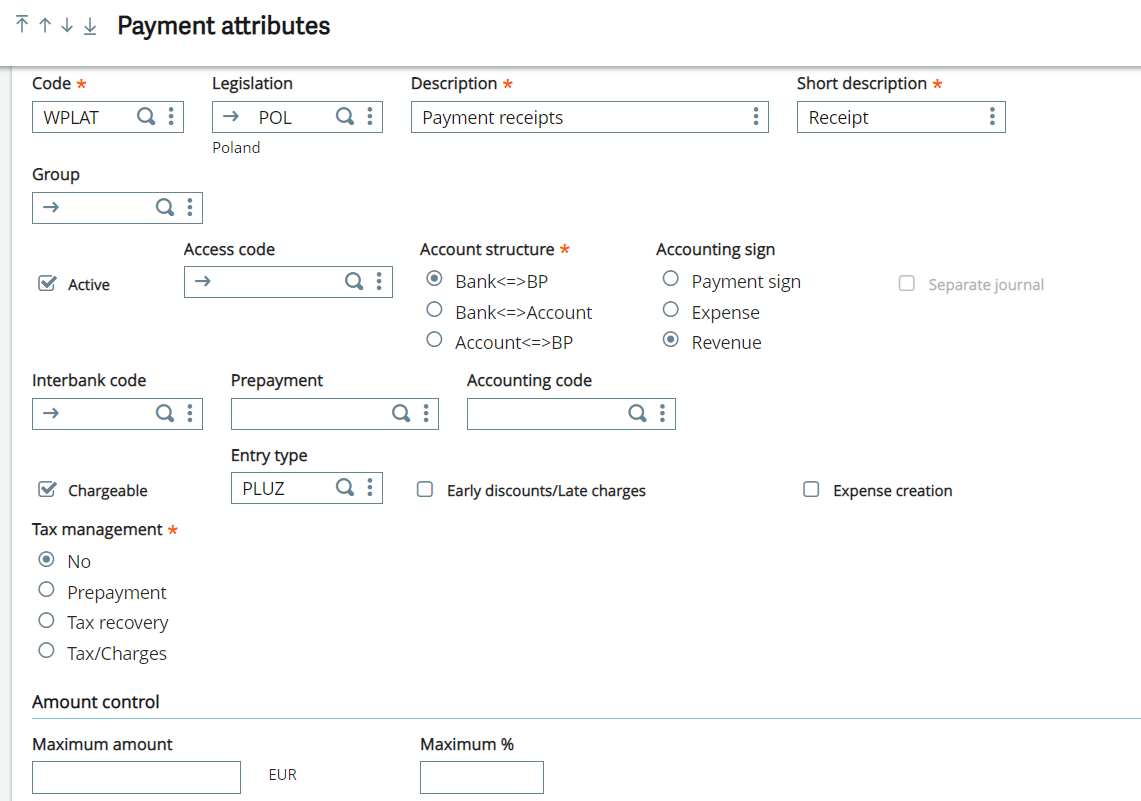
For Expense - Apply the following settings in the Payment attributes function (GESCDA):
- Code: Select PLATN.
- Description: Payment.
- Short description: PLATN.
- Account structure: Bank<=>BP.
- Tax management: Select No.
-
For Revenue - Apply the following settings in the Payment attributes function (GESCDA):
- Code: Select WPLAT.
- Description: Payment receipts.
- Short description: Receipt.
- Account structure: Bank<=>BP.
- Tax management: Select No.
-

Entry section:
-
Payment entry type field: select Bank register.
-
Entry batch field: select the Entry batch check box.
Creating additional payment entry types
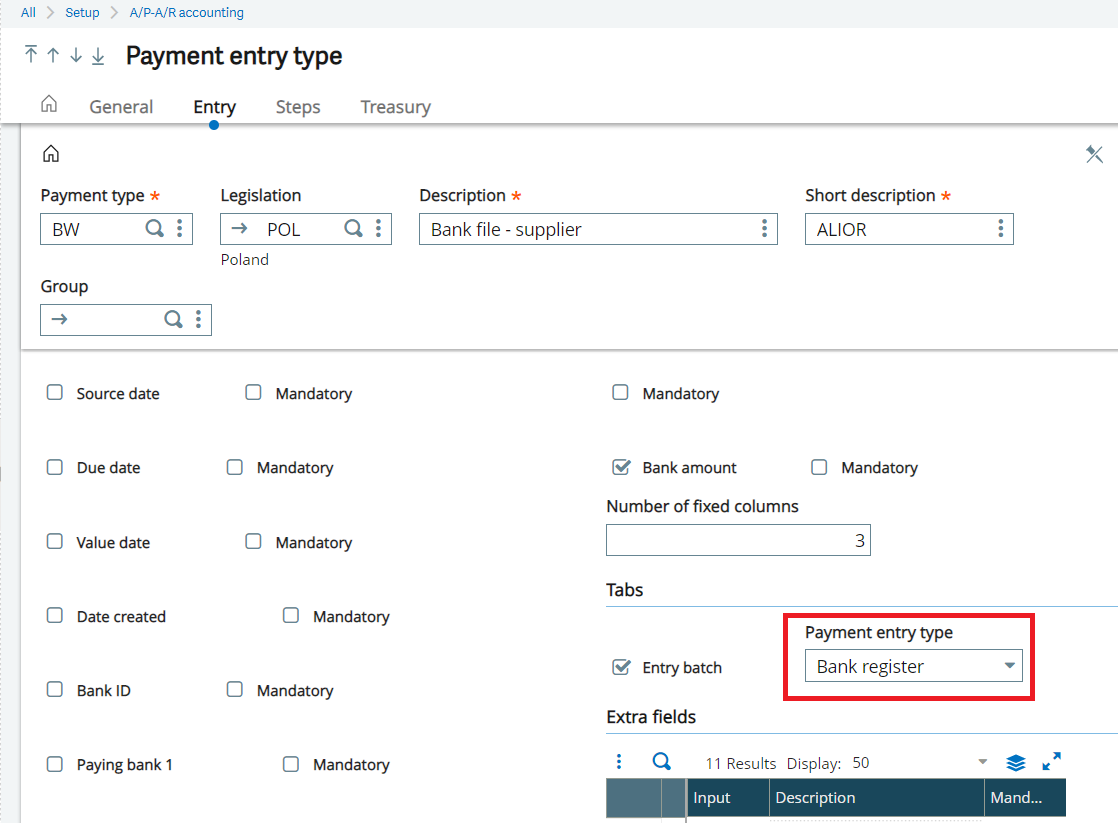
To create a remittance and the Elixir file, you must define an additional payment type. You could name it PRZEL, for example.
Using the settings as follows:
- Payment type: Select your additional payment type.
- Description: Select Bank file - supplier.
- Short description: Bank file.
- Do not select Bank register for the Payment entry type field.
- Select the Entry batch check box.
Creating bank accounts
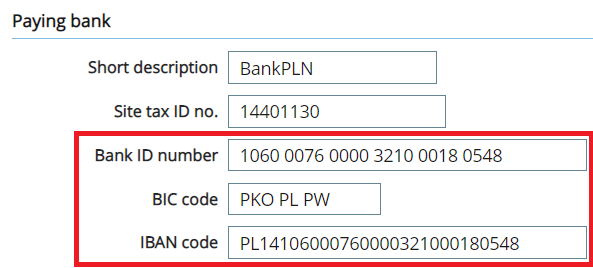
Create a bank account using the standard Bank account function (GESBAN):
-
Site tax ID no.: Enter a site.
-
Bank ID number: Enter a bank account number and do not include:
-
The country code
-
The first two digits of the checksum; the country code is included in the IBAN code field.
-
-
BIC code: SWIFT code
-
IBAN code: This field displays the full bank account number filled automatically by the system.

Unique payment ID number
A unique payment ID number (code: XDIDP) is defined in Sequence number structures function (GESANM).
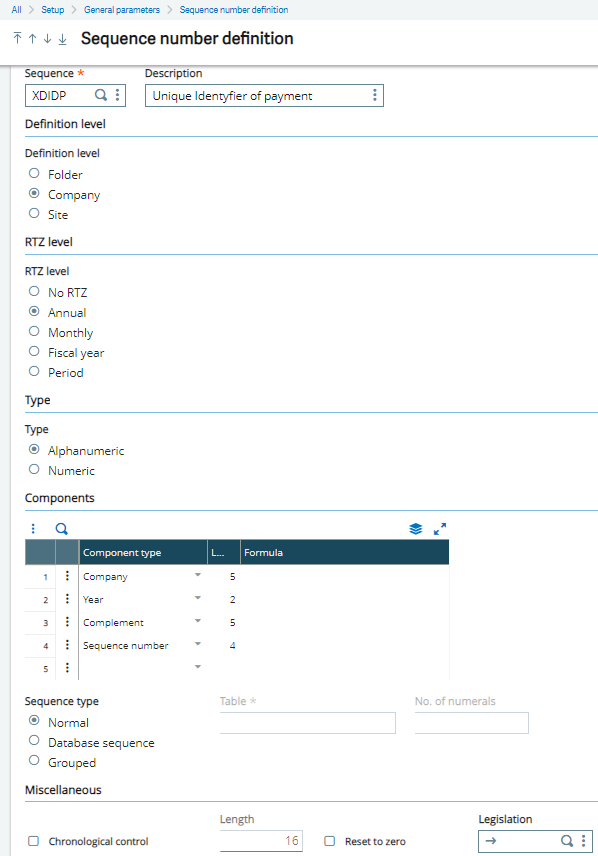
Enter the sequence number in the: XDIDPAY - Payment ID parameter (XD chapter, PAY group).
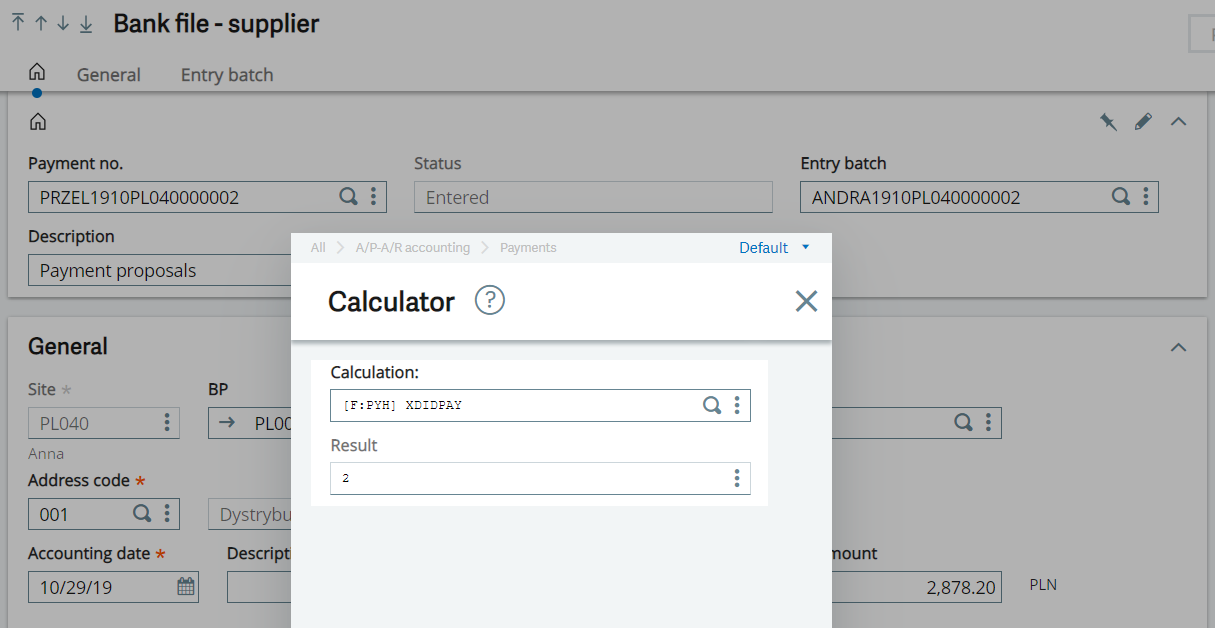
When creating a payment, the system will create a unique ID number and assign it to the generated payment. This ID number is not displayed, but you can find it using the Calculator tool. Click the action panel, then Diagnosis and Calculator. Enter the code [F:PYH] XDIDPAY at the tool level:
The generated bank file (Elixir) contains data needed for the bank to correctly enter the transfer, (e.g., BP’s account, amount, transfer date, transaction title, etc.). In the transaction title add-on adds invoices numbers and a unique payment ID number in parenthesis.
MT940 file import definition
The MT940 file import definition function (GESXDI) is needed for the system to identify which bank is supported in the system and which is not. All supported and programmed banks are provided at start up.
XDMT940DIR: MT940 files path parameter
Imported MT940 files can be saved by the system in the indicated place. The destination must be specified in the XDMT940DIR - MT940 files path parameter (XD chapter, PAY group). Before setting the parameter, create a directory on the server and define it in X3 Storage Areas (AVOLUME).
Linking bank accounts and payment entry types
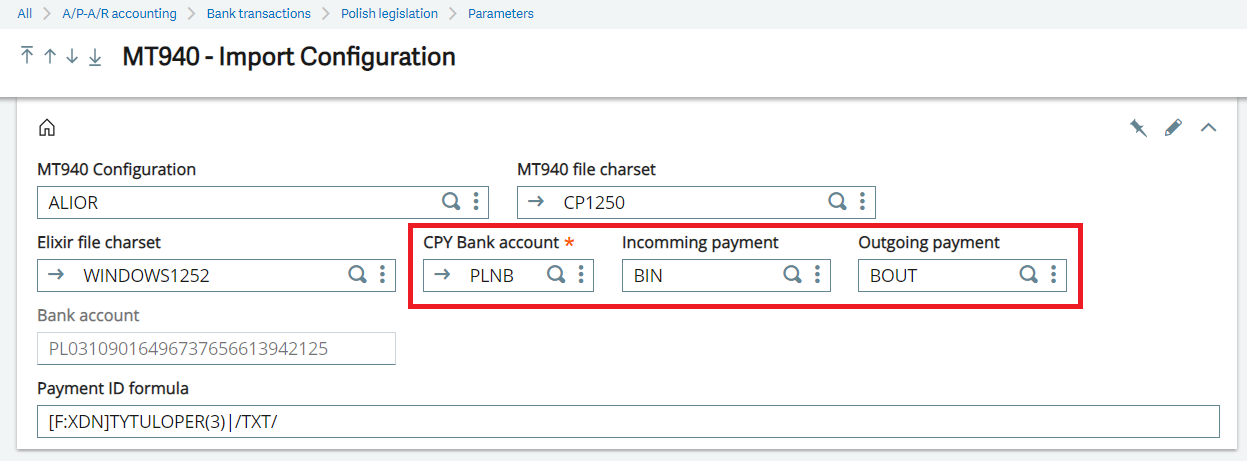
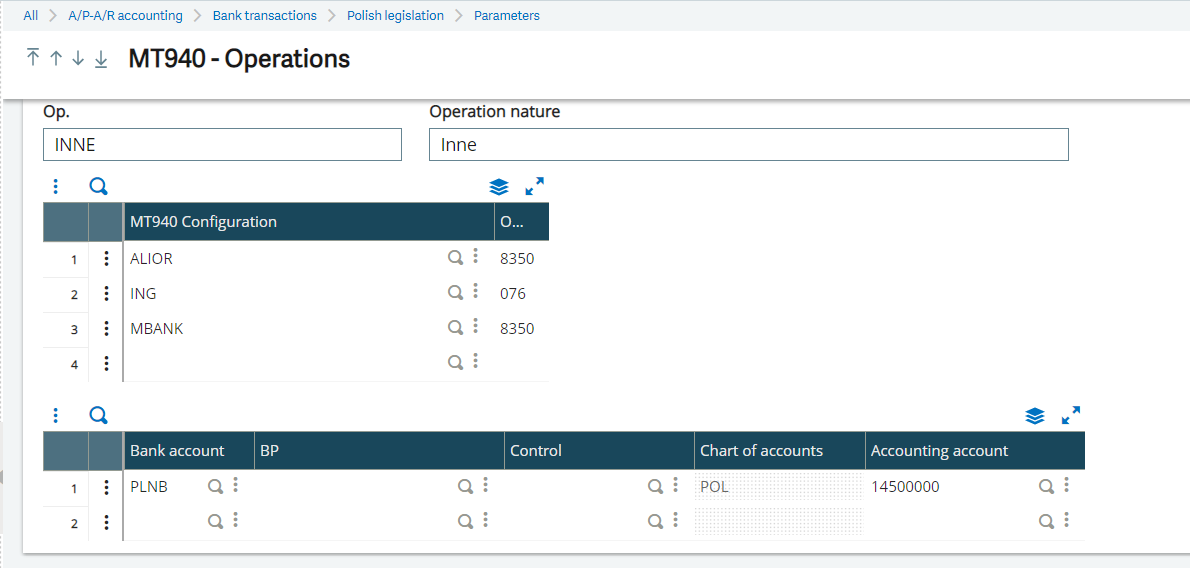
The bank account and payment entry types created in the previous steps must be linked. Select them in the MT940 file import configuration function (GESXDK):
-
MT940 Configuration: Select the configuration by bank name
-
MT940 file charset: Enter the characters of the MT940 file, e.g. UTF-8, CP-1250. Each bank can have unique character set.
-
Elixir file charset: Enter the characters of the Elixir file, e.g. UTF-8, CP-1250. Each bank can have unique character set.
-
CPY Bank account: Enter the bank account created in previous step.
-
Incoming payment and Outgoing payment: Select the payment entry types created before. These payments will be used by default in the bank register for the bank account from previous point.
-
Payment ID formula: Set up the Split Payment in MT940. The Split Payment transaction from the MT940 file must be matched with a payment existing in the system Sage X3. Special ID number is placed in TXT section in MT940 file.
/VAT/123,00/IDC/12345123451234/INV/FV-201701/17/TXT/Free text
This ID number is used to combine the sent payment with the transaction received from the MT940 file. Every bank can have its own MT940 file with small differences and the ID number can be located in different places in the file. You should indicate where the system should look for this ID. This should be done in this field. More details about Split Payment in Sage X3 you can read in the chapter: Split Payment.
MT940 file operation settings
The system allows recognition of fixed, recurring banking transactions (costs, fees, deposits, etc.). Parameterization is possible in the MT940 file operation settings function (GESXDO).
After starting the function, the system will display the settings of the defined banking operations. To define a new operation, first identify which transaction codes are used in the selected bank. It is best to do it during a trial import of MT940 files.
System requirements:
-
Operation names (Op.): Enter custom text that will identify the operation.
-
MT940 Configuration: Select from the list.
-
Operation code: Enter bank transaction code (internal bank number, different for each bank).
-
Bank account: Enter company's bank account.
-
BP: Enter a business partner if the transaction need it.
-
Control: if the transaction is to have a completed settlement account.
-
Accounting account: Assign an accounting account when the system recognizes the transaction code.
Creating sequence number definitions
Open: Setup > General parameters > Sequence number definition > Structures
You can create your own sequence number for the bank register using the standard Sequence number definition function (GESANM). Sequence code: XDWB.

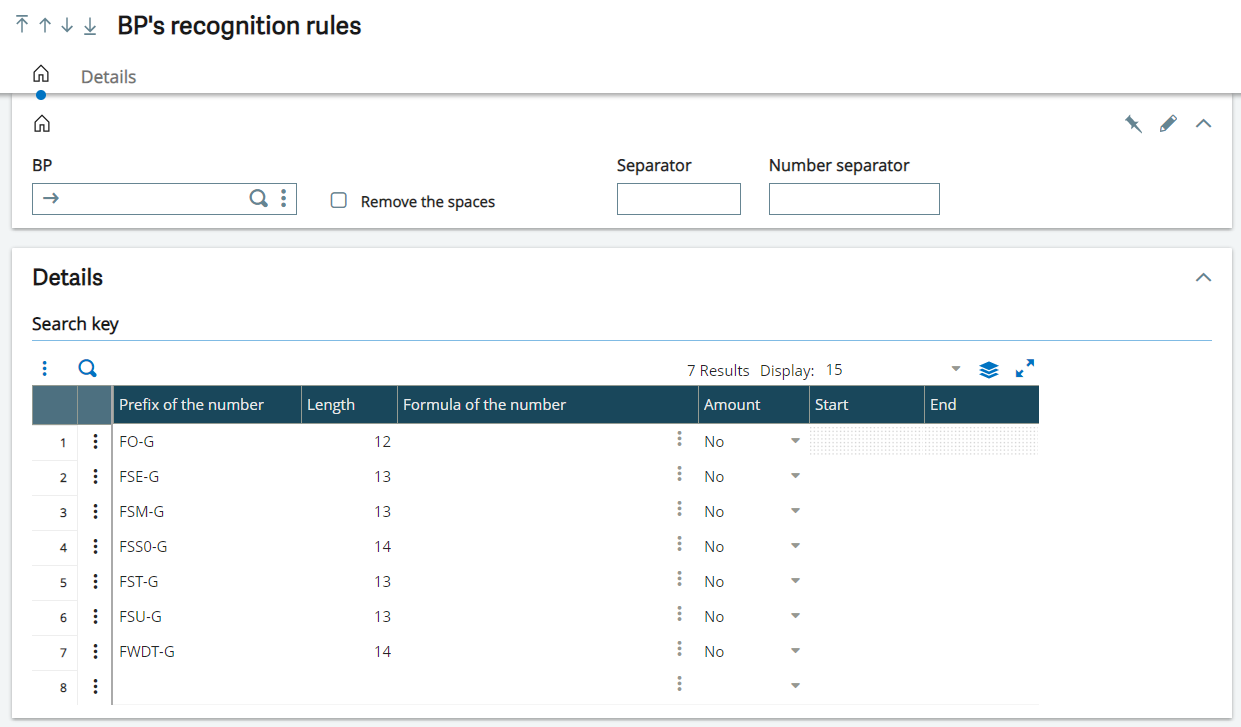
BP file rules
One of the challenges in processing the MT940 file is the automatic recognition due to the inconsistent naming of transactions of payments from customers.
If you receive large packets of transfers in a structured form, you can define the structure for the recognition of numbers paid invoices.
In the BP’s recognition rules function (GESXDOB):
-
BP
-
BP for whom the selected settings apply
-
If empty - general setting for the company
-
-
Remove the spaces: Select this check box to remove all spaces from the transaction title.
-
Separator: Enter a unique character, like a comma or semicolon, that separates consecutive invoice numbers.
-
Number separator: If amounts are given, enter a number separator.
-
Prefix of the number: Enter a prefix for sales invoice sequence number
-
Length: Enter the length of the invoice number. This field is mandatory.
-
Formula of the number:
-
The formula converts a searched phrase to an existing invoice number.
-
The VALEUR variable stores the value of the searched phrase.
-
The formula must be in accordance with the EVALUE instruction.
-
-
Amount: Select Yes to include amounts in the search or No to exclude.
-
Start: Enter a unique character to indicate the start of the amount.
-
End: Enter a unique character to indicate the end of the amount.
Example 1:
Example 2:
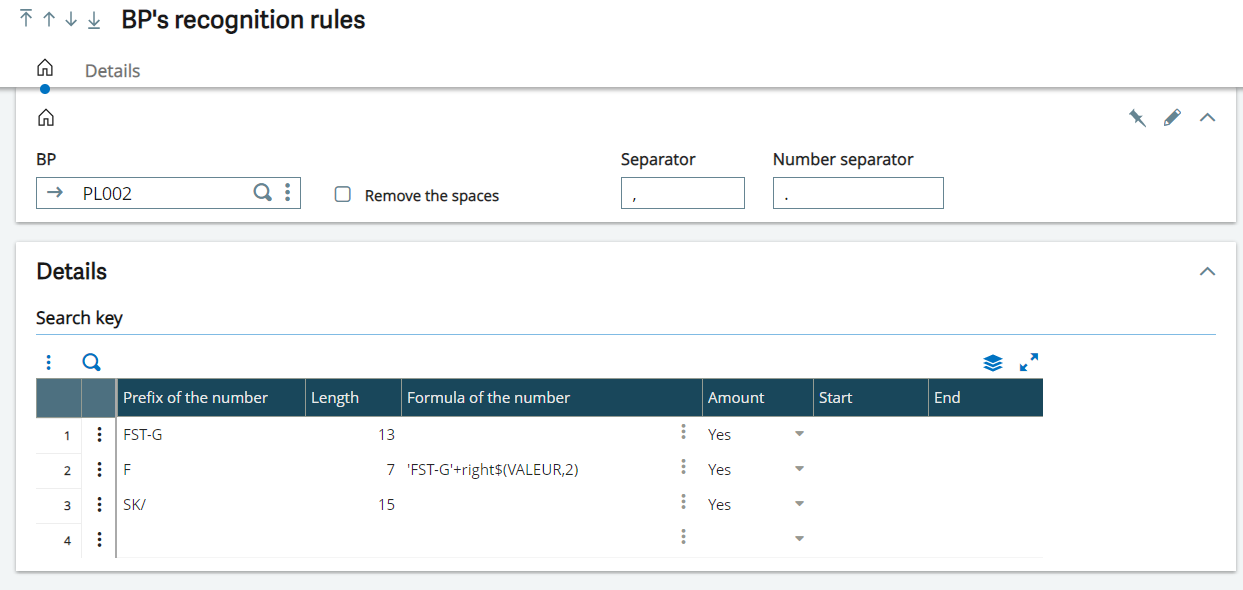
If the system recognized a counterparty on a revenue banking transaction, then the BP's rules are searched first. In the absence of recognition results, the general rule for the company is searched.
The existing rule searches for a phrase in the title of the transaction from the Prefix of the number field. Then it takes as many characters as entered in the Length field and searches for an open item. Sample rule action:
<20PRZELEW PRZYCHODZ¤CY
<21Z R-ku:97116022020000000031300376
<22JMP FST-G16120243 20221.49,F120208
<2319690.78,F120229 19513.87,F120228 1
<249350.58,F120226 19008.36
<25
<26
The transaction title will be:
PRZELEW PRZYCHODZ¤CY Z R-ku:97116022020000000031300376 JMP FST-G16120243 20221.49,F120208 19690.78,F120229 19513.87,F120228 19350.58,F120226 19008.36
Rule number 1, from Example 2, sample title in the file:
-
The system will search for the phrase FST-G, if found phrase, thirteen characters will be used:
-
Search results FST-G16120243. The system will search for open item by the search result. If it is found, then the phrase to the Separator will be removed due to the transaction.
-
The system will search the entire title until it finds the key in the title. If not, then it will go to the next defined rule and search the rest of the title.
-
In this case, rule 2 from example 2, searches for F, uses 7 characters and converts according to the formula:
F120208 19690.78,F120229 19513.87,F120228 19350.58,F120226 19008.36
F120208 = 'FST-G'+right$(VALEUR,2) > wynik: FST-G120208
-
The result of FST-G1202028 will be found in open items.
-
If the Amount is Yes, use this settings:
-
Start: space
-
End: comma
The system will try to read the payment amount for the invoice from the phrase:
F120208 19690.78,F120229 19513.87,F120228 19350.58,F120226 19008.36
-
Creating payments
In the Payment proposal function (PAYPROPAL), you can select open items and create payments to suppliers, using the PRZEL payment entry type you created earlier.
Selection criteria:
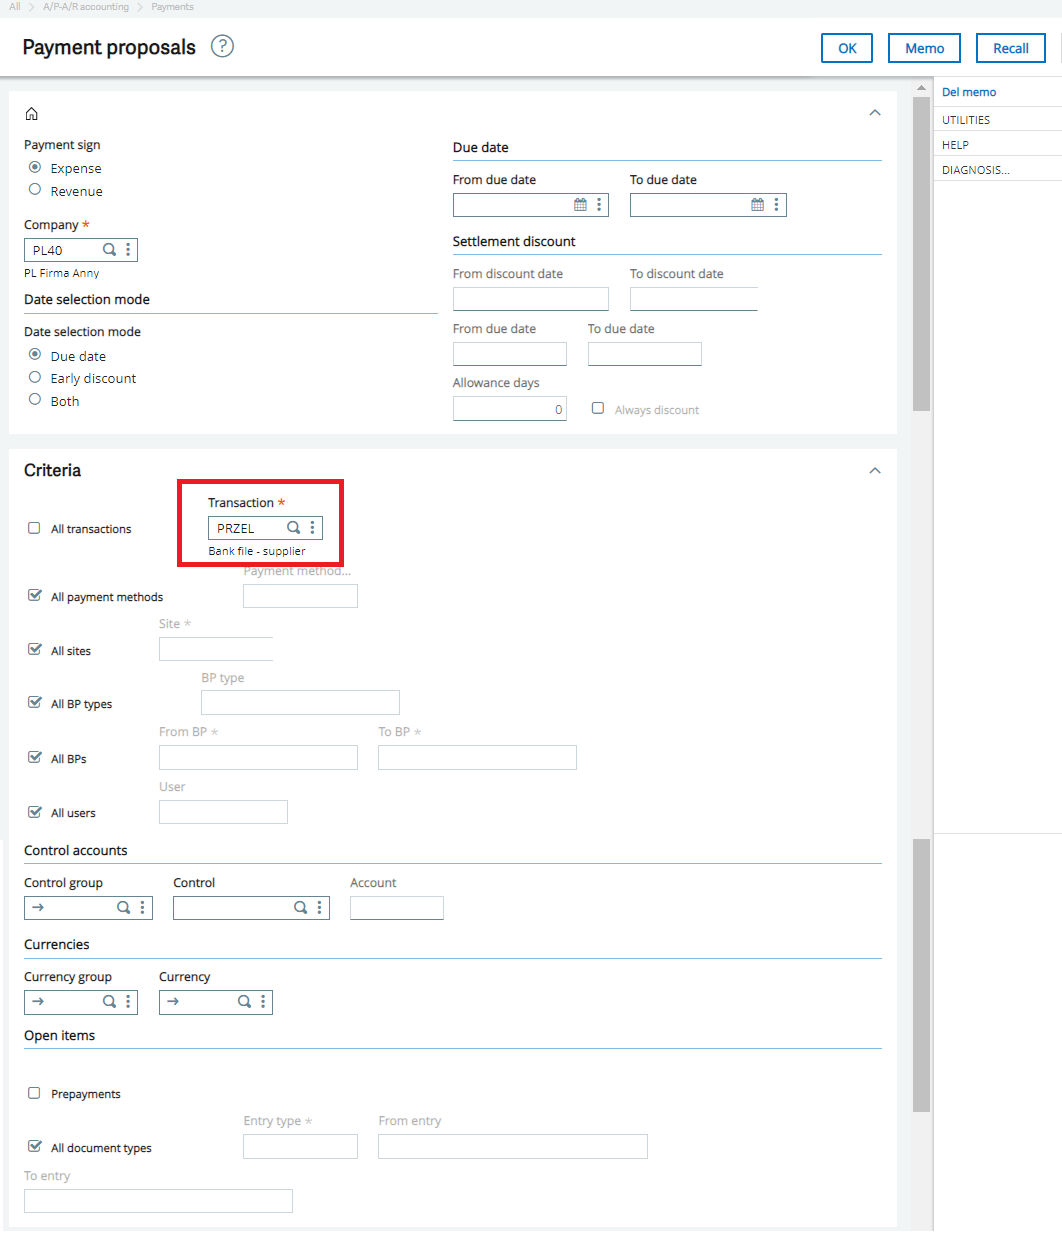
-
Bank field: Select a bank.
-
One item/payment check box: If selected, the system will create as many payments as there were selected open items. If not selected, system will create one payment per supplier/customer.
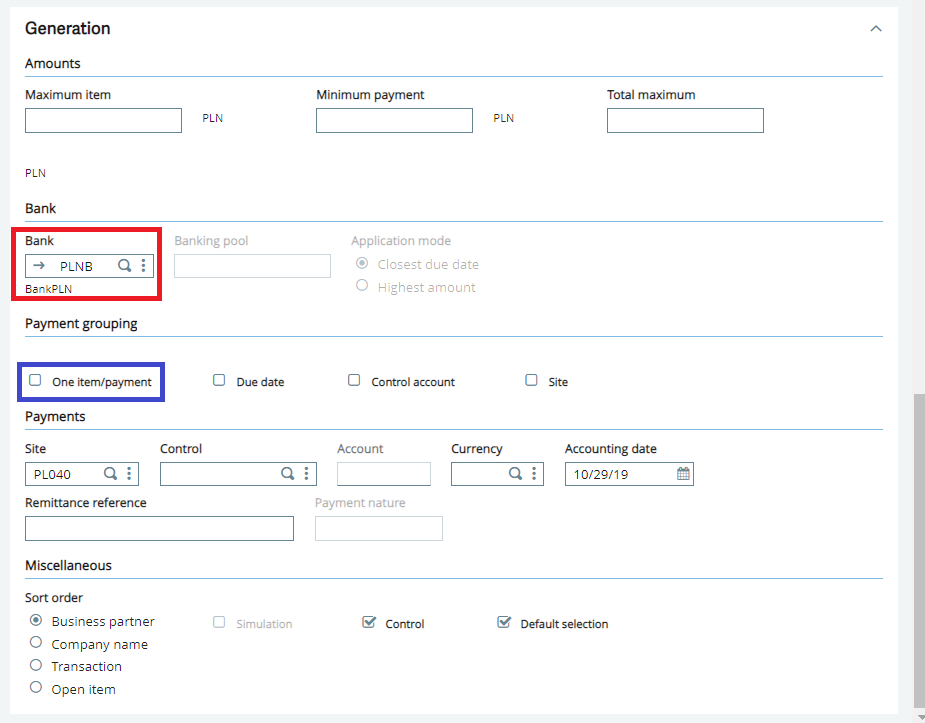
Open item selection:
-
Select column: Select Yes if you want to create a payment for this open item.
-
Click Create to generate payments.
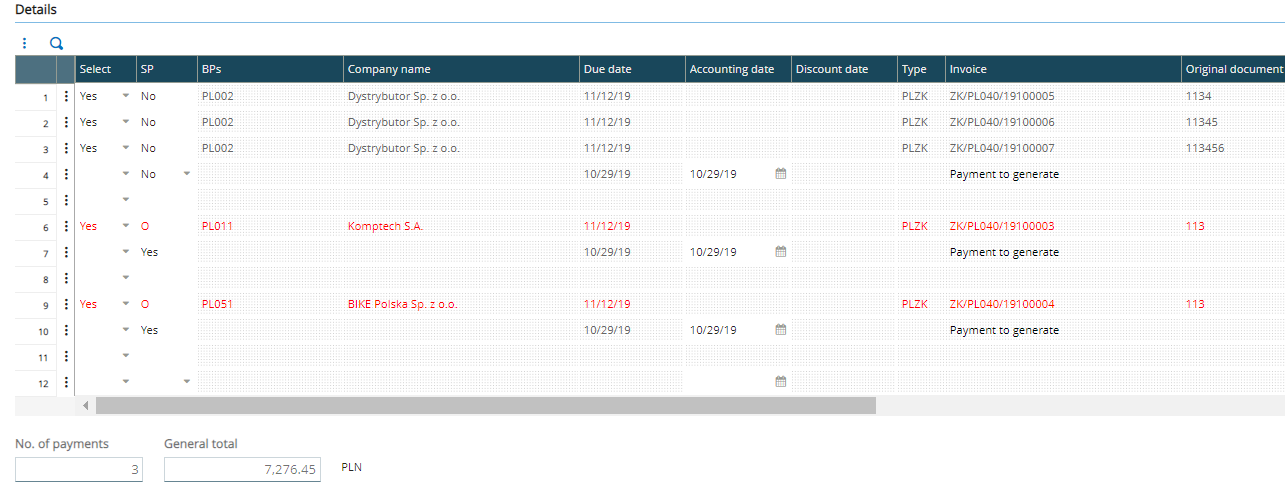
Created payments can be seen in Payment/Receipt entry function (GESPAY).
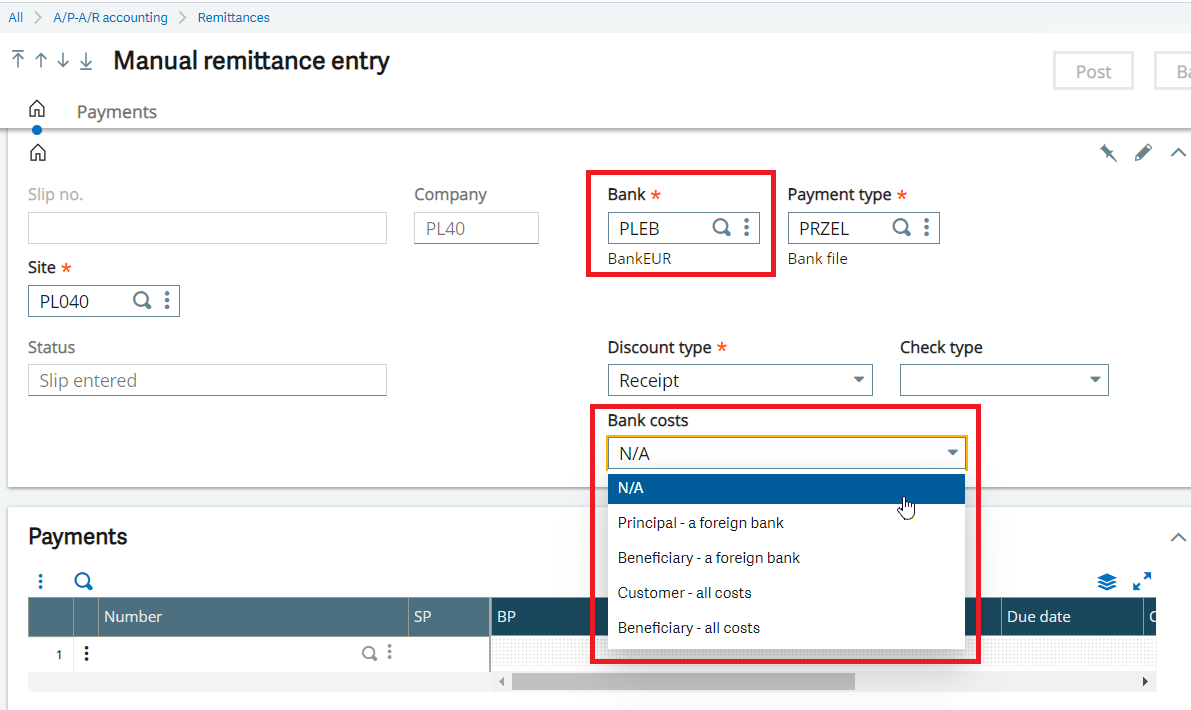
Creating remittances and Elixir files
Open: A/P-A/R accounting > Remittances > Manual remittance entry
To create the remittance and Elixir file go to the Manual remittance entry function (GESFRM).
Click New and select payments created in the Payment proposal function (PAYPROPAL) and click Create:
-
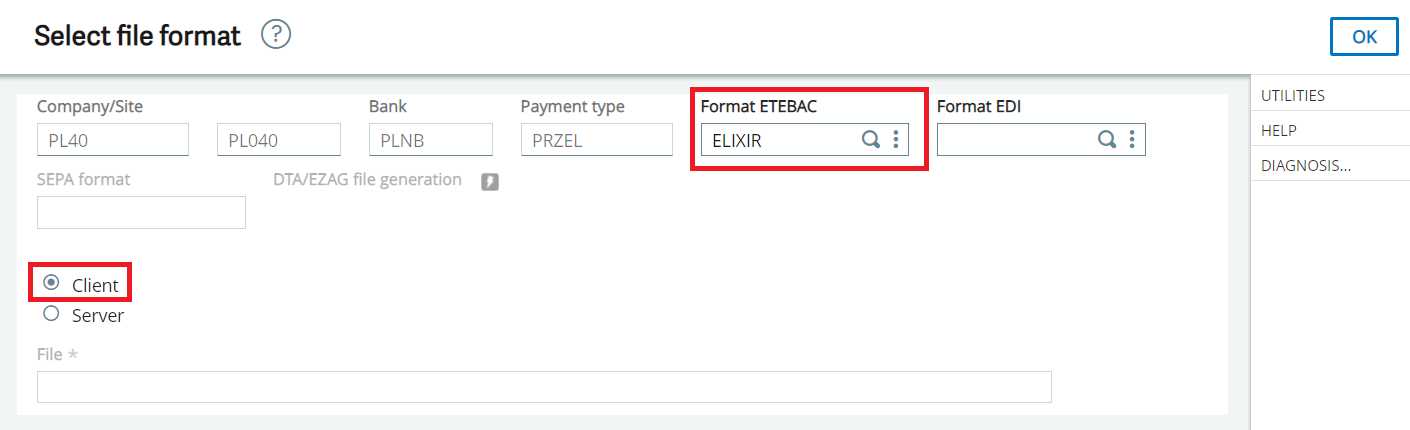
Bank file: click it to create the Elixir file.
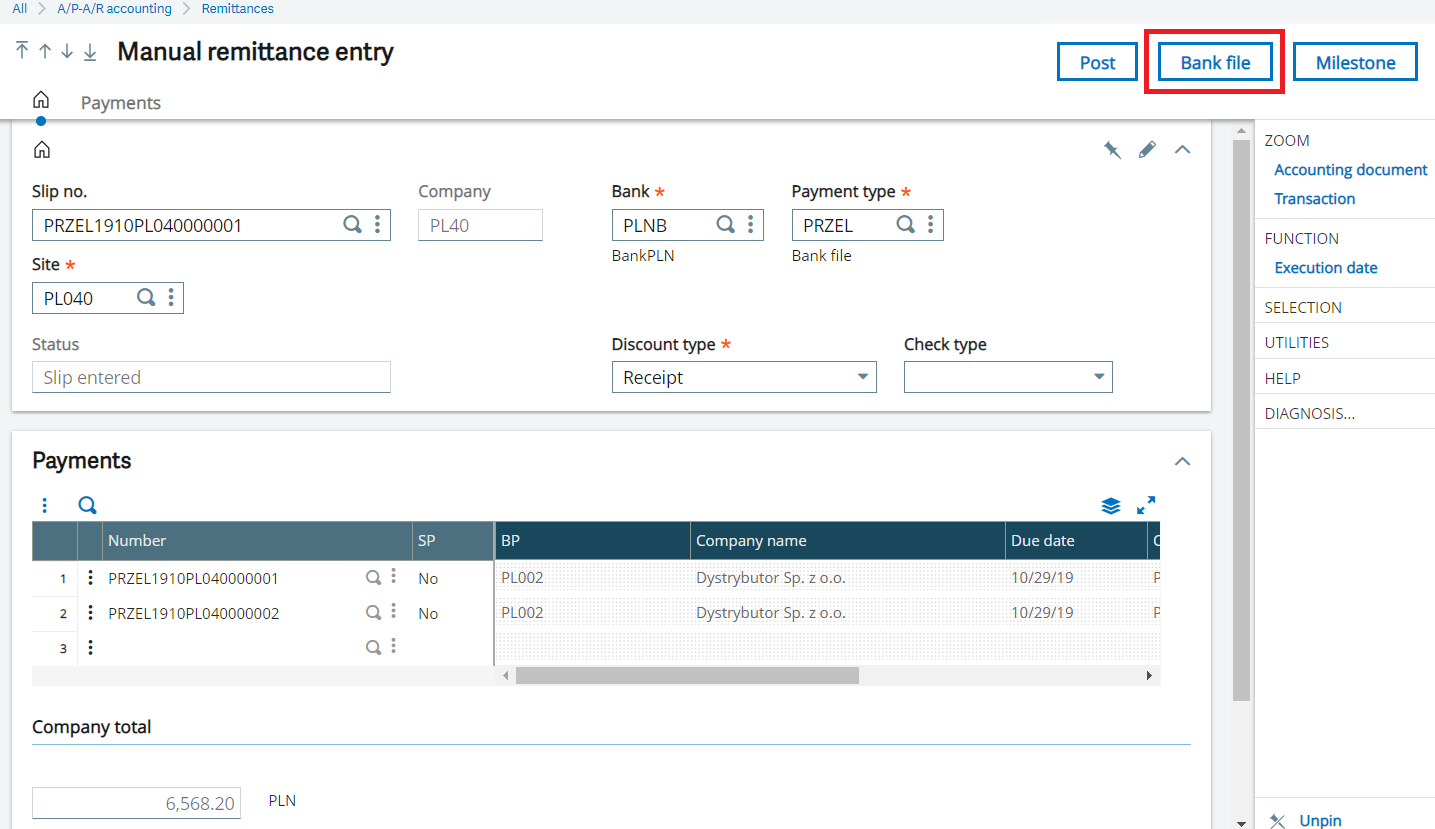
In Select file format:
- Format ETEBAC field: Select Elixir.
-
Client radio button: Select this option to save the file to your local machine.
-
Click OK to create the file. You will find created file in the Pobrane/Downloads folder.
Elixir file in currency different from the general ledger currency
When making a currency payment, the person who orders the transfer must indicate the person incurring the bank costs.
To create a remittance and Elixir file go to the Manual remittance entry function (GESFRM).
Open: A/P-A/R accounting > Remittances > Manual remittance entry
-
Click New.
-
Bank costs: If the bank selected in the header is in a currency different from the main ledger currency, the new field is displayed in the header: Bank costs.
Select the entity incurring the bank costs:
- Principal: a foreign bank (Zleceniodawca - bank zagraniczny)
- Beneficiary: a foreign bank (Beneficjent - bank zagraniczny)
- Customer: all costs (Zleceniodawca - wszystkie koszty)
- Beneficiary: all costs (Beneficjent - wszystkie koszty)
- N/A
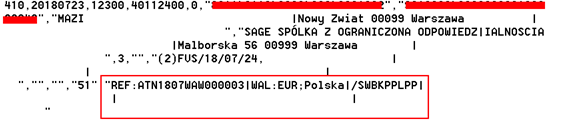
Example of an Elixir file in a foreign currency:
Importing MT940 files: Bank statement
On the day after sending the Elixir file, the banking system should enable you to download a bank statement. The bank statement can be downloaded in various formats depending on the bank (XML, XLS (Excel), CSV, MT940 or PDF). The file in MT940 format is needed for the process supported by the add-on. MT940 files should be downloaded from the bank's website and saved on your computer.
Sample MT940 file:
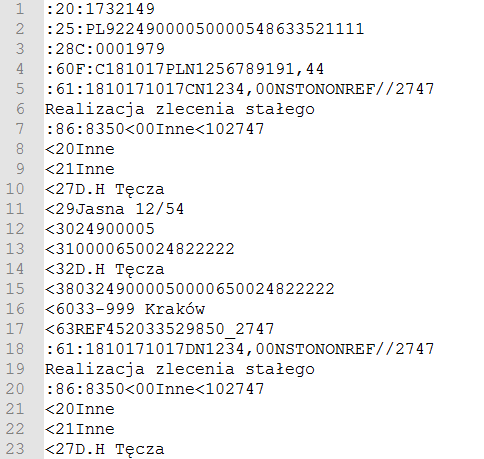
The MT940 file contains all transactions carried out on a bank account on a specified date:
-
Outgoing payments to suppliers: created manually or imported from Elixir file
-
Incoming payments from customers
-
Other bank transactions: taxes, fees, internal transfers.
 When you select the Imported files MT940 function (GESXDM):
-
On the selection panel: list of all imported MT940 files.
-
In the center: details of the selected file. List of transactions from the file. All fields are inactive because the data comes from the bank. Their modification would cause inconsistency with the banking system.
-
On the right panel and above:
-
Transactions: Displays all transactions from the chosen MT940 file and their details. You can assign an account to the transaction or match the open items.
-
Export: Creates bank register:
-
Creates new payments
-
Creates transfers bank register
-
Moves existing payments and new ones to the created bank register
-
-
Assign account: Runs the account recognition algorithm
-
Import: Imports the MT940 file
-
Bank register: Displays the related bank register
-
Delete: Deletes the imported data unless the chosen file has already been linked to the bank register
-
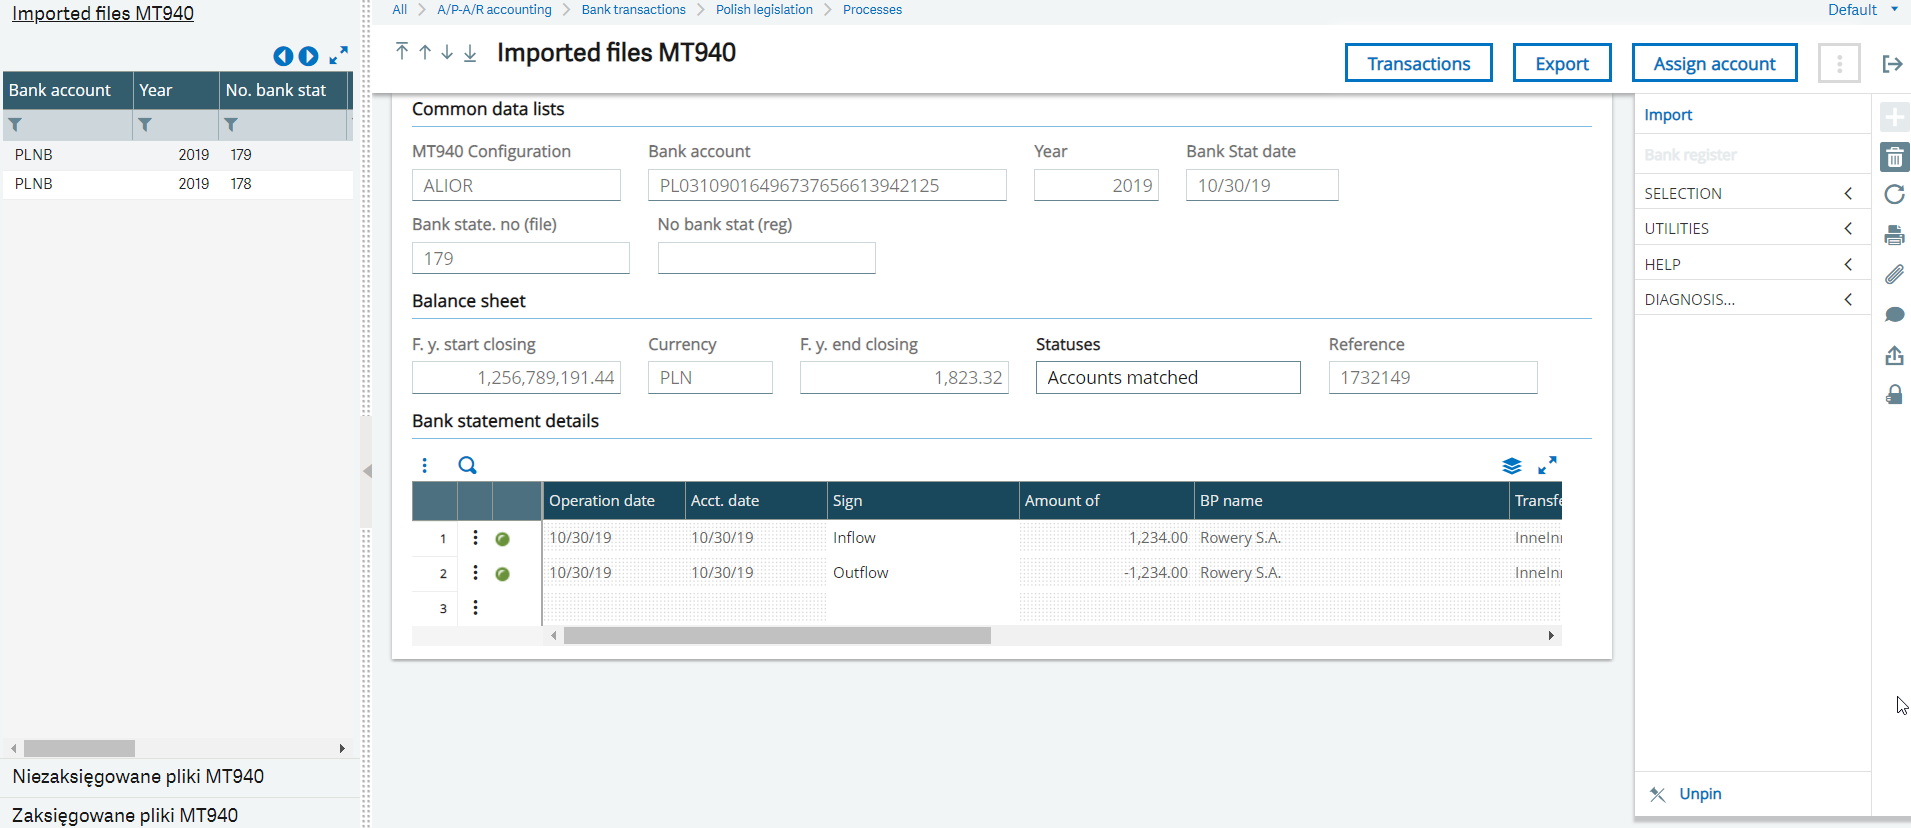
-
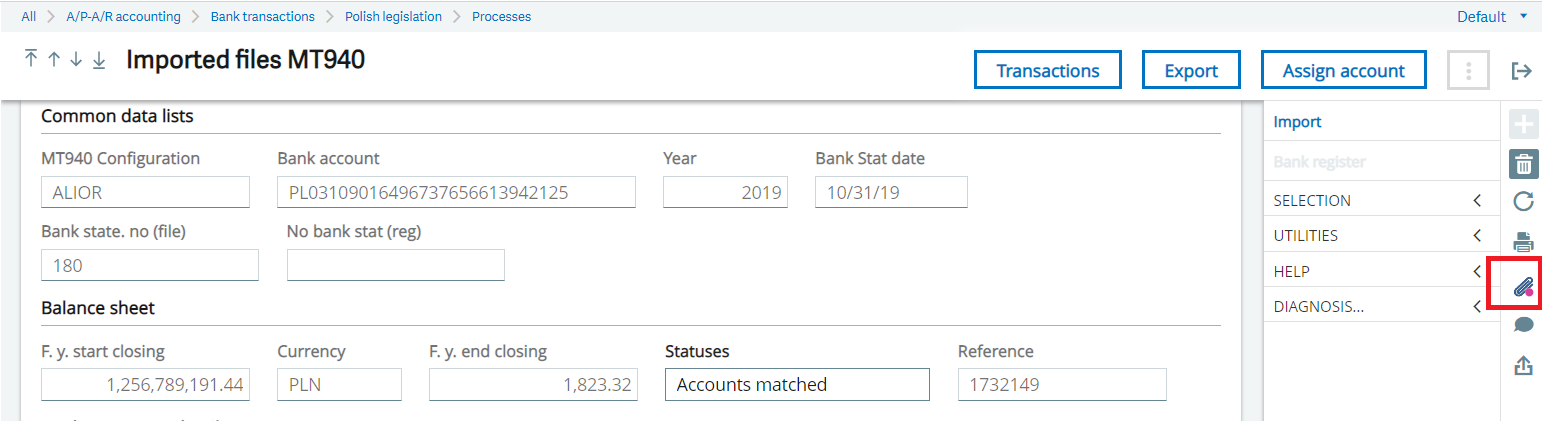
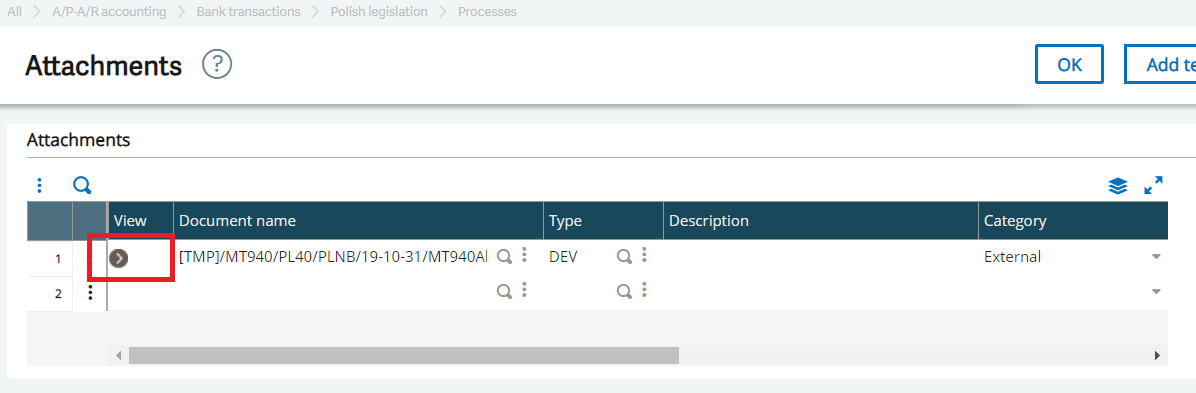
Import the MT940 file
-
File
After you have imported the file correctly, the file will be saved to the location defined in the XDMT940DIR - MT940 files path parameter. This will allow you to download a copy of the file through the standard attachment functionality.

-
Transactions
After you have imported the file correctly, data from the file will appear in the Imported files MT940 window. To see the details of each transaction, click Transactions from the panel above.
-
The header displays the most important information about the transaction.
-
In the next step you must assign at least one accounting account.
-
If the transaction is linked to a control account, select the BP.
-
If the transaction should be linked to the not matched open item, you can match this open item.
When importing a file, the system recognizes transactions and tries to match them to existing open items or payments or to assign the account. System does it in the following way:
-
Searching the BP by bank account number (IBAN)
-
Searching for operations defined by user in MT940 file operation settings function (GESXDO). Described previously in MT940 file operation settings.
-
If the transaction is a revenue and the BP is a customer, the system will search the sale invoice (open item) using rules defined by user in BP's recognition rules function (GESXDOB). Described previously in BP file rules .
-
Searching existing payments (expenses) using Unique payment ID number. Described previously in Unique payment ID number .
-
If the transaction is an expense and the BP is recognized, then the system searches an open item by invoice number.
If the automatic assignment of the account did not work, you can do so manually. You can also select the invoice, open item and the amount in the following table:
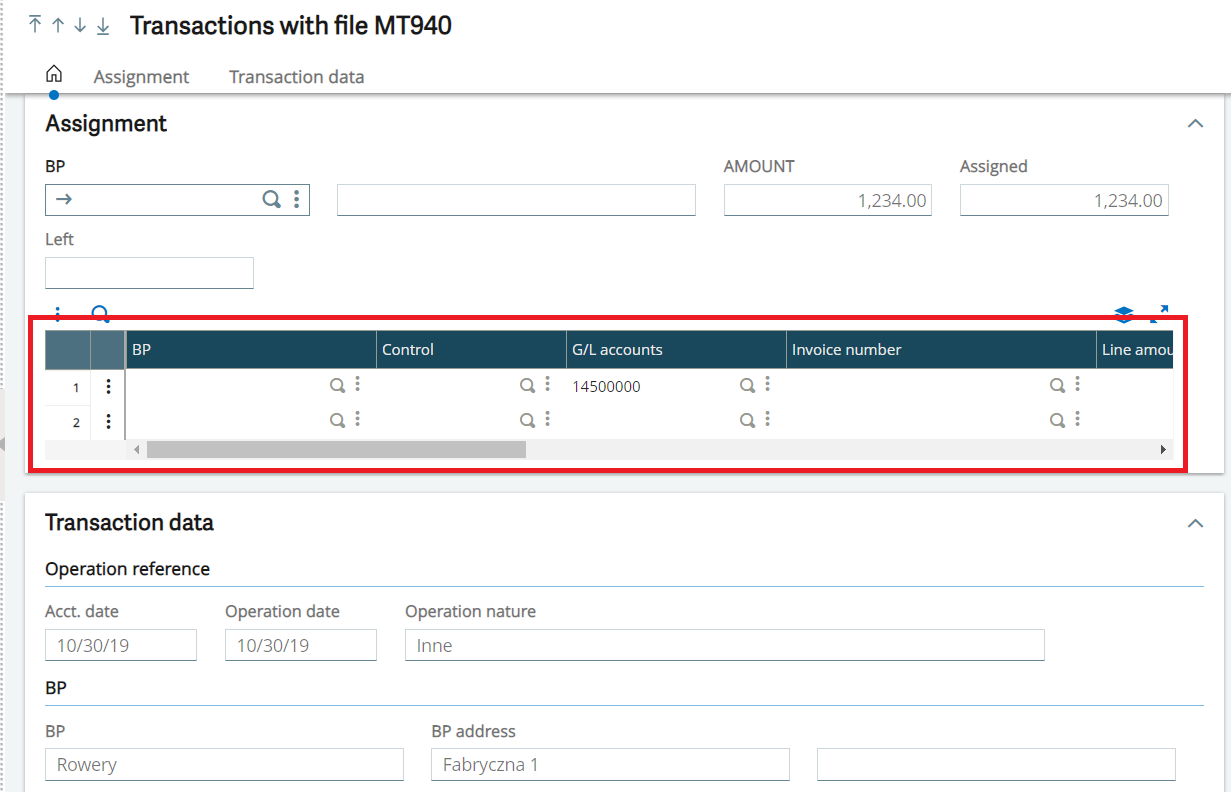
-
You can split one transaction from a file to several different BPs and open items.
-
Columns with dimensions appear automatically when you change the account. Remember that the dimensions are automatically transferred to the generated payments, and then to the journal entry.
-
The process of transaction recognition and account assignment can be run repeatedly by clicking Assign account. The process works only for unrecognized transactions (those with a red icon).
-
Export to Bank register
If all transactions are matched to an account or payment or an open item, you should export the statement to the Bank register function (GESXDE). To do this, click the Export button. During this process:
-
New bank register will be created
-
New payments will be created
-
Existing payments recognized through a unique ID will be linked to the created bank register.
If the export of the MT940 file to the Bank register has been successful this function will close. Further work should be done in the Bank register or Payments functions.
After the export is completed, the system displays a Log file that displays errors or shows the export result. The log contains also information on the validation of the data import of each payment using the SILENT_IMPORT method.
Bank register
The bank register is the equivalent of a bank statement from a given day or range of days for the selected company's bank account. According to the Polish law, you cannot post a payment without confirmation by the bank transfer of money. You can enter in the system confirmation of the previously generated payment. The main difference between the MT940 file and the Bank register is that the MT940 file is the source for creating the Bank register. It contains details related to transfers such as account numbers, amounts or transaction titles. The Bank register function (GESXDE) combines standard payment documents into one document and allows you to view payments and receipts confirmed in the bank. Not every bank register can be created via the MT940 file. If the customer's bank does not support the MT940 statement, the bank register must be registered manually.
On the selection panel: list of all bank registers.
In the center: the current bank register
-
On the top is a header.
-
Payments: The table with payments created/linked inside the selected bank register.
-
On the right panel and above: actions applied on the selected bank register.
Register block:
-
Bank account field: Bank account (GESBAN).
-
Currency field: Defaults from the bank account currency.
Dates block:
-
The dates from the same registers (bank accounts) cannot overlap.
-
The Accounting date in the link payments must correspond to those dates.
-
Statuses field: if all payments are posted, the status changed into Posted.
Balance sheet block:
-
F. y. start closing: The field displays the fiscal year closing amount for the previous bank register.
-
F. y. end closing: The field displays according to the F. y. start closing amount plus payments registered in this bank register.
F. y. end closing = F. y. start closing + inflow - outflow
-
Opening bank bal.: The initial statement balance from the MT940 file.
-
Closing bank bal.: The final statement balance from the MT940 file.
User block:
-
User: The user who created the bank register.
-
Date created: The date of creation of the bank register.
-
Changed by: The user who last modified the bank register.
-
Change date: The date of the last modification of the bank register.
Creating payments for the bank register
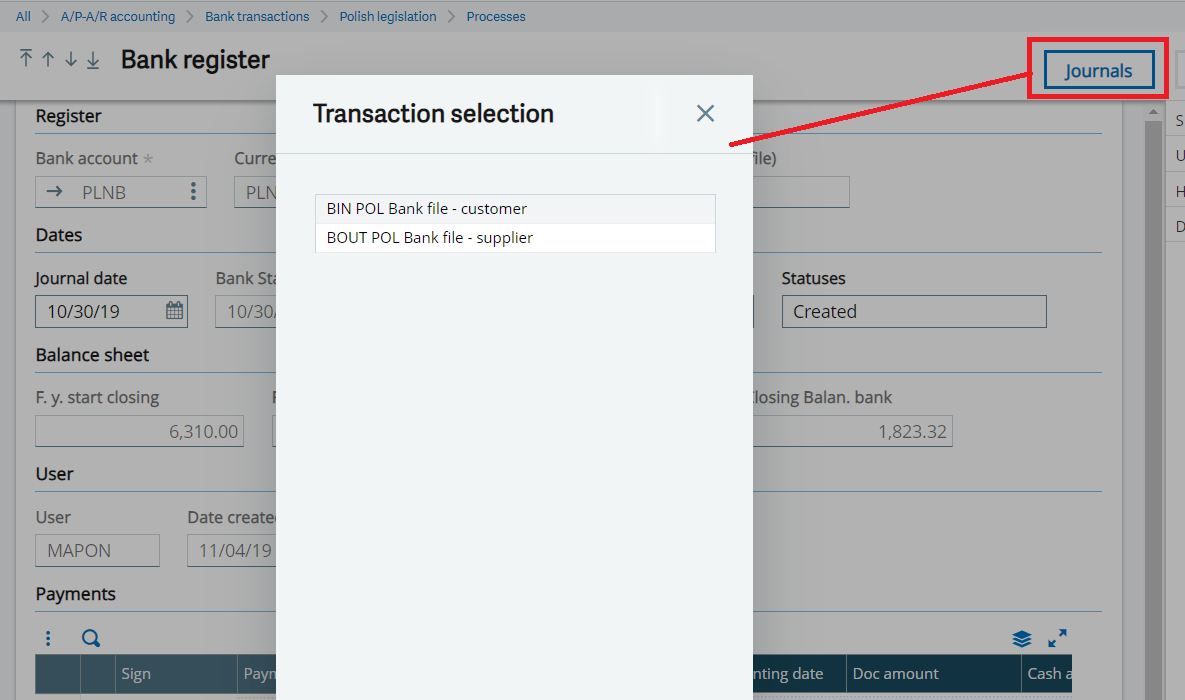
In the Bank register function (GESXDE), click Journals to create or see a payment. When you click Journals a window opens called Transaction selection.
In the Transaction selection window: select a Payment entry type, which is set up in the MT940 - Import Configuration function (GESXDK). After selecting a transaction, the action goes to the standard Payment/Receipt entry function (GESPAY).
After creating payments, it is possible to:
-
Post the payment: Standard function
-
Make an accounting cancellation: Standard function
When the export from MT940 has been successfully completed, any changes to the imported MT940 file are not possible until the associated payment is deleted.
Exporting MT940 to the bank register
When exporting the MT940 file, the system creates the bank register on the date of the MT940 file. The statement number is automatically given according to the sequence number taken from the parameters.
If the system has created a bank register:
-
The following information should be included in the export log: Bank register created (number).
-
The No. bank stat (reg) field in the Imported MT940 files function (GESXDM) should be filled in with the bank register number:
-
The Bank register action should be active.
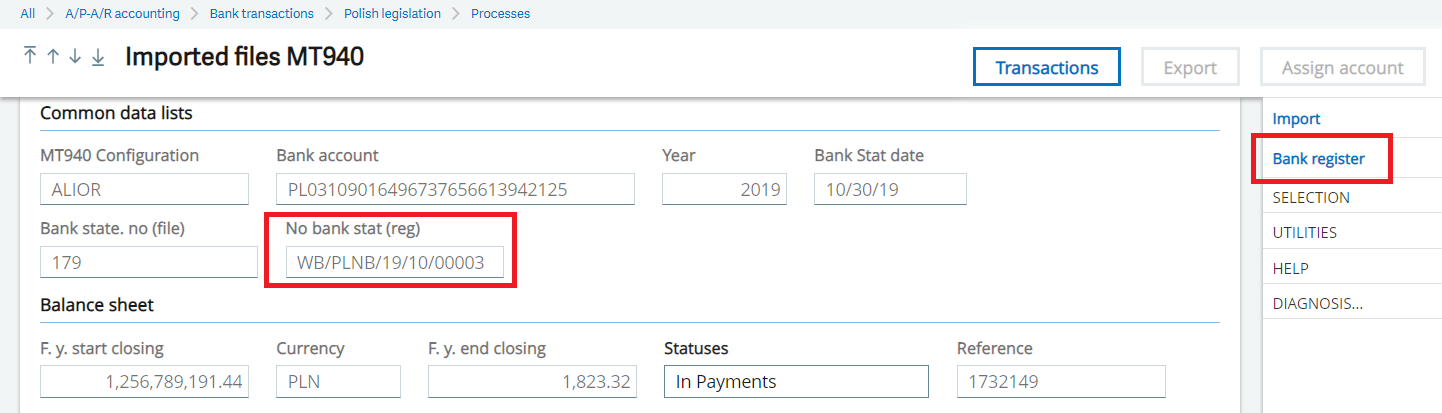
The final result of the process should be a created bank register including payments. All payments related to this bank register have an Entry batch field with the bank register number. When creating a bank register, the system creates automatically an entry batch.
Posting payments from bank register
-
In the Manual remittance entry function (GESFRM), after the export to bank register, you can post your payments created in the first function using the button Post.
-
Payments created during export to Bank register from MT940, can be posted using the Bank posting function (REMBAN).