Prerequisites
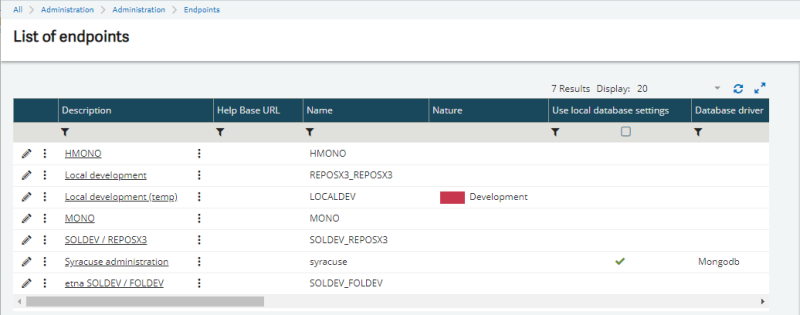
A Sage X3 endpoint is a connection point associated with a service. It gives you access to the administration platform (Syracuse), or to Sage X3 folders.
Do not confuse endpoints with Sage X3 folders.
Endpoints are managed in the Endpoints function (Administration > Administration > Endpoints > Endpoints).
Overview
Production Scheduler consists of the following:
- An application server. Sage refer to this as the scheduler server. It is a Windows service.
Production Scheduler is installed and runs on this server. This is also where the planning data is located and processed.
- An IIS web server. This server hosts the Production Scheduler application front-end. This application is deployed on an IIS website, with HTTPS if necessary. You connect to your planning application through the IIS website on this server.
Prerequisites
System prerequisites
Before attempting to install Production Scheduler your system must meet the minimum configuration requirements described below. This is especially important for the Windows Management Framework (see table below), which is mandatory to execute the setup.
| Category | Configuration requirements |
|---|---|
| Operating system |
Microsoft Windows 2012 R2 64-bit with IIS 8 / 8.5 Microsoft Windows 2008 R2 64-bit with IIS 7.5 |
| .NET framework | 4.5.2, full package x64 (mandatory version) |
| Package manager |
Nuget v2.8.5 To install nuget v2.8.5.208, launch the Windows PowerShell then execute the following command. Make sure you perform this as an administrator. >> Install-PackageProvider -Name NuGet -MinimumVersion 2.8.5.208 -Force |
| Windows Management Framework (WMF) |
5.0 This framework is required for the PowerShell® tools you will need to deploy the planning software components. Refer to this (Microsoft®) page for more details on this framework and on how to get it. |
| Disk space |
300 MB for each running instance of Production Scheduler. 100 MB required for the .NET framework. |
The disk space, the memory size, and the network bandwidth all depend on the amount of data in the production plan: number of work orders, operations, links, and resources. You need a minimum of dedicated memory for each user accessing Production Scheduler concurrently.
Below are some standard configurations for one Production Scheduler instance and one user. Use these as a starting point for your sizing analysis.
| Number of operations in the plan | CPU | RAM | RAM additional concurrent user | Bandwidth | Storage |
|---|---|---|---|---|---|
| Up to 4,000 | 2 vCPU XEON 2.2 (2.7) Ghz | 4 GB | 200 MB | 450 Mbps | 1 GB |
| Up to 8,000 | 2 vCPU XEON 2.5 (3.3) Ghz | 8 GB | 300 MB | 750 Mbps | 1.5 GB |
| Up to 16,000 | 4 vCPU XEON 2.8 (3.6) Ghz | 12 GB | 400 MB | 1,000 Mbps | 2 GB |
| More than 16,000 | 4 vCPU XEON 3.2 (3.6) Ghz | 16 GB | 600 MB | 2,000 Mbps | 4 GB |
Disk bandwidth is not critical because it is only used during startup and when saving the plan (which is a background process).
Defining users
Sage X3 user
Open: Setup > Users > Users
You need a Sage X3 user (also called a classic user) for the installation. You define Sage X3 users in the Users function (GESAUS).
You can use the user delivered by default with Sage X3 (PLN). PLN is linked to the PLN menu profile and PLN function profile. Alternatively, you can create a dedicated user, based on the PLN user.

Sage X3 Web server user
Open: Administration > Administration > Users > Users
You need a Sage X3 Web user for the connection to the Web server. In this guide we call this Sage X3 Web user the Syracuse user.
Follow the steps below to create a dedicated Syracuse user for Production Scheduler:
- Open the Roles function.
- Enter all requested information. Sage recommends the following:
- Open the Groups function.
- Enter all requested information.
- Open the Users function.
- Enter all requested information, and:
- In the Administration section, make sure you select the group you are going to use for Production Scheduler.
- In the Endpoints login table:
- Make sure you select all the endpoints you want Production Scheduler to access.
- If the login of the Sage X3 user you are going to use for Production Scheduler (Setup > Users > Users) is:
- The same as the Syracuse user, you do not need to specify a login.
- Different from the Syracuse user, enter the Sage X3 user login that will be used to access the endpoint.
Reminder: Sage X3 user login
Click New role, or go to an existing role that you want to use for Production Scheduler.
Click New group, or go to an existing group that you want to use for Production Scheduler.
Click New user.

Client certificate authentication
You can install Production Scheduler in basic authentication mode, or in client certificate authentication mode.
If you decide to use client certificate authentication mode, you must perform the steps described in this section.
Prerequisites
- The Sage X3 Web server must be correctly installed using load balancer mode.
- The host certificate must be installed in the Certificates function (Administration > Administration > Certificates > Certificates). This should have been done during the Sage X3 installation process.
Enabling client certificate authentication
Open: Administration > Administration > Servers > Notification servers
To enable client certificate authentication you must configure a host that supports HTTPS, as follows:
- Select the host configuration. Click Edit to add a new connection.
- Enter the following values in the Connections table:
Port. 8443 (or any other suitable value).
Active. True (select the check box).
SSL. True (select the check box).
Client authentication. True (select the check box).
Server certificate. Enter the certificate created during the Sage X3 installation.
Creating a client certificate
- Open a command prompt.
- Go to the cert_gen folder in the installation directory of the Web server.
- Use the certgen tool to generate a certificate using the following command:
certgen -create -pass pwd_to_use -capass pwd_ca -cn login_em -days 730 -notransfer certificate_name
Where:
pwd_to_use is the password for the certificate you are creating.
pwd_ca is the passphrase for the CA certificate used during host configuration.
login_em is the common name, that is, the Syracuse user.
certificate_name is the name of the certificate you are creating.
- Combine the .crt and the .key files in a .pfx file (pkcs12 format) by running the following command:
openssl pkcs12 -export -out certificate_name.pfx -inkey certificate_name.key -in certificate_name.crt
You must have OpenSSL installed on your computer for this step. - If you have curl installed on your computer you can test the certificate using the following command:
curl -v -s -k --cert certificate_name.crt:pwd_to_use --key certificate_name.key https://x3-web-server:8443/api1/syracuse/collaboration/syracuse/users
If everything was correctly configured you should have 200 status in the output.
HTTPS connection on the IIS server
If you want to have an HTTPS connection on the IIS server, you must first generate the SSL certificate, or obtain it from a trusted certificate authority. You must then place it in the IIS server personal store.
Certificate installation for information on certificate management.
Installing the Syracuse Web Server.
OpenSSL for information on Secure Sockets Layer (SSL) protocols.