Setting up Production Scheduler
Environment
In PlannerOne Manager an "environment" corresponds to a Sage X3 production site.
Sage X3 endpoint
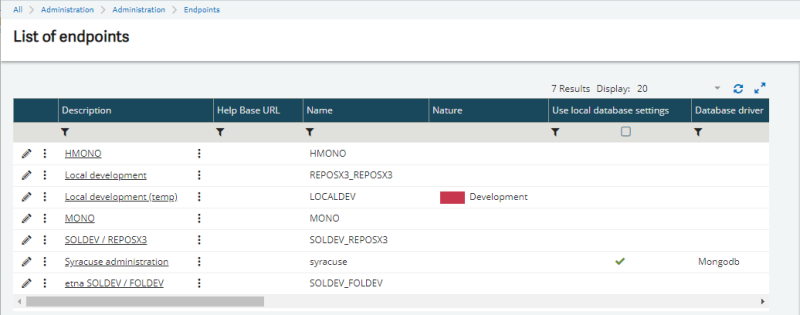
A Sage X3 endpoint is a connection point associated with a service. It gives you access to the administration platform (Syracuse), or to Sage X3 folders.
Do not confuse endpoints with Sage X3 folders.
Endpoints are managed in the Endpoints function (Administration > Administration > Endpoints > Endpoints).
Tenant
A Production Scheduler tenant corresponds to a Sage X3 endpoint.
Setting up Production Scheduler in PlannerOne Manager
Initializing sites
Once Production Scheduler is installed, you must initialize the production sites of your endpoint in PlannerOne Manager in order to make them available in Production Scheduler.
Make sure you have created all the production sites you need in Sage X3 before this step.
To initialize a site:
- In PlannerOne Manager, go to the Production Scheduler Adapter tab.
The In Production Scheduler column contains the status for the sites (False = disabled, True = enabled).
- Select the sites you want to initialize.
- Click Init environment from ERP.
The sites you have selected are initialized, and data from Sage X3 is loaded. A progress bar indicates that data is being collected.
Once the operation is complete, the sites are initialized and their status change to True. The list should refresh automatically, but you can click Refresh, if needed.


You can view the initialized sites in Sage X3:
- In Sage X3, open the Manufacturing > Production Scheduler > Production Scheduler function (FUNPSSCH).
- In the Site field, enter or select a site you have initialized in PlannerOne Manager.
- Click OK. The plan is loaded and displayed.

Additional actions in PlannerOne Manager
Below are additional actions you can perform in PlannerOne Manager. These are not required for the installation of Production Scheduler, but you may need to perform them at some point. The list is not exhaustive.
For more information on what you can do in PlannerOne Manager, refer to the PlannerOne documentation located in the <installation_path>\<version>\docs\Install folder.
Reinitializing a site
When data needs to be reset, you must reinitialize a site:
- In the Production Scheduler Adapter tab, select the sites you need to reinitialize.
- Click Init environment from ERP.

Deleting a site
Deleting a site means disabling it and changing its status to False. To delete a site:
- In the Production Scheduler Adapter tab, select the sites you want to disable.
- Click Delete environment in PlannerOne.

Restarting, stopping or resetting the PlannerOne service
To restart, stop or to reset the PlannerOne service (rarely needed):
- In the Service name field of the Windows service tab, select the service name (the tenant you are connected to).
- Click Start, Stop or Reset, as required.

Analyzing errors
The Logging and Error list tabs show errors that might have occurred, and information related to PlannerOne execution. An administrator can analyze the data contained on these tabs to understand any issues that might occur during the PlannerOne execution.


Setting up Production Scheduler in Sage X3
To be able to use Production Scheduler, the following features must be set in Sage X3.
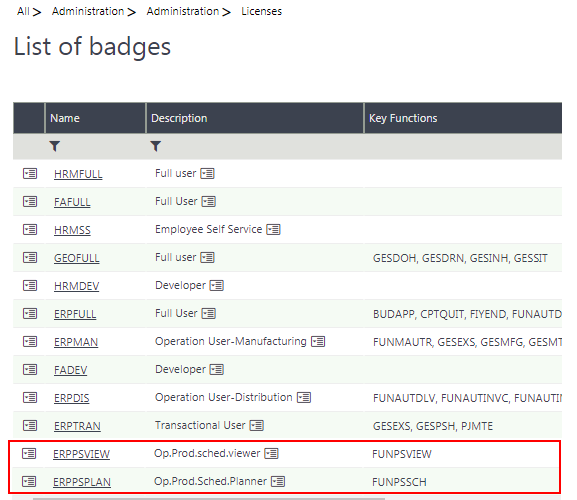
Badges: Read-only mode versus Edit mode
An end user that needs plan read-only rights must use the ERPSVIEW badge.
An end user that needs full edit rights (they need to update the plan) must use the ERPSPLAN badge.
Manufacturing module
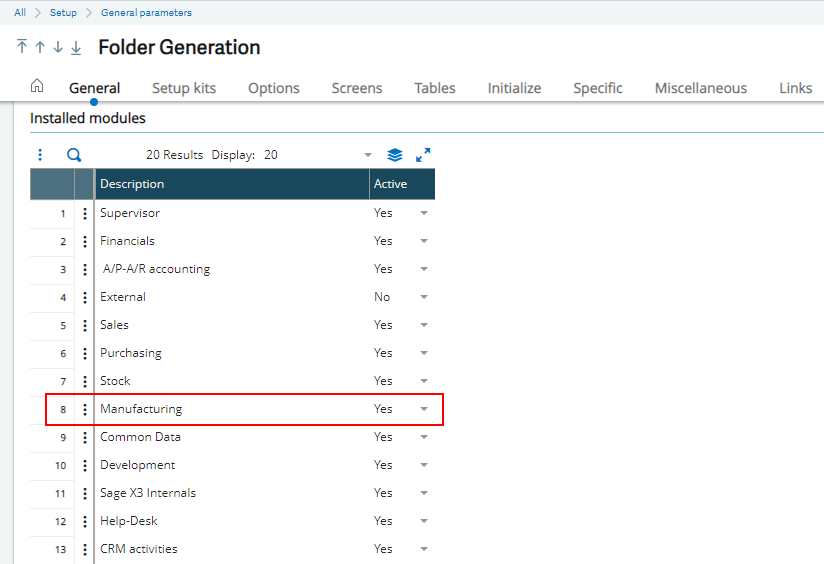
Open: Setup > General parameters > Folders | General
The Manufacturing module must be active (Installed modules block).
POCOM and POPS activity codes
Open: Development > Data and parameters > Development setup > Activity codes
The POCOM (PlannerOne) and POPS (Production Scheduler) activity codes must be active.


Default workdays and unavailable periods
Open: Setup > Organizational structure > Sites | Details
Default workdays and Unavailable periods must be defined for the production site.
If no calendar has been defined for a work center, the Default workdays and Unavailable periods defined for the production Site are used.

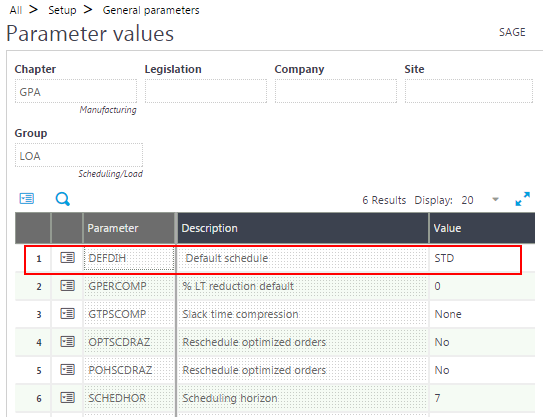
DEFDIH general parameter
Open: Setup > General parameters > Parameter values
A time table schema value must be set for the DEFDIH - Default schedule parameter (GPA chapter, LOA group).
If no time table schema has been defined for a work center, this value is used.
- Time table schemas are defined in the Time table schemas function (GESDIH).
- Time table schema codes are set in the Weekly structures function (GESTWD).
-
Manual or automatic work order submission
Open: Setup > Manufacturing > Entry transactions > Work orders | Parameters
You need to define whether the work order is submitted for scheduling manually or automatically.
Select the Manual or Automatic radio button for the Production Scheduler mode field (Allocations block).
