Detailed operations
The example below shows the update of a Sage X3 V11 P08 environment running on Windows 2016/SQL 2016 with Apache 2.2.25 to Apache 2.4.39.
1. Apache 2.4 and prerequisites download
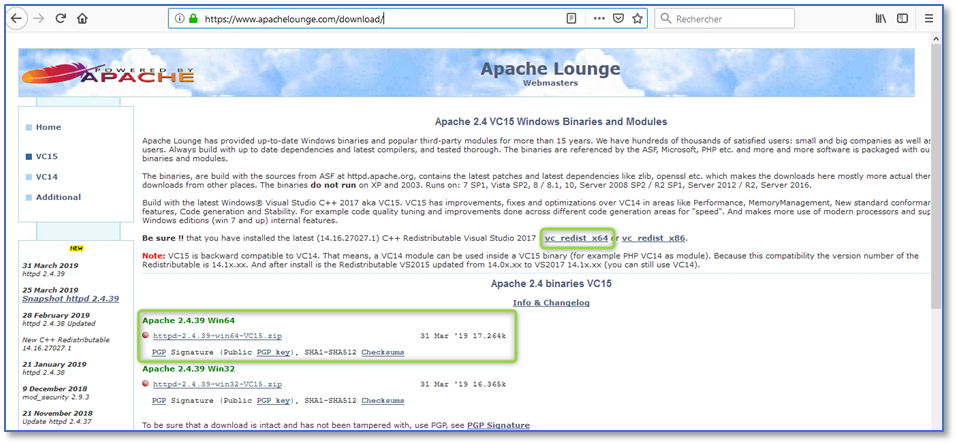
- Go to the Apache Lounge website.
- Except for Sage X3 V5 running on Windows 32-bits, download the following 64-bit components:
- Windows® Visual Studio C++ 2017 (VC15) redistribution through the vc_redist_x64 download link.
- The latest Apache 2.4.xx Win64 binaries.
2. Analysis of the current Apache 2.2 installation, parameters and httpd.conf backup
On the Windows machine hosting your Sage X3 application server, collect information on the current Apache 2.2 installation.
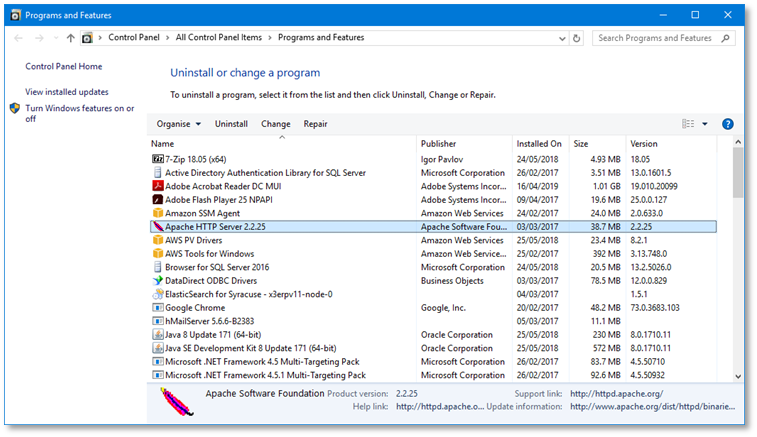
- First look in your Programs and Features to determine the installed Apache 2.2 version:
- Then find the Apache 2.2 root directory location. To do so:
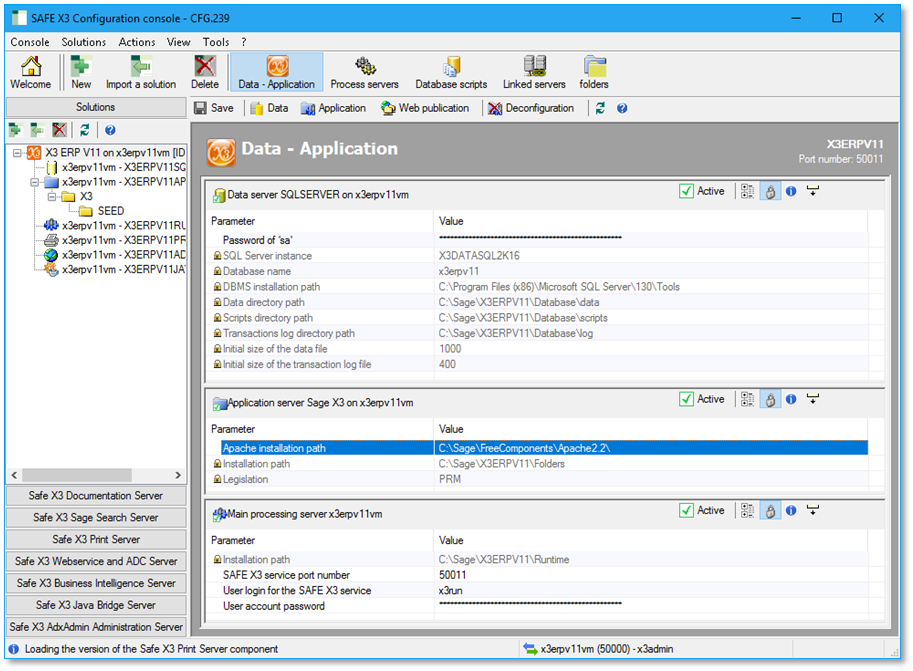
- Launch the SAFE X3 configuration console.
- Load the solution and visualize the value of the Apache installation path in the Application server box.
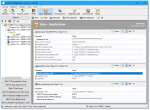
- In our case it is C:\Sage\FreeComponents\Apache2.2\, which is not the default value for installations with the Apache 2.2.25 MSI distribution.
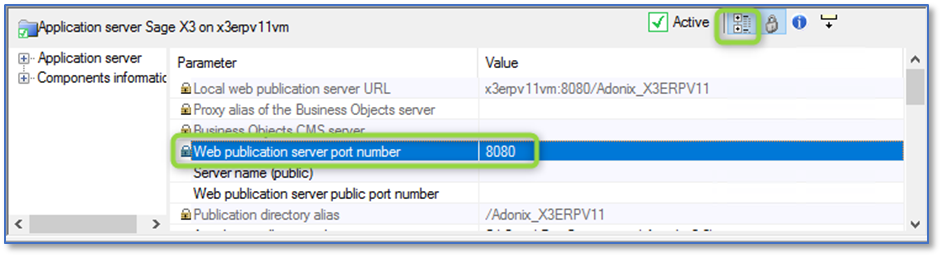
- To retrieve the information about the TCP port used by Apache:
- Click the Advanced button in this section.
- Look at the Web publication server port number value.
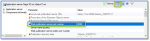
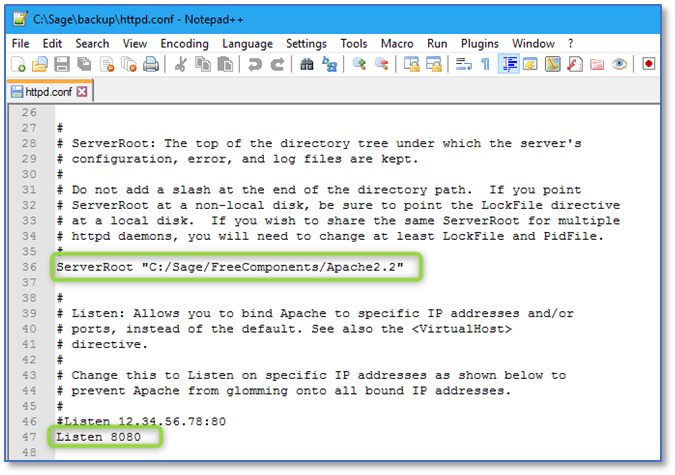
In this example, this is not the 80 default value but a customized 8080 value.
- Note down the Apache installation path and Web publication server port number values. You will need them later.
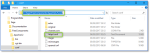
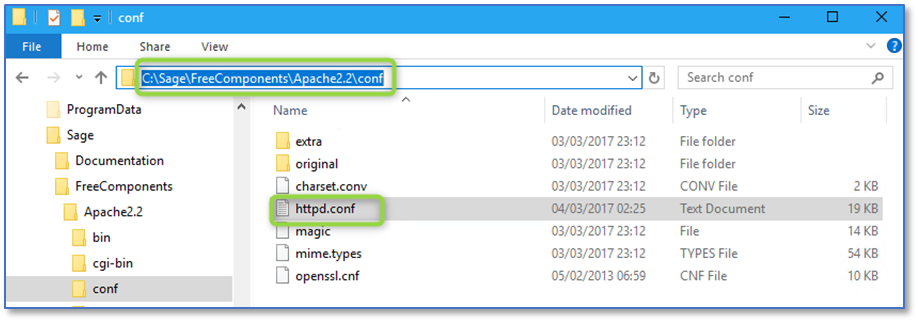
- Then browse to your <Apache installation path>\conf directory and make a copy of the httpd.conf configuration file outside of the <Apache installation path> directory tree.
- If you look at the content of the httpd.conf file or its copy, you can find:
The root path of the Apache 2.2 installation online starting with ServerRoot.
The value of the TCP port on which the Apache httpd server is listening on the line starting with Listen.
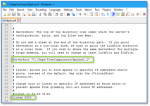
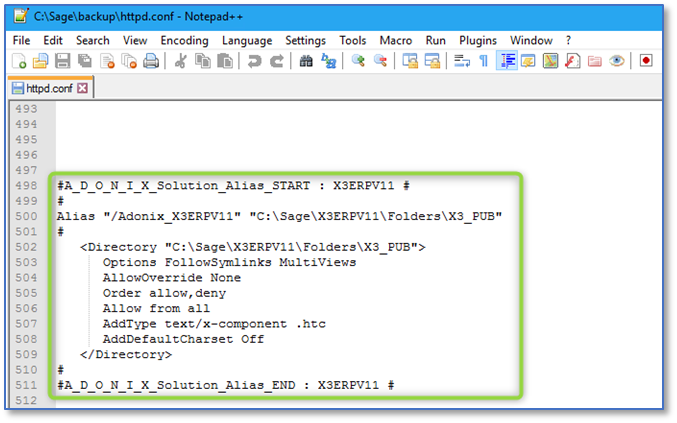
Sage X3 solution’s X3_PUB publication characteristics at the end of the file.
3. Plan the Sage X3 application usage stop from web users, web services and ADCs
The next operations will imply a partial (for V5/V6 with rich client use) or total (for V7 and beyond) application service stop during the time Apache 2.2 is stopped and replaced by Apache 2.4 and reconfiguration is done at different levels.
This impacts interactive users connecting through the web interface, web services and portable terminals (ADC).
This operation is about 15 minutes long.
4. Stop Sage X3 services depending on Apache 2.2
Stop properly the httpd consumer service before stopping and uninstalling Apache 2.2. These services may be hosted on different servers than the one hosting the Sage X3 application:
-
Classic (legacy) SAFE X3 web server(s) if present on any version.
You need to stop two services named Sage X3_WEB_apachehttpd_<WSNAME> and Sage X3_WEB_apachetomcat_<WSNAME> where <WSNAME> is the name given to this component at installation time. In this example it is X3ERPV11ADCSVR.
-
Syracuse web presentation server(s) from V7 and beyond.
You need to stop one service named Agent Sage Syracuse - <XXXXX> where <XXXXX> is the identifier that was given to the Syracuse node at installation time. The identifier is generally NODE0.
For this service, the display name is Agent Sage Syracuse - <XXXXX> and the service name is Agent_Sage_Syracuse_-_<XXXXX>.
Do not perform the Syracuse shutdown by stopping the Sage Syracuse - <XXXXX> service. Indeed, this one is managed by the Agent Sage Syracuse - <XXXXX> service that will restart it as long as it is running.


In a clustered Syracuse implementation, you need to stop all Syracuse servers of the cluster.
Use your preferred way to stop the services. You can stop them either:
- Through the Windows services console.
- By net stop command from an elevated command prompt.
5. Stop the Apache 2.2 service, uninstall Apache 2.2 and clean up the installation
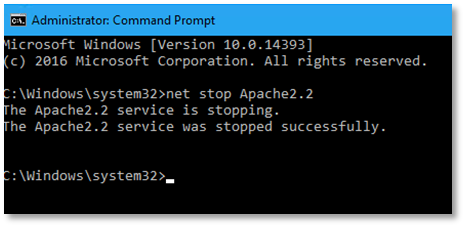
- Stop the Apache 2.2 service by Windows services console or with a net stop command from an elevated administrator command prompt. The default service name is Apache2.2.

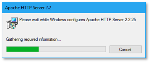
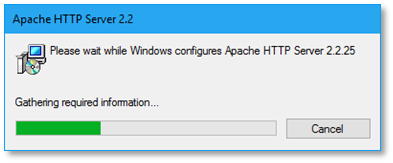
- Uninstall Apache 2.2.
- Confirm you want to close the Apache HTTP Server Monitor.
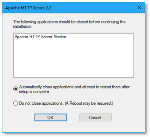
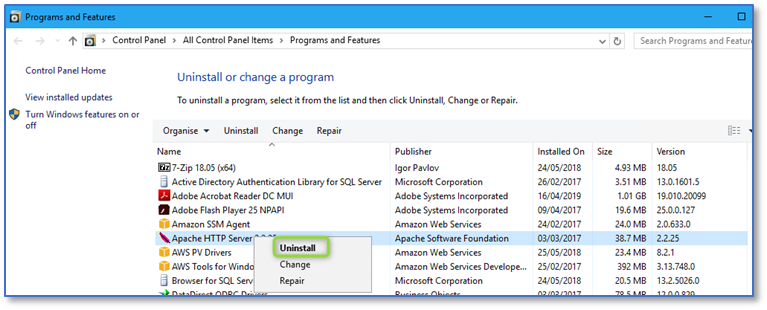
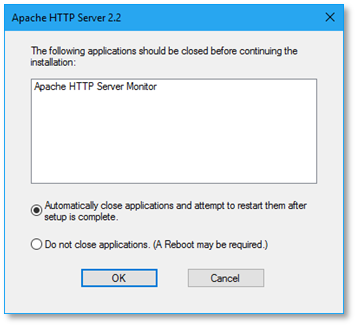
Once the uninstallation is completed, the entry should have disappeared from the list of installed programs and features.
The Apache monitor icon might remain visible in the task bar. It disappears when you put the mouse pointer on it.
Then clean up the directory where Apache 2.2 was installed. Only the conf and logs subdirectories should remain.
6. Install, configure, start and test Apache 2.4
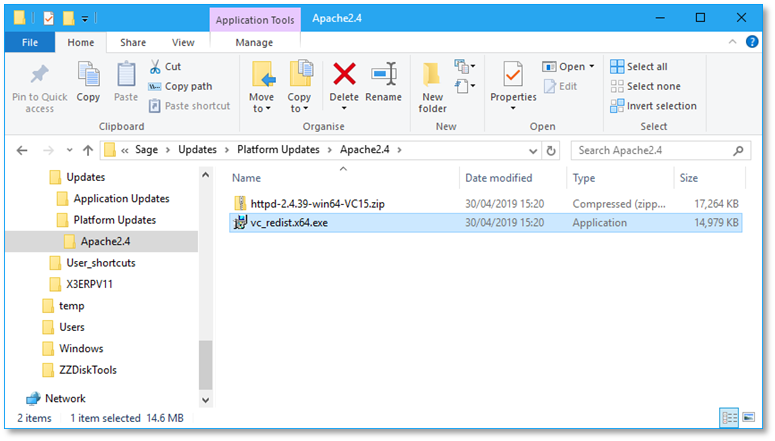
You previously downloaded:
- The httpd-2.4.xx-win64-VC15.zip file with Apache httpd 2.4.xx (2.4.39 in our case).
- The vc_redist.x64.exe file for the Visual C++ 2017 redistribution.
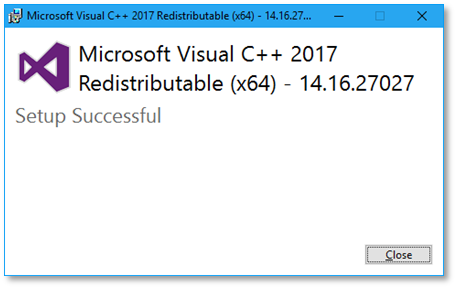
6.1. Prerequisites installation
First install the Visual C++ 2017 redistribution.

6.2. Apache 2.4 distribution extraction and move to the desired location
Then unzip the Apache httpd 2.4.xx distribution. You can use Windows Explorer or a utility like 7-Zip to do so.
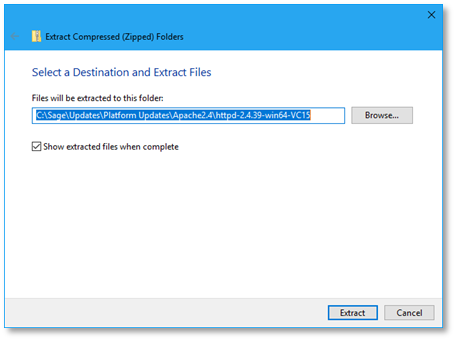
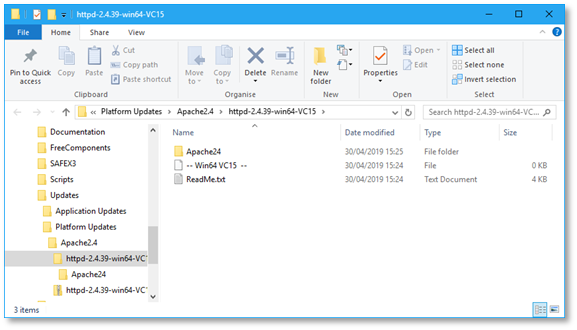
In the end you will get an Apache24 subdirectory under the extraction target as well as a ReadMe.txt file. Consult the ReadMe file, it contains valuable information.
You should move the Apache24 subdirectory to the location where you want your Apache 2.4 httpd server to be. It could be:
-
To C:\Apache24 if you want to use the default configuration.
-
To the same type of location where you previously had Apache 2.2. In this example, the Apache 2.4 root directory is C:\Sage\FreeComponents\Apache24 as the previous installation was in C:\Sage\FreeComponents\Apache2.2\.
6.3. Httpd.conf configuration file modification
-
If your previous Apache 2.2 installation was listening on port 80 and you have chosen C:\Apache24 as root directory for Apache httpd 2.4, you should have nothing to change in httpd.conf.
-
If your Apache 2.4 root directory is not C:\Apache24 then change the Define SRVROOT clause in httpd.conf.
-
If your listening port was not 80, change the Listen clause in httpd.conf.
In this example, we need to modify both: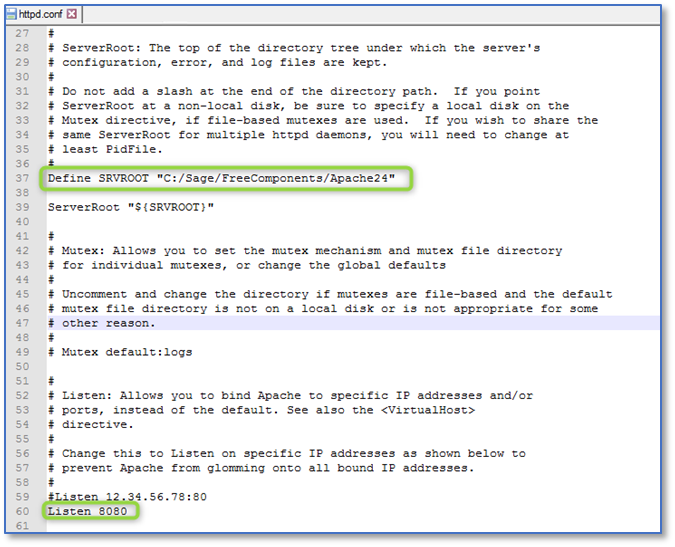
Pay attention to the following details:
-
In Apache 2.2, the server root definition was ServerRoot "<your apache 2.2 root directory>". Now in Apache 2.4, it is Define SRVROOT "<your apache 2.4 root directory>".
-
Replace the Windows \ directory separator by a Unix/Linux-style / in the path for the server root.
Do not perform a global replace of all \ by / in this configuration file as there are a lot of significant \ in other locations.
6.4. Httpd.conf file syntax check and Apache 2.4 service creation
After you have done the needed adjustments in httpd.conf, create the Windows service that will launch the Apache httpd 2.4 server.
Launch an elevated administrator command prompt and change the directory to the bin subdirectory of your Apache 2.4 root directory.
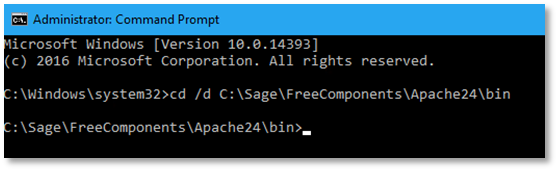
6.4.1. Configuration file syntax check
Perform a syntax check of the configuration file by launching httpd -t.
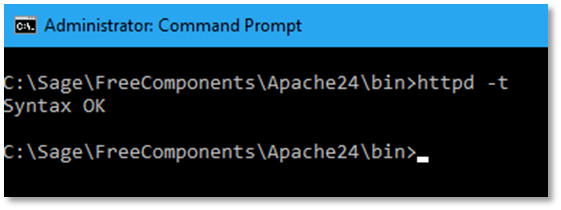
If you get a Syntax OK answer as shown above, proceed to the Apache2.4 service creation.
If you get warnings or errors, correct these errors before creating the service.
Hostname resolution warning
You might get a warning message if Apache can't perform a reverse DNS resolution of your server’s name. This can happen if your server is:
- An autonomous Windows server not within an active directory (AD).
- Not properly registered in an external reverse DNS directory.

In that case, you should add a ServerName clause in httpd.conf with the internal hostname of your server followed by a colon and the port that is set up in the Listen clause.
Edit httpd.conf again and search for ServerName. You will find some explanations about this clause. Add a line after the commented example with the following syntax:
ServerName <YourHostName>:<YourListeningPort>
In this example: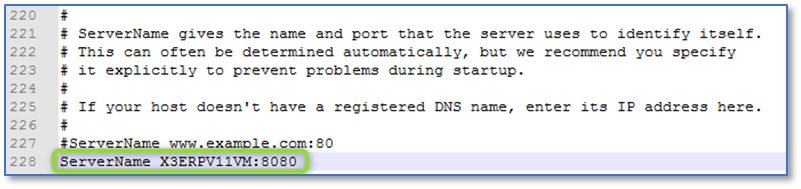
After the modification is done, re-check the syntax with the httpd -t command. It should remove the warning message.
If it is solved, proceed to the Apache2.4 service creation.
Syntax error message
If you made a typographical error in your httpd.conf modifications, you receive an error message on syntax similar to the one below:

Correct your mistake before trying to create the service otherwise the service won’t start.
6.4.2. Apache2.4 service creation
Once you have checked the syntax of your httpd.conf file with the httpd -t command and it returns no warning or error, you are ready to create the service.
From the same elevated administrator command prompt within the bin subdirectory of the Apache 2.4 installation, launch the httpd -k install command:
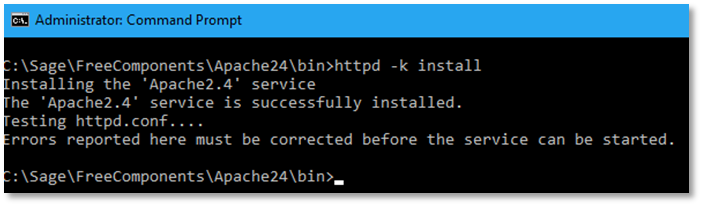
If you see errors or warnings reported after the Testing httpd.conf message, this means you have not run httpd -t properly. Check again and correct the mistakes before trying to start the service.
If you have the status shown above, you are ready to start the Apache2.4 service.
You can check what was created with the service console:

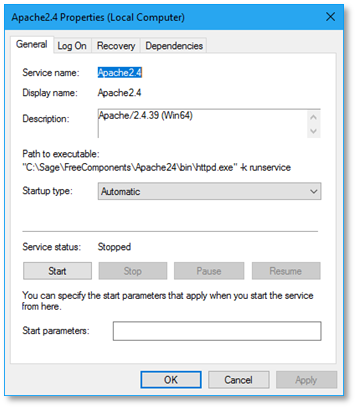
The Apache2.4 service was created, running as local system and with an automatic start mode. But it was not started.
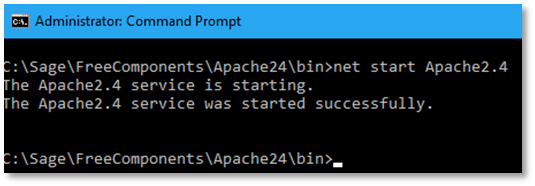
6.5. Apache2.4 service start
You can now start the Apache2.4 service, either through the console or with a net start command from an elevated command prompt.
6.6. Apache 2.4 httpd server basic test
Before going further, check the Apache 2.4 httpd server is running properly by launching any web browser from the application server and trying to browse to the server’s root using the URL http://<yourservername>:<yourlisteningport>. You can use localhost as server name.

It should display It works!.
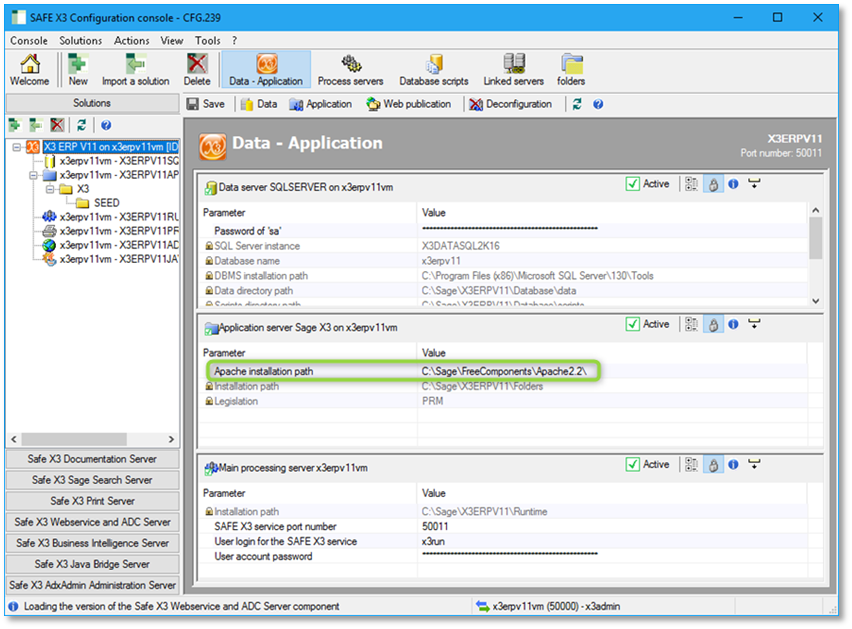
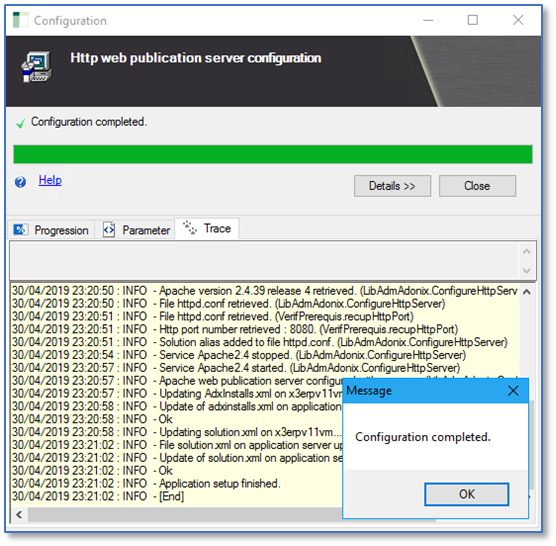
7. Easy Sage X3 configuration update with console from CFG.239
If you have a SAFE X3 configuration console with version ≥ CFG.239 , you can proceed as follows:
-
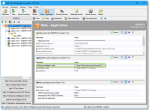
Launch the SAFE X3 configuration console.
-
Connect to the solution.
-
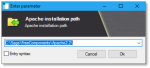
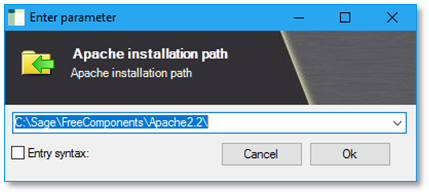
In the Application box, click Apache installation path.
This box is displayed for a few seconds:
And is replaced by this box with the previous Apache 2.2 root directory path:
-
Replace the previous Apache 2.2 root directory path by the new Apache 2.4 root directory path and click OK.
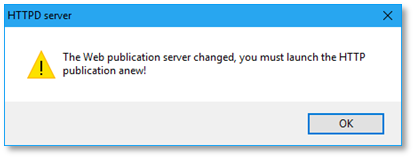
The following warning message is displayed, click OK.

-
First click the Save button and then the Web publication button.

-
SAFE X3 configuration console:
-
Detects that Apache is now in 2.4 version.
-
Rebuilds the solution’s X3_PUB publication part of httpd.conf.
-
Stops and restarts Apache2.4 service.

-
-
Click OK on the Configuration completed pop-up message, and then Close on the configuration pop-up window.
-
You can now leave the SAFE X3 configuration console.
-
You can have a look at what was added to httpd.conf. In our example we can see:
-
You can now test Apache 2.4 solution’s X3_PUB publication.


8. Manual Sage X3 configuration update when the console version is older than CFG.239
8.1. Manual update - solution.xml and adxinstalls.xml configuration files edition to reflect Apache’s location change
Now that Apache’s version and location have been changed, you need to reflect this in Sage X3 solution’s classic solution.xml and in AdxAdmin’s adxinstalls.xml configuration files.
-
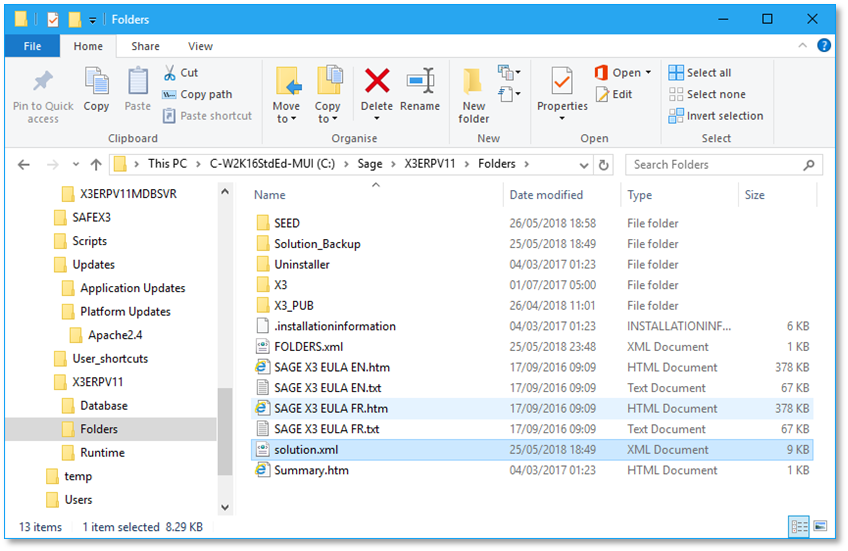
With Windows Explorer, browse to the location of Sage X3 solution’s folders.
-
Make a backup copy of the solution.xml solution’s classic configuration file.
-
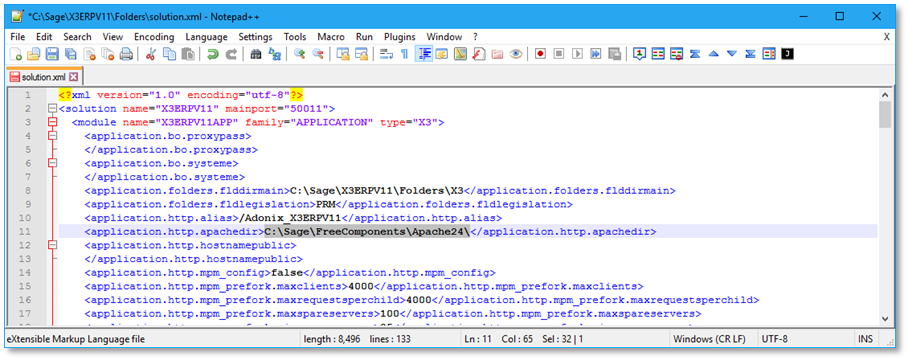
Edit solution.xml and find the application.http.apachedir string.
-
Change the value of the previous Apache 2.2 root directory path by the value of the new Apache 2.4 root directory path.
In our example, C:\Sage\FreeComponents\Apache2.2\ becomes C:\Sage\FreeComponents\Apache24\.
-
Save your modifications.
- Now locate the place where the SAFE X3 AdxAdmin administration engine is installed. It is generally X:\Sage\SafeX3\AdxAdmin where X: can vary.
-
Browse to the inst subdirectory of that location.
-
Make a backup copy of adxinstalls.xml.
-
Edit adxinstalls.xml.
-
Perform the same modification described above for solution.xml:
-
Find the application.http.apachedir XML variable.
-
Replace the previous Apache 2.2 root directory path by new Apache 2.4 root directory path.
-
Save the modified file.
-

8.2. Manual update - Copy and edit publication statements from previous httpd.conf to new httpd.conf
With Notepad or an advanced editor such as Notepad++:
-
Open the backup copy of the previous httpd.conf Apache 2.2 configuration file.
-
Go down to the end of the file.
-
Copy all statements between #A_D_O_N_I_X_Solution_Alias_START : <YourSolutionName> # and #A_D_O_N_I_X_Solution_Alias_END : <YourSolutionName> # including these lines.
-
Open the new Apache 2.4 httpd.conf configuration file located in <Apache2.4_root_dir>\conf.
-
Go down to the end of the file.
-
Paste all statements you copied previously. The pasted area should look like this:
#A_D_O_N_I_X_Solution_Alias_START : <YourSolutionName> #>
#
Alias "/Adonix_<YourSolutionName>" "<FoldersPathForYourSolution>\X3_PUB"
#
   <Directory "<FoldersPathForYourSolution>\X3_PUB">
      Options FollowSymlinks MultiViews
      Order allow,deny
      Allow from all
      AddType text/x-component .htc
      AddDefaultCharset Off
   </Directory>
#
#A_D_O_N_I_X_Solution_Alias_END : <YourSolutionName> # -
Replace the two lines in bold above by one line containing Require all granted:
#A_D_O_N_I_X_Solution_Alias_START : <YourSolutionName> #>
#
Alias "/Adonix_<YourSolutionName>" "<FoldersPathForYourSolution>\X3_PUB"
#
   <Directory "<FoldersPathForYourSolution>\X3_PUB">
      Options FollowSymlinks MultiViews
      Require all granted
      AddType text/x-component .htc
      AddDefaultCharset Off
   </Directory>
#
#A_D_O_N_I_X_Solution_Alias_END : <YourSolutionName> # -
Save the modified httpd.conf file.
-
Exit the editor.
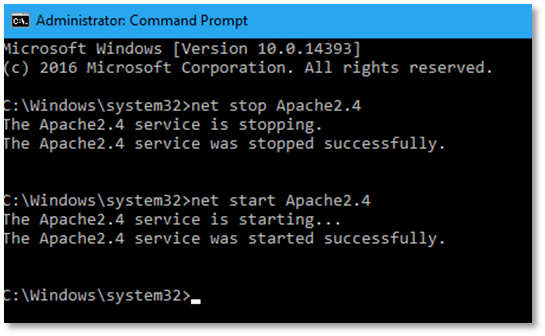
8.3. Manual update - Restart Apache2.4 Windows service
Stop and restart the Apache2.4 Service. You can do this either with:
- Windows services console.
- Command lines from an elevated administrator command prompt.
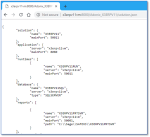
9. Test Apache 2.4 solution’s X3_PUB publication
When operations on httpd.conf are over, perform the following test.
- Open a web browser that can display json files. You can use Firefox or Chrome but not Internet Explorer.
- Browse to http://<YourServerName>:<YourApachePort>/Adonix_<YourSolutionName>/solution.json. In our example, it is http://x3erpv11vm:8080/Adonix_X3ERPV11/solution.json.
- You should see the content of the solution.json file that is stored under X3_PUB. Here is the result with Google Chrome:

10. Restart your web server(s) and test application access in web mode
You can now restart the Windows services associated to the web servers stopped earlier.
- If you are running Sage X3 V5 or V6, restart the Windows services associated with SAFE X3 web servers if present and test the application access from Internet Explorer.
- If you are running Sage X3 ≥ V7, restart the Agent Sage Syracuse – XXXXX Windows services on the relevant hosts. Then wait for at least 15 seconds for Syracuse start and test the application access from any supported web browser.
- The legacy SAFE X3 web services and the ADC server for web services in Sage X3 V7 and U8.
- ADC access for all versions.
Log on and test web and classic pages functions.