Notification servers
| Administration Page | Application/Contract | Syracuse/Collaboration | class | notificationServers | Representation | notificationServer |
|---|
Use this function to set up a notification service connecting to your email servers to send rich text notification emails to Sage X3 users or external recipients.
Notification emails are generated by:
-
The application through license expiration, password reset emails, and so on
-
The workflow rules
You need to configure a notification server to send reset password links by email.
You can set up multiple notification servers and assign them to different companies or legislations.
Activate the notification server
Set the SYRMAIL - Use notification server parameter (SUP chapter, WRK group) value to Yes to activate the notification server.
-
Go to Development > Data and parameters > Development setup > Parameter definition.
-
Select the SUP chapter in the Chapter field or the SUP Supervisor chapter from the left list.
-
Select your folder.
-
Select the WRK Workflow group and enter the details.
-
Set the SYRMAIL - Use notification server parameter value to Yes.
Set a notification server for the folder by company or by legislation
Use the SYRMAILSRV - Notification server parameter (SUP chapter, WRK group) value to set the notification server you want to use for the whole folder or a single company or legislation.
-
Go to Development > Data and parameters > Development setup > Parameter definition.
-
Select the SUP chapter in the Chapter field or the SUP Supervisor chapter from the left list.
-
Select your folder, company, or legislation.
-
Enter the WRK Workflow group details.
-
Set the SYRMAILSRV - Notification server parameter (SUP chapter, WRK group) value to the name of the notification server you want to use for this folder, company, or legislation.
Information
The following information is associated with a notification server.
Name
The name used to reference the notification server.
Description
A user-friendly description. This information is entered by default in the current language.
Type
Specify the protocol used by your email server to deliver messages. The SMTP protocol is set by default.
The notification server uses the selected protocol to connect to your email service provider. Its choice depends on your provider’s requirements and other architecture prerequisites.
You can also select the options below depending on the email service provider you use:
-
AWS Simple Email Service
-
SendGrid Service
-
Mailgun Service
-
Office 365 - Microsoft Graph
Each service provider above has its own set of parameters. Refer to the relevant documentation provided by your email service provider for more details.
Configuration with SMTP
Enter the information to connect to your SMTP server. You can use any email service provider that supports SMTP.
Mail server
Enter the hostname or IP address of the email service to connect to.
Port
Enter the port to connect to. Generally, ports 587 or 25 are for non-secure or STARTTLS modes. Ports 465 and 587 are frequently used for TLS mode. Refer to the SMTP connection security section for more details.
Proxy
Enter the proxy URL if you have configured a proxy to connect to the SMTP server.
SMTP connection security
Configure the SMTP connection security and authentication. An email server connection needs always to be secure on a production system.
This section relates to the connection encryption parameters. Always secure your SMTP connection to avoid security vulnerabilities that expose email streams and information to potential attackers.
Security mode
The security mode depends on the SMTP server configuration defined by the server provider.
The available security modes are:
- None: This is not recommended because emails are vulnerable to attacks that can modify their content, reroute them, or steal sensitive information.
- STARTTLS when available: STARTTLS is used if the email server supports it.
- STARTTLS required: STARTTLS is always used. The email is not sent if the connection cannot be encrypted because the email server does not support STARTTLS.
- TLS: The connection with the SMTP server is secured and encrypted without initiating an insecure connection first. TLS mode is the most secure mode, STARTTLS is less secure because the first connection can be attacked.
CA certificates of mail server
Select the certificate authority used by the SMTP server to sign its server certificate (if it is a self-signed certificate or not a well-known authority).
For TLS (transport layer security), the mail server authenticates with a server certificate and can enable encrypted secure connections (like with HTTPS). When you use self-signed certificates for the mail server or certificates that are not issued by known certificate authorities, you can add the corresponding certificates of the certificate authorities here.
Client certificate
Select a client certificate if it is requested by the SMTP server for authentication.
Authentication
This section adds authentication to the connection in addition to encryption. This field has two choices:
- No authentication: This is the default choice. The notification server can connect to the email server and send emails without additional authentication.
- Authentication with user and password: In this case, you need to enter the user and password defined on the email server side here. A confirmation is required for the password.
SMTP pooled connections
Configure SMTP pooled connections if necessary and set connection timeouts.
If pooling is used, then a fixed number of open connections is kept and a message is sent once a connection becomes available. This is useful when you have a large number of messages that you want to send in batches or when your provider allows you to only use a small number of parallel connections.
- Use pooled connection: Select this checkbox to use pooled connections instead of creating a new connection for each email.
- Maximum simultaneous connections: Set the number of maximum simultaneous connections.
- Message count limit by connection: Limit the number of messages that can be sent using a single connection. After the maximum number of messages is reached, the connection ends and a new one opens for the following messages.
SMTP connection timeouts
- Connection timeout (sec): Set the waiting time in milliseconds for the connection to establish.
- Greeting timeout (sec): Set the waiting time in milliseconds for the greeting after the connection is established.
- Socket timeout (sec): Set the allowed inactivity time in milliseconds before the connection ends.
Configuration with other email service providers
The information and message configuration sections are the same as those for SMTP, but the others differ.
Each service provider has their own set of parameters and settings. You can also consult the relevant documentation for each email service provider.
AWS simple email service
- Set the access key and the secret key from the AWS account credentials.
- Select the region used by the AWS service endpoint. In case of trouble, check that the account used to connect to AWS SES supports the SendRawEmail operation.
SendGrid service
Set the API key from the SendGrid account.
Mailgun service
Set the API key and domain from the Mailgun account.
Office 365 - Microsoft Graph
You can connect to a Microsoft 365 email service using OAuth2. OAuth2 is the only form of authentication recommended with a Microsoft 365 service.
-
Create an Azure application. You will receive a client ID, a tenant ID, and a secret access key.
Note - informationContact your Azure administrator for more information on how to create an Azure application including an email service. -
Enter your client ID, tenant ID, and secret access key in this section.
-
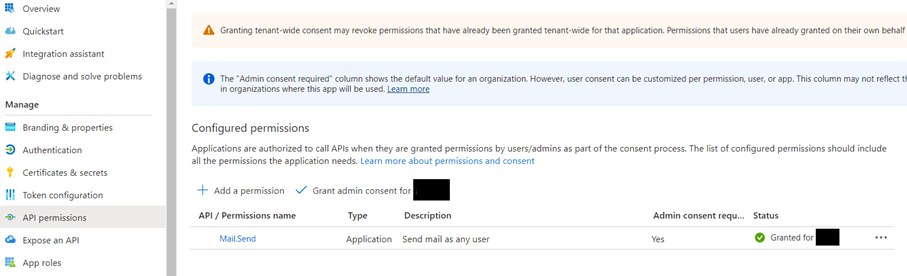
In Azure, go to the API permissions pane.
-
Add the MailSend permission with the Application type.
Message configuration
Define the email address of the notification sender and select the default theme that is used to format the email sent by the server.
Sender email
Specify a default sender email for generic system notifications and emails generated by workflow rules that do not have a sender email specified.
Default theme
Specify the theme to encapsulate all emails generated by this notification server. Notification themes are HTML envelopes for your email that encapsulate the main email text generated by the system or workflow rules.
Actions
The following operations are available from the Actions menu.
Notification themes
Use notification themes to customize the way your email templates are built. Themes are HTML encapsulation for your main email content, which is generated automatically or through the workflow rules.
You can access the Notification themes function directly and create or edit your email templates.
Test configuration
When this operation is triggered, a pop-up window opens where you can enter an email address, and a test email is sent to this address. If the email sending succeeds, a success message displays on the header line of the page.