Purchase receipt
Use this transaction to perform a purchase receipt. It can be:
-
A direct receipt, without any purchase order.
Note - informationDirect receipts are allowed only if the PTHDIR - Direct receipt general parameter (ACH chapter, REC group) is set to Yes. -
A purchase order receipt. This transaction also covers the receipt of a shipped purchase order, the receipt of a purchase order linked to a shipped container, and the receipt linked to a shipment pre-receipt.
To help you perform a purchase order receipt, you can use the Sage X3 Receiving purchase order report (POHWKT) to scan the purchase order bar code as well as the Sage X3 product codes. For more information, see the functional prerequisites.
When performing a purchase receipt, you can create license plate numbers (LPNs) "on the fly" when the right Sage X3 functional prerequisites are met.
You can access this transaction through:
- The Receipt menu from the home page, for a direct receipt or a purchase order receipt.
- The View purchase order or the View purchase orders to receive inquiries for a purchase order receipt.
Prerequisites
Functional prerequisites
-
Print orders to receive (FUNPOHWKT)
Open: Stock > Receipt/issue transactions > Print purchase orders to receive
Use this function to print a document with all the information you need to perform a purchase order receipt. This document displays the same information as the supplier packing list. It helps you enter the data as you can scan the purchase order bar code as well as the Sage X3 product codes.
-
Product-site (GESITF)
Open: Common data > Products > Products-sites
Use this function to set the Suggested location that displays in this transaction. Go to the Management section and select the Location management checkbox. The Default locations grid displays the list of location categories defined in the Product category function (GESITG) for the different movement types.
The suggested location is the Default location you set for the location category defined for the Supplier receipt movement type.
Note - informationTo be used as the suggested location, the Default location must be defined with a full location code. It cannot be defined with generic characters (*,#,!,?). -
Product (GESITM)
Open: Common data > Products > Products
Use this function to enter the product GTIN (Global Trade Item Number). This information is part of the GS1 composite barcode which can be used to identify the product. The GS1 composite barcode can also be used to identify other key information called Application Identifiers (AIs). In the Purchase receipt transaction, when you scan a GS1 composite barcode, the following AIs are read and entered automatically: the GTIN, the Lot, the Expiration date, and the Serial number. Other AIs can be part of the GS1 composite barcode but they are not managed in this transaction.
Note - informationTo be used in this transaction, the GS1 composite barcode needs to include at least the 2 following AIs:- The GTIN. It is used to apply controls on the product.
- At least another AI, not necessarily managed in this transaction.
-
Mobile Automation setup (FUNADCSEARCH)
Open: Setup > Stock > Mobile Automation setup
In this function, use the Product filter section to select the information that you want to use to search for a product, in addition to the product code. You can set 2 additional criteria that can be: The Supplier UPC code, the Supplier product code, the X3 UPC code, or the X3 product description.
Note - informationThese 2 criteria are used only for purchase order receipts. For direct receipts, the information that displays and that you can use to search for a product is: The product code, the X3 product description, the Supplier UPC code and the Supplier product code.Open: Setup > Stock > Mobile Automation setup
Use this function to automatically populate the Location field in Purchase receipt tickets. Go to the Receipt tab and select the Location preloaded checkbox.
Functional prerequisites for creating LPNs on the fly
-
Product-site (GESITF)
Open: Common data > Products-sites
-
Check that the Container management checkbox is selected.
-
Enter a Default container.
-
Enter the requested information in the Container capacity table. This information is used to calculate the number of LPNs to be created depending on the quantity to be received.
-
-
Product category (GESITG)
Open: Common data > Products > Product categories
Use this function to set the License plate number as a mandatory information for the Supplier receipt movement type and the required movement codes.
Functional prerequisites for creating custom composite codes
-
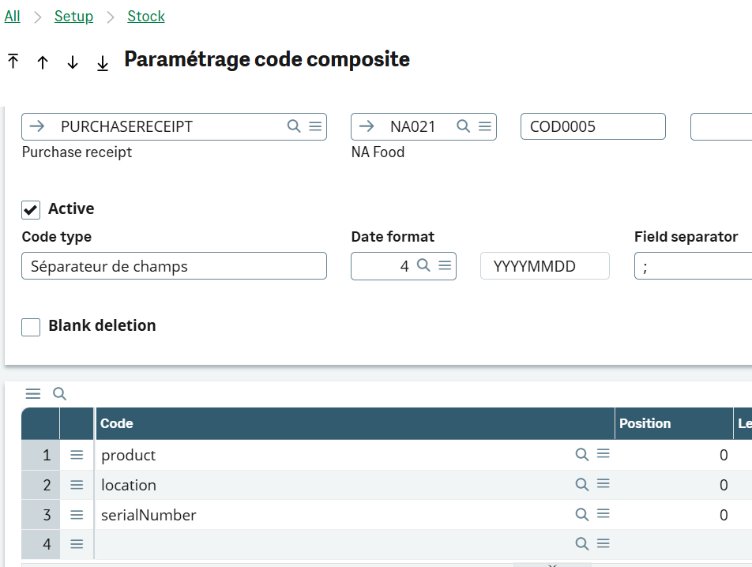
Composite code setup (GESCMPH)
Open: Setup > Stock > Composite code setup
In this function, you can create custom composite codes. Custom composite codes can be read in the Mobile Automation application.
When you read a custom composite code in Mobile Automation, the fields you selected in the composite code setup page will be automatically populated.
For instance, you created a custom composite code in X3 and selected the Product, the Location and the Serial number fields:
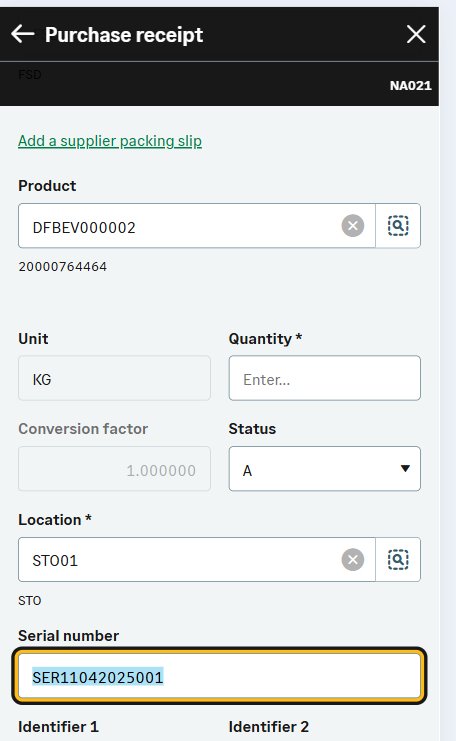
In the Purchase receipt transaction, when you read the composite code, these fields will be automatically populated:
How to create a purchase receipt
Open: Receipt > Purchase receipt
To create a purchase receipt, you must enter information on the Purchase receipt page:
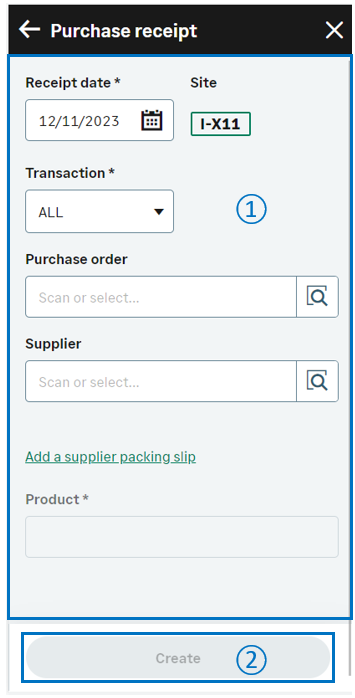
- The first part of the page is dedicated to:
- Information related to the header: The Receipt date, the stock Site, the entry Transaction, the Supplier code.
- Information related to the lines: The Purchase order or the Product code.
-
The second part of the page is used to enter the receipt line details. It displays when the Product code or Purchase order line has been populated.
When you have processed a receipt line, you can save it and move on to another line or keep the product on the header and enter additional stock details for the same product.
Operating mode
- In the initial page, check that the Receipt date, Site and Transaction default values are correct.
- Scan, select or enter the following information:
- The Supplier code for a direct purchase receipt
- The Supplier packing slip
- The Purchase order number for a purchase order receipt
The Sage X3 product code. For more information, refer to the Purchase receipt page section.
The product code and the supplier code are preloaded if you display this transaction from the View purchase order or the View purchase orders to receive inquiries.
- Scan, select or enter a purchase order line and then the shipment number.
When you have selected the product code or the purchase order line, and if necessary the shipment number, the Enter receipt detail page automatically displays.
- Enter the detailed receipt information. When you scan a GS1 composite barcode on the initial page, the following detailed information is extracted from the code and entered automatically : The Lot, the Expiration date, and the Serial number. For more information, see the functional prerequisites.
-
Tap the following actions:
Add to save the receipt line and enter an additional receipt line for the same document (such as a different location or a different LPN).
Create when you have processed all the lines and you are ready to validate the purchase receipt creation.
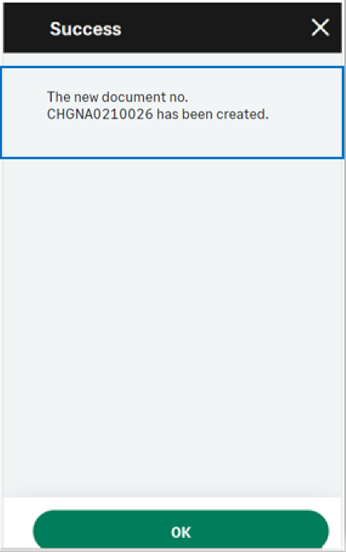
If you could proceed with the creation, the generated receipt number displays.
If you could not proceed with the creation, an error or information message displays. Tap Go back to display the previous page, and Cancel to delete all the receipt lines.
Step by step
Purchase receipt page
|
Enter the details of the receipt.
A warning message displays if the product is part of a stock count session. |
|
| You cannot tap Create: First you need to enter the receipt details and save at least one receipt line. | ||
| When the product code or the PO line is selected, additional fields display. |
Receipt details fields

|
Receipt details: the Unit, Quantity and Status always display.
|
|
|
Additional fields can be displayed or hidden depending on the product settings or on the selected entry transaction. When you scan a GS1 composite barcode on the initial page, the Lot and the Serial number can be extracted from the code and entered automatically. These additional fields are described below. |
||
|
Tap the following actions:
Note - settingsTo print the receipt note, the labels, and the LPN labels, refer to the functional prerequisites for printing labels and documents.
|
||
|
Note - informationTo access a Purchase receipt transaction, CWSPTH function must be authorized.
To create a Purchase receipt transaction, GESPTH function must be authorized. |
||
|
A message displays the generated receipt number and confirms that the printing is launched. |
Management by exception is applied here: Only some of these fields will display, depending on the Product settings (GESITM) or on some of the functional settings defined in the Stock section of the Receipts entry transaction (GESPTR) being used.
| Field | Product settings | Entry transaction | Description |
|---|---|---|---|
| Container | X |
This field displays only if the functional prerequisites for creating LPNs on the fly are met. Note - warningWhen the License plate number is set as a mandatory information in the Product category function (GESITG), you need to enter either the Container value or the License plate number value.
|
|
| License plate number |
X |
|
This field displays only if Container management is active in the Product-Site function (GESITF). Note - warningWhen the License plate number is set as a mandatory information in theProduct category function (GESITG), you need to enter either the Container value or the License plate number value.
If a location is assigned to the selected LPN, it will display automatically in the Location field. |
| Suggested location | X |
This field displays only when the following conditions are met:
Note - informationThis is only a suggested location, you need to enter the actual location in the Location field.
|
|
| Location | X |
This field displays only if Location management is active in the Product-Site function. If you selected the Location preloaded feature in the Receipt section in the Mobile Automation setup function in X3, this field is automatically populated with the suggested location. |
|
| Supplier lot | X | X |
This field displays only if the product is managed by lot and Supplier lot is not defined as an hidden field in the entry transaction. |
| Lot and Sub-lot | X |
These fields display only if the product is managed by lot. The Lot field is managed based on the receipt Management rules set for the Supplier receipt Movement type in the Product category function (GESITG):
If the Lot entry field is set to New lot or to Free, the lot number is entered automatically when you scan a GS1 composite barcode for a product with a GTIN. For more details, refer to the functional prerequisites. |
|
|
Lot custom text/number/date |
X | X |
These fields display only if the product is managed by lot and the check box for these fields is selected in the entry transaction. Entry in these fields is optional. |
| Expiration date/Use-by date | X | X |
These fields display only if the Recontrol/Expiration management is defined on the Product level and if the Expiration check box is selected in the entry transaction. Use the calendar icon to enter these dates. The expiration date is entered automatically when you scan a GS1 composite barcode for a product with a GTIN. For more details, refer to the functional prerequisites. |
| Potency | X | X | This field displays only if the product is potency managed and if the Potency check box is selected in the entry transaction. It displays the default potency value from the Product. You can modify it. |
| Serial number | X |
This field displays only if serial number management applies to the product. In this case, if a serial number sequence is not defined, you must enter this serial number. The serial number is entered automatically when you scan a GS1 composite barcode for a product with a GTIN. For more details, refer to the functional prerequisites. |
|
| Major/Minor version | X | These fields display only if the Major and Minor version management is defined for the product. Select the version status. The Major version list includes only major versions assigned to the minor version. | |
| Identifier 1/Identifier 2 | X |
These fields display only if they are not defined as hidden fields in the entry transaction. If they are defined as entered fields, you can use these fields to enter manually free alphanumeric information. |
|
| Close PO line | This field displays only for a purchase order receipt. Defaults to Yes if the quantity is 100 % complete for the purchase order line. Otherwise, defaults to No. |
| Field | Description | Sage X3 field code | Table (data creation) |
|---|---|---|---|
| Receipt date | Receipt date | RCPDAT | PRECEIPT |
| Site | Receipt site | PRHFCY | PRECEIPT |
| Purchase order | Purchase order number | POHNUM | PRECEIPTD |
| Supplier | Supplier code | BPSNUM | PRECEIPT |
| Product | Product code | ITMREF | PRECEIPTD |
| Receipt unit | Receipt unit | UOM | PRECEIPTD |
| Quantity | Quantity | QTYUOM | PRECEIPTD |
| Status | Status | STA | STOJOU |
| License plate number | License plate number | LPNNUM | STOJOU |
| Location | Location | LOC | STOJOU |
| Supplier lot | Supplier lot number | BPSLOT | STOJOU |
| Lot | Lot number | LOT | STOJOU |
| Sub-lot | Sub-lot number | SLO | STOJOU |
| Lot custom text | Lot custom text | USRFLD1 | STOJOU |
| Lot custom text | Lot custom text | USRFLD2 | STOJOU |
| Lot custom number | Lot custom number | USRFLD3 | STOJOU |
| Lot custom date | Lot custom date | USRFLD4 | STOJOU |
| Expiration date | Expiration date | SHLDAT | STOJOU |
| Use-by date | Use-by date | DLUDAT | STOJOU |
| Potency | Potency | POT | STOJOU |
| Serial no. | Serial number | SERNUM | STOJOU |
| Major version | Major version | ECCVALMAJ | STOJOU |
| Minor version | Minor version | ECCVALMIN | STOJOU |
| Identifier1 | Free field 1 | PALNUM | STOJOU |
| Identifier2 | Free field 2 | CTRNUM | STOJOU |
Limitations
- Subcontract receipts are not managed.
- You cannot scan a composite code on the sidebar.
- Fields on the sidebar do not read and interpret the composite code.
- Products that are managed with Potency in X3 are not taken into account in Mobile Automation. It is not possible to perform stock entries, stock issues or stock movements for products managed with Potency.