Putaway

Use this transaction to validate stock movements based on the storage lists generated from the Putaway plan function (FUNSSL). These movements are performed to put away stock received 'at dock' and awaiting storage.

Prerequisites

Web service prerequisites

In Sage X3, perform the following actions:

  1. Open: Administration > Web services > Classic SOAP pools configuration

    Stop the web service pool.

  2. Web services (GESAWE)

    Open: Development > Script dictionary > Scripts > Web services

    Perform the publication of the CWSVXASY web service.

  3. Open: Administration > Web services > Classic SOAP pools configuration

    Start the web service pool.

How to validate a putaway

Open: Receipt > Putaway

To validate a putaway movement, you must enter information on 3 pages:

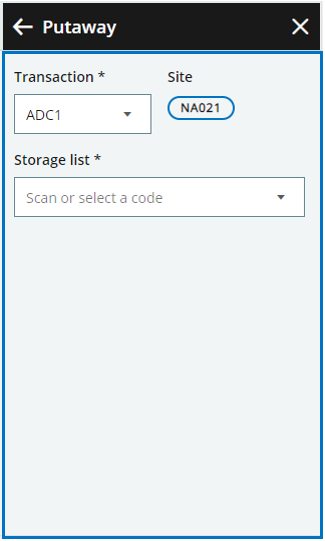
  • The initial page is used to select the storage list and the transaction to be used.
  • The second page is used to select the stock line to move to a new location.
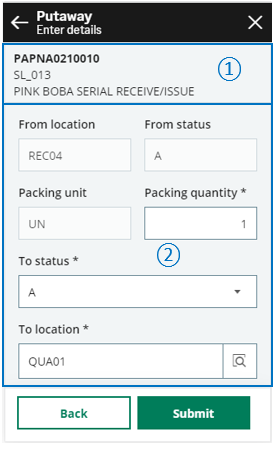
  • The third page is used to enter the quantity and validate the stock movement.

Operating mode

  1. In the initial page, check that the Site and Transaction default values are correct.
  2. Select the Storage list. The Select a product page automatically displays with the stock lines.
  1. Scan, select or enter the stock line to move. The Enter details page automatically displays.
  1. Enter the quantity to put away and check the new stock details.
  2. Tap:
    • Submit to move the stock. The page closes and the line is removed from the storage list.
    • Back to display the previous Select a product page.

Step by step

Putaway initial page


  • The Transaction field displays only if you have access to several entry transactions. It defaults to the first available Putaway plan entry transaction (GESSRG) (sorted by alphabetical order).
    You can select another transaction from the drop-down list. This list is filtered on the following elements:

    • Your Function profile (GESAFT) permissions (access codes)

    • The transaction settings: the Expiration, Potency, Lot custom text 1 /2, Lot custom number and Lot custom date check boxes must be cleared.

  • The Site defined in the Site screen displays automatically. You cannot modify it on the current page.
  • Scan or select a Storage list from the drop-down list which displays storage lists previously generated in the Putaway plan function (FUNSSL).
 
  When the storage list is selected, the Select a product page automatically displays

Select a product


The header displays the selected storage list number.
   
Use the Search field to filter the content of the list: Scan or type manually a product code, a location of origin, a serial number or a UPC code.
   

The list is sorted by product code, then by serial number. For each product, it displays the following information:

  • Product code
  • Product description
  • Location of origin
  • Quantity and unit of measure
  • Serial number. It displays only if the serial number management applies to the product.
    • If the serial number management mode is Received/Issued, the serial number displays for each product. Each line will be updated individually.

    • If the serial number management mode is Global Received/Issued, only the starting serial number displays with the total quantity. It will be updated globally.

  When the product is selected, the Enter details page automatically displays. A warning message displays if the product is part of a stock count session.

Enter details


The header displays the following information:

  • Selected storage list number

  • Product code and product description

  • The From location value displays and cannot be modified. It is predefined in the storage list created in the Putaway plan function.

  • The From status value displays and cannot be modified. It is predefined in the storage list created in the Putaway plan function.

  • The Packing unit value displays and cannot be modified. It is predefined in the storage list created in the Putaway plan function.

  • The Packing quantity defaults to the total quantity to put away to the new location. You can change it for a smaller quantity only.

  • The To status value displays. It is predefined in the storage list created in the Putaway plan function, but you can select another value.

  • The To location value displays. It is predefined in the storage list created in the Putaway plan function, but you can select another value.

  • The Lot and Sublot fields display only if the product is managed by lot. Their values cannot be modified. They are predefined in the storage list created in the Reorder plan function.

  • The Serial number field displays only if the serial number management applies to the product. The serial number displays and cannot be modified if it is predefined in the storage list created in the Putaway plan function. If the serial number management mode is Received/Issued, the serial number which displays is the product serial number. If the serial number management mode is Global Received/Issued, the serial number which displays is the starting serial number.


Tap the following actions:

  • Submit to put away the stock to the new location and print the stock labels. The page closes, and the line is removed from the storage list. A message displays to confirm that the printing is launched.

    To print labels, refer to the functional prerequisites.

    A GraphQL API request is sent to Sage X3. The data of this payload is mapped with a web service script named CWSVXASY to update the Sage X3 database.

  • Back to display the previous Select a product page.