Stock change by LPN
Use this transaction to perform the following actions:
-
Move an entire license plate number (LPN) inside a stock site. It can be an internal location change and/or a stock status change.
-
Generate stock movements and create a stock change document in Sage X3.
Prerequisites
In Sage X3, perform the actions described below:
Functional prerequisites
-
Stock change transactions (GESSCT)
Open: Setup > Stock > Entry transactions > Stock change transactions
Check that a stock change entry transaction with an Internal movement type and a Container number access code exists.
-
Assignment (GESTCA)
Open: Setup > General parameters > Sequence number definition > Assignment
Check that a sequence number is defined and assigned to the Stock changes document.
Web service prerequisites
-
Open: Administration > Web services > Classic SOAP pools configuration
Stop the web service pool.
-
Import/export templates (GESAOE)
Open: Setup > Usage > Imports / exports > Import/export templates
Validate the CWSSCSL import template.
-
Web services (GESAWE)
Open: Development > Script dictionary > Scripts > Web services
Publish the AOWSIMPORT web service.
-
Open: Administration > Web services > Classic SOAP pools configuration
Start the web service pool.
How to create a stock change by LPN
Open: Stock control > Stock change by LPN
To create a stock change, you must enter information on 2 pages:
- The initial page is used to:
- Set the Change date and the entry Transaction.
- Identify the License plate number code.
-
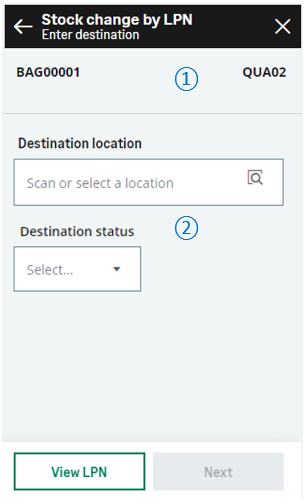
The second page is used to enter the location of destination and/or the status of destination of the LPN.
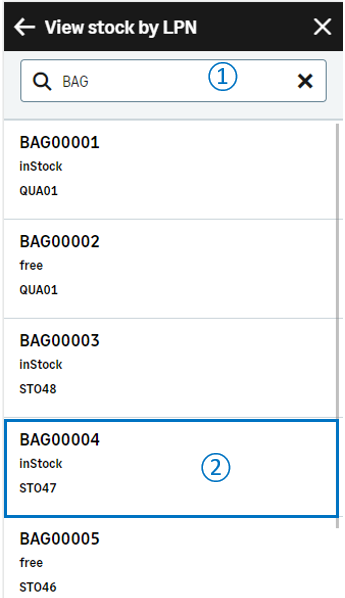
From this page you can go to the View stock by LPN transaction to display the list of products contained in the LPN and select a product to display its details.
When you have completed the changes for this LPN, you can create the stock changes document, or select another LPN to perform another stock change which will be on the same stock change document.
Operating mode
- In the initial page, check that the Change date, Site and Transaction default values are correct.
- Scan, select or enter the License plate number code. The Enter destination page automatically displays.
-
Enter the location of destination and/or the status of destination.
- Tap Next. The initial page displays again automatically. The LPN that has been moved is listed at the bottom of the screen. You are ready to complete the following actions:
-
Perform another stock change by LPN in the same stock change document. Scan, select or enter another LPN and repeat step 3 to step 4.
- Validate the creation of the stock change document and go to step 5.
- Delete a line: Tap the delete icon.
-
Tap Create when you have completed the changes for all the LPNs and you are ready to validate the stock change by LPN creation.
-
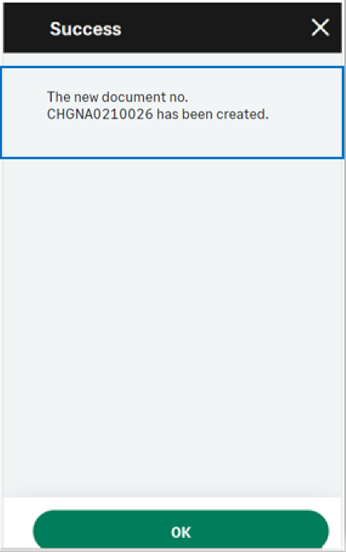
If you could proceed with the creation, the generated stock change number displays. The stock change document and its movements are created.
-
If you could not proceed with the creation, an error or information message displays.
-
Tap Go back to display the previous page.
-
Tap Cancel to delete all the stock changes by LPN.
-
-
Step by step
Stock change by LPN initial page
 |
|
Stock change by LPN - Enter destination page
Use this page to determine the location of destination and/or the status of destination of the LPN.
|

|
The header displays the following information:
|

|
Enter the destination information :
Fields display according to the selected Stock change entry transaction being used. Example
If the entry transaction is set only for location changes, only the Destination location field displays. The Destination status field does not display. |
|
At this stage, the stock changes are saved in the UI only, and not in the database
|
||
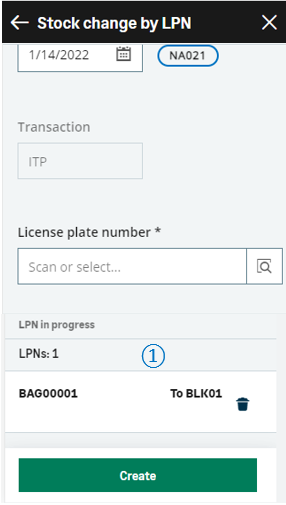
Create the stock change document and generate stock movements
|
|
The list of LPNs which will be part of the change provides the following information at the bottom of the page:
You can perform the following operations:
Before validating the creation, you still have the possibility to delete a saved stock change: Tap the delete icon. |
|
Tap Create when you have completed all the LPNs changes and you are ready to validate the stock change creation and print the stock labels. To print labels, refer to the functional prerequisites.
|
|
A GraphQL payload is sent to Sage X3. The data of this payload is mapped with the CWSSCSL import template which is called by the import-type AOWSIMPORT SOAP web service. A message displays the generated document number and confirms that the printing is launched |
|
|
. |
||
| Field | Description | Sage X3 field code | Table (data creation) |
|---|---|---|---|
| Site | Receipt site | STOFCY | SCHGH |
| Change date | Effective date | IPTDAT | SCHGH |
| License plate number | LPN | LPNNUM | SCHGD |
| Location | Location | LOC | SCHGD |
| Destination location | Location of destination | LOCDES | STOJOU |
| Status | Status | STA | SCHGD |
| Destination status | Status of destination | STADES | SCHGD |