Methodology, recommendations, and limits
Before creating and running automated tests, you need to consider the following questions:
- You must be using Sage X3 version 2021 R1 (12.0.25) or above. Prior versions are not compatible.
- You cannot check the content of generated files. You can only confirm they've been generated.
- You can check the content of pdf reports generated for Sage X3 with Sage X3 Automated Test Platform version 4.0.0 and above.
- Tests are limited to pages and screens within Sage X3 and Sage X3 Warehousing. You cannot, for example, interact with an external website like HMRC.gouv.uk for MTD or other applications such as web scheduling or Sage Enterprise Intelligence (SEI). However, you can test standard functions, customizations, or add-ons as long as they are integrated to Sage X3 or Sage X3 Warehousing applications and use the Sage X3 and Sage X3 Warehousing standard UI components.
-
You can test SOAP web services via Sage X3 Classic SOAP web services ( from release 4.1.0).
-
You cannot test APIs.
-
You can cannot execute Sage X3 Automated Test Platform on Mobile Automation pages.
-
You cannot test requests submitted to the batch server. (Those operations are asynchronous and would require the Robot to pause the feature file execution during too much time, until the request submition is completed)
- Sage X3 Automated Test Platform is not designed for performance testing or benchmarks. It is limited to implementing regression tests.
- You cannot execute a test on a production environment. Tests are limited to development or test environments.
-
The standard Sage X3 and Sage X3 Warehousing languages are supported except the Arabic language.
- You are limited to checking if a visual process exists, but not its content.
- Step definitions are limited to writing to a text editor field and to checking the content. You cannot write a step definition that interacts with the text formatting buttons.
- With Sage X3 Automated Test Platform 4.1.0, step definitions have been added to interact with the Sage Copilot Chatbot and Insights. This functionality is delivered in beta version and subjected to change according to the modifications done on Sage X3 or Sage Warehousing.
- Any samples provided in this or other documentation are not designed to be used as-is in your test environment. These samples are based on data in the SEED folder. Samples only run in a SEED folder updated to the latest version with no customizations or modifications to the standard setup. Samples will not work if you make any modifications.
-
If you want to execute samples on your SEED folder, you need to execute them in the following order:
-
Prerequisites
-
Business flow samples
-
Samples
-
-
Use a different user setup with its own credentials to test habilitations. Refer to the Sage X3 Automated Test Platform step definitions guide for information about the step definition you can use to test the state and visibility of fields.
-
Don’t try to automate everything. Think about the tests you want to implement. What will represent the best coverage and what will add the best value to you.
-
Implement a clear naming convention for your tests. This naming convention should be unique and clear. This makes it easier to update tests created in VS Code and in Allure reports.
For example:
prefix-type-[legislation]-function/identifier-[sequence]."feature"
-
Prefix: such as "fin"for finance, "pur"for purchase, "sal"for sales, etc.
-
Type: crud, flow, more information below about automated test types
-
Legislation: code of the legislation linked to the
-
Function: Sage X3 function code
-
Identifier: when the function is not relevant, the identifier briefly describes the purpose of the test
-
Sequence: numbering
-
The information within square brackets is optional.
-
-
Don’t start by implementing complex business flows.
-
Start with small tests that provides high value.
-
Automated tests should be considered as short use cases.
-
Keep in mind that the longer the automated test is, the longer it will take to be executed, and the longer it will take to maintain it.
-
Each time you update Sage X3 or Warehousing product, you need to check and manually retest your solution, which can be time consuming.
-
Identify your critical tests (highest value). These are tests that are executed regularly, (e.g., once a week, once a month, your current processes, etc.) contrary to those executed very rarely, (e.g., once a year).
-
Ensure they are clearly marked to distinguish them from your lower priority tests.
-
Regression testing definition (source ISTQB)
-
Testing a previously tested program following a modification to ensure that defects have not been introduced or uncovered in unchanged areas of the software as a result of the changes made.
-
-
Regression tests
-
Automated tests are aimed at describing controls or a list of actions executed in Sage X3. The automated test describes an expected behavior and outcome. When the automated test is executed, it is controlled that the tests get the same results and outcomes as those described in the automated test (feature file).
-
If all the actions or controls pass without any errors, the automated test passes with success.
-
If at least one action or a control fails, the automated test fails.
-
It can be the result of an incorrect test definition. This will require reviewing and updating the automated test.
-
Or if the test used to work:
-
It can be a potential regression detected by the automated test.
-
It can be a change of behavior within Sage X3 implied by a standard modification or a customization. This will require reviewing and updating the automated test. Examples of potential changes that can have an impact of the automated test:
-
Updated translation
-
Change of functional behavior (new message displayed, change of process, etc.)
-
-
-
-
-
As described in Setting up Sage X3 endpoints, tests can be run on a development or test endpoint, but not your production endpoint.
-
If means you need to have dedicated test environments to execute your automated tests. However, it is important to keep in mind the following points:
-
Your automated tests need to use specific data (reference automation tests data) that should be used only by those automated tests. The risk otherwise is to use data that has been modified and which will alter the successful execution of your automated tests.
-
Each time your automated tests are executed, the data base context changes. To make sure your automated tests can be executed again, you might need to refresh the folder where the automated tests have been executed.
-
Your automation execution test folder cannot be refreshed with the production folder because the data of the production folder continuously changes.
-
It needs to be refreshed with a reference automation test folder where you create the necessary data, documents and setup for your automated to be executed.
-
-
It is important to separate the manual test and the automation execution folders. The risk otherwise is to have manual tests changing the data and altering the successful execution of the automated tests.
-
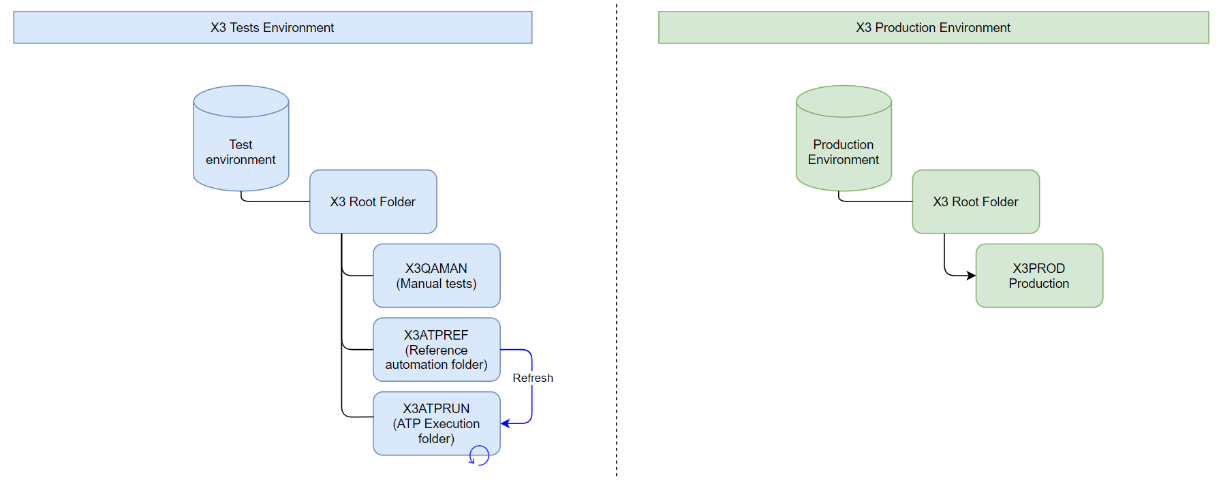
Recommendation
Your test environments could have the following architecture:
-
The Automation reference data (setup, documents, common data) are created in the X3ATPREF folder.
-
Once your specific developments have been validated, they are installed on the different test folders.
-
Standard patches are also installed on the different folders of the test environment
-
The folder X3ATPRUN (used to execute the automated tests) is refreshed on demand, using a copy of the Reference automation folder (X3ATPREF).
-
The folder X3QAMAN is used for manual tests only.
Recommendations
The Sage X3 Automated Test Platformis based on the Cucumber open source component that supports behavior-driven development (BDD). Cucumber allows you to write and execute automated regression tests in a user-oriented language called "Gherkin."
Gherkin language introduction
Gherkin language is a business-readable, domain-specific language that allows you to describe the software’s behavior with an end-user approach. Each action or step in the automated test exactly represents actions a Sage X3 user would perform.
Gherkin reserved keywords
Gherkin primary keywords
Feature: A keyword is used to define the feature name. To ensure consistency, it is recommended to name the feature with the same code as the feature file. An automated test always starts with the feature keyword. A feature can be composed of one or several scenarios.
Scenario: A keyword is used to define the scenario name. A scenario is a test case aimed at describing a succession of user actions performed by the automated test. A scenario is composed of steps describing the different actions performed by the automated test.
Scenario outline: A keyword is used to define a type of scenario that allows it to be executed several times using a different combination of values for each execution.
Example: A keyword is used to define the different combination of parameters and values used by the scenario outline.
A step can be an action or a verification performed by the automated test. Each step begins with one of the following keywords:
Given: describes the initial context of a step
When : describes an event or an action in a step
Then: describes an expected outcome or result of a step
And: used with other steps, (e.g., Given, Then, etc...) to include something
But: used with other steps, ( e.g., Given, Then, etc...) to exclude something
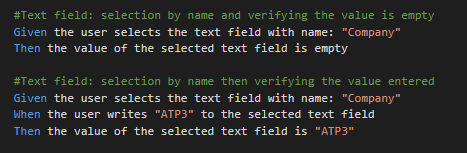
The context in this example is accessing the "Company" field functionality.
-
After the functionality is accessed, the first outcome is verified: The value of the "Company" text field company is empty when no value is defined.
-
Then the second outcome is verified: The text field contains the value "ATP3" when the value "ATP3" is entered.
" " ": (Doc Strings) used to encapsulate the value
| : (Data Tables) used for scenario outlines to define different combinations of values and the parameters they are related to
@ Tags: defined before the feature keyword to categorized them. When a Jenkins pipeline is executed, it is possible to execute all the features related to the same Category (feature defined with the same tag)
#Comments: not executed.
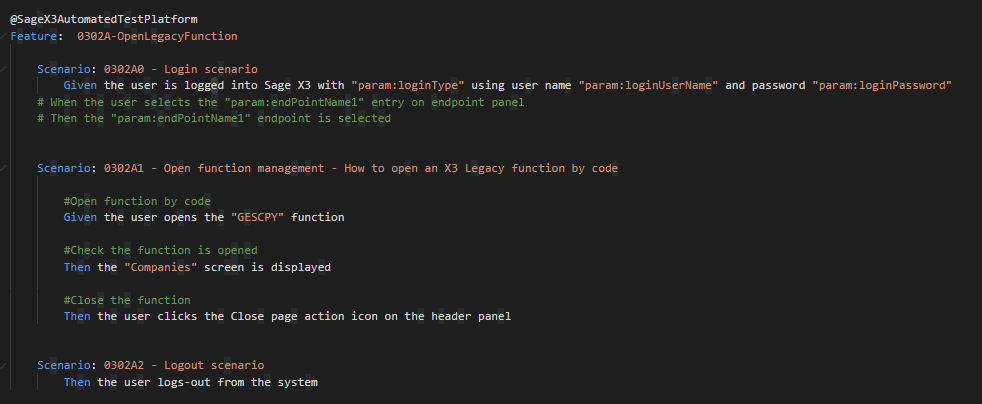
Automated test example
An automated test starts with the feature definition and then adding one or multiple scenarios. The following automated test is composed of three scenarios:
-
A scenario to log in
-
A scenario to open a specific function
-
A scenario to log out of Sage X3
Each scenario is composed of steps describing the different actions to be performed by the automated test.
When the automated test is executed, the actions are executed in the following order:
-
To log in into Sage X3 using a login, password and connection type parameters.
-
To select the proper endpoint and to check that the endpoint has been selected.
-
To open the opens the company functionality and to verify the company functional is opened. Then to close the company function.
-
To log out of Sage X3.
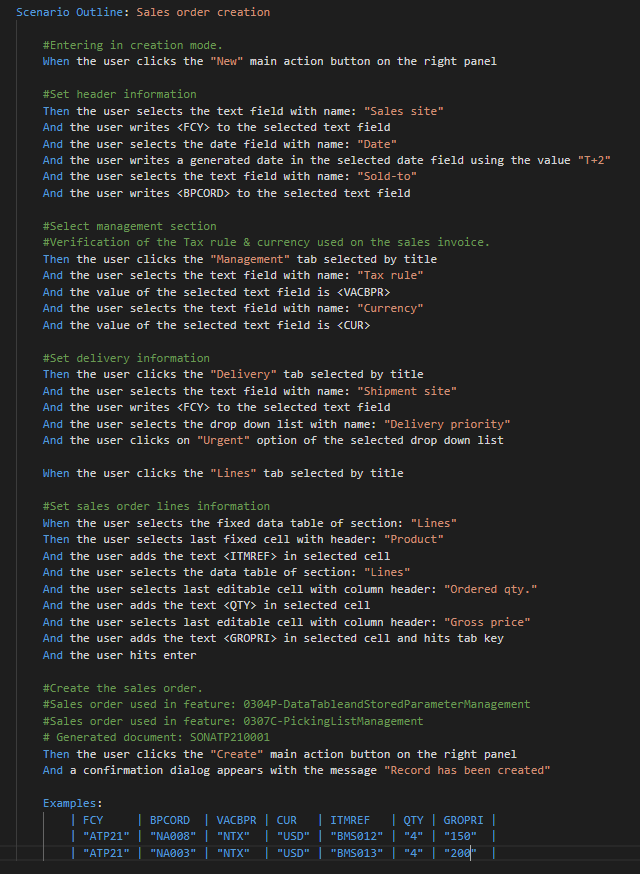
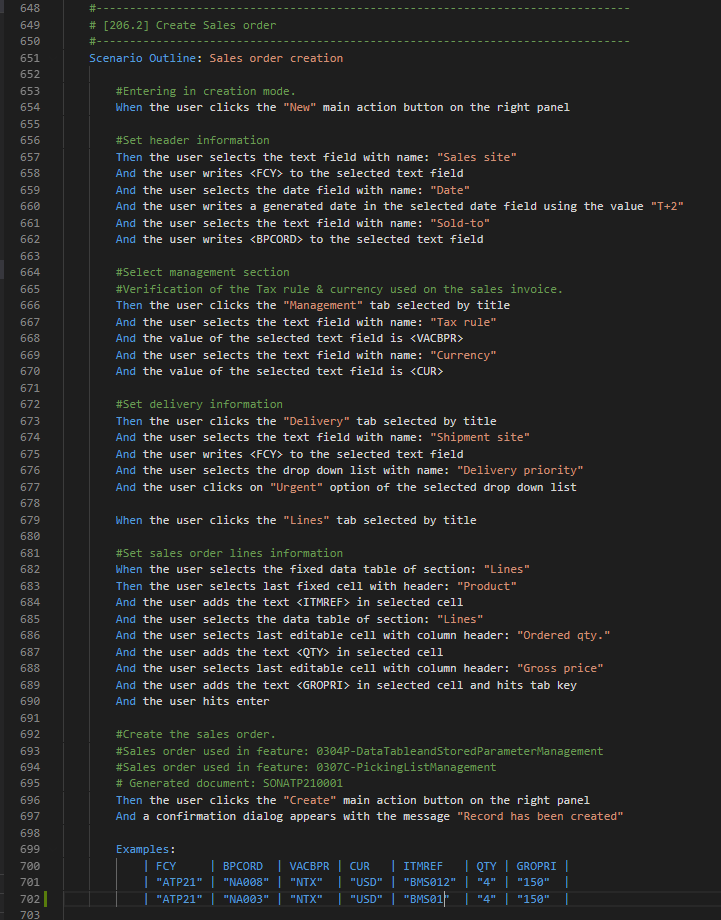
Example of a scenario outline
The following scenario is for a "scenario outline," which is a type of scenario used for running the same test multiple times with different datasets for each iteration.
The values defined between the delimited characters "<>" are the parameters.
Under the Examples tag, a data table delimited by pipe characters | declares the parameters and their corresponding values.
In this example, the scenario outline will be executed twice:
The first time to create a sales order for customer NA008 and the product BMS012, and the second time using a different customer, product and price according to the data in the parameter values in the data table.
Recommendations
The Examples section corresponds to the last section of the scenario outline. All the step definitions for the scenario outline should be written before this section. After the Examples section, a new scenario or scenario outline should be started, or the test should end.
When you write scenario outlines, it is recommended that the step definitions to open and close the function should be set outside of scenario outline. If you keep the step definitions to open and close the function inside of the scenario outline, they are executed at each iteration of the scenario outline.
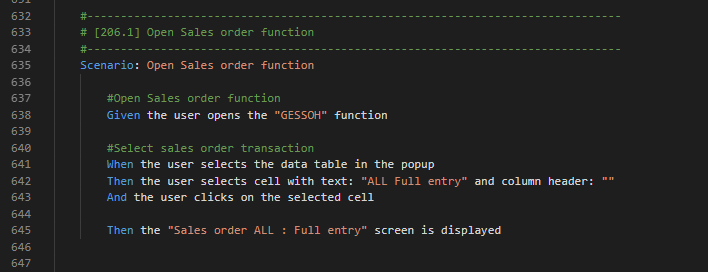
Scenario and scenario outline examples
The first scenario consists of opening the required function or entity.
The second scenario is a scenario outline. This scenario consists of creating the necessary data with different values for each iteration.
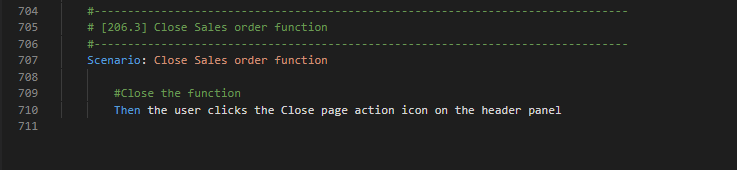
The third scenario consists of closing the required function that was opened.
Writing automated tests
How to fine the x3name for a field
When you write automated test with (Undefined variable: Sage_X3.X3ATP), you can select the graphical components either by the field name (field description) or by the x3name (X3 field code) in the HTML code.
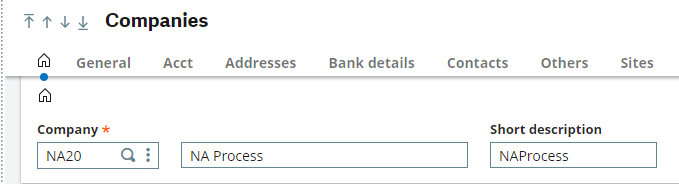
Let’s take the example of the companies’ functionality.
The company text field can be selected by its field description.
And the user selects the text field with name: "Company"
However, the long description doesn’t have field description, so you need to identify it by selecting X3 field name.
And the user selects the text field with the x3name: "CPY0_CPYNAM"
How to find the x3name for a text field
-
Using the screenshot above as a model, place your cursor over the UI graphical element (text field) containing the value NAProcess.
-
Right-click and select Inspect.
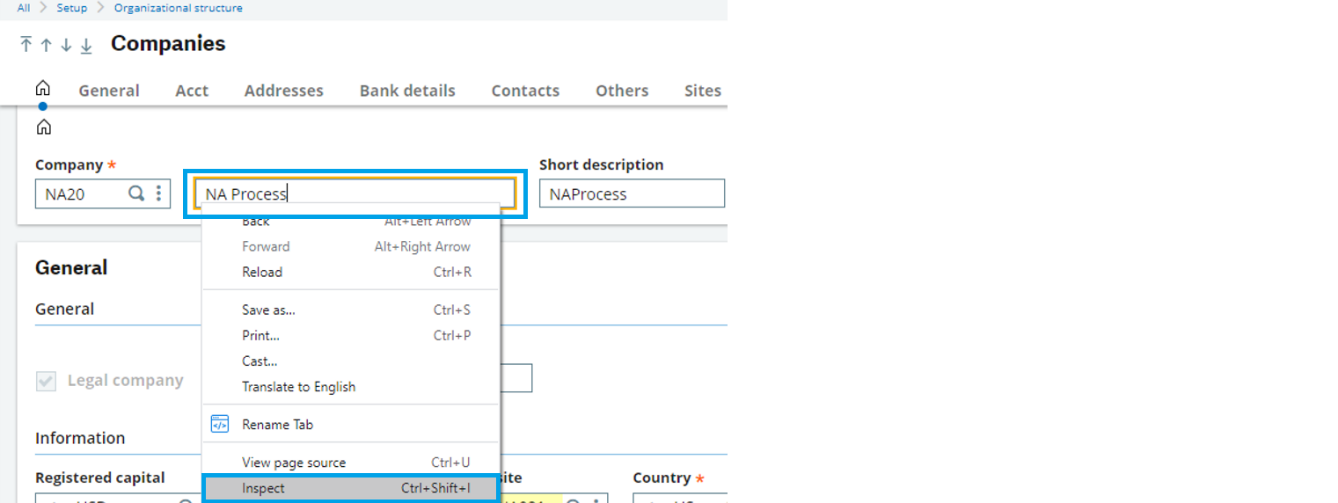
The HTML code for the page displays. The x3name for the text field is in the data-s-field-x3name tag.

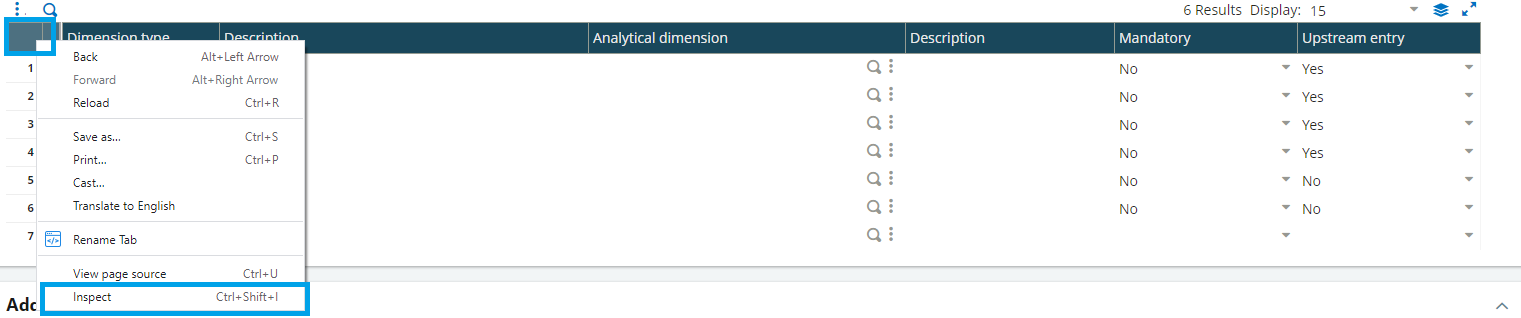
How to find the x3name for a data table
-
Click the left top corner of the data table, right-click and select Inspect.
-
In the HTML code for the data table is in the data-s-field-x3name.
This data x3name value contains the keyword ARRAY.

Recommendations
Should you use the x3name or the field description in the UI? There are pros and cons for each solution.
When an automated test is written using the field description, it is easier to write the automated test and to maintain it. The readability of the test is more user-friendly. However, you need to review and potentially update the automated test each time the field translation changes.
On the other hand, the x3name is not impacted by updated UI translations. Keep in mind that it is not always possible to select the graphical components by their x3name, (e.g,. left list, right list, screen title, messages). Also, it takes more time to write the automated test because you need to search for the x3name for each field. If you write automated test using the x3name, the translation change won’t be detected by the Sage X3 Automated Test Platform.
Types of automated tests
Remember when you write automated tests:
-
CRUD: You use this type to test simple object Create, Read, Update, Delete actions
-
FLOW: You can create more complex tests for generating a business flow such as creating a sales order, creating a delivery by selecting the sales order, generating a sales invoice by selecting the delivery, etc… You can also validate the different controls developed for a specific functionality.
-
GraphQL: type of tests aimed at executing GraphQL queries or mutations
Refer to Executing GraphQL queries & mutations (Extensibility) in the Extensibility framework documentation.
Recommendations and principles
Complex automated tests have a very high risk factor regarding time to maintain them.
The automated tests should be short: to keep the execution time acceptable and easy to maintain. Don’t try to test everything in a single automated test. The automated should be split into smaller use cases independent from one other.
The automated tests should be independent. If you want to avoid conflicts when the automated tests are executed, they should use their own data.
When multiple people are running automated tests, each person should use their own dataset. Create your own data (your own company, customer, etc...).
Do not modify someone else's data. You risk causing their automated tests to fail.
Using stored values
In certain situations, Sage X3 generates documents and data with automatically and dynamically created reference numbers.
-
Because the sequence number is generated dynamically, it is not possible for the Sage X3 Automated Test Platform to predict which value will be assigned to the new document created.
-
It is important to create your automated tests to be generic, so they can be executed several times without having to modify the test each time you need to execute it again.
The Sage X3 Automated Test Platform makes it possible to store the value of a given text field or a given data table cell into a stored value that can be reused later in your test.
-
A stored value is only usable in the feature file in which it has been created.
-
It means the stored value can only be used inside the current feature file and can’t be passed to another feature file. The stored value saved in memory is deleted once the test execution is completed successfully or not.
This is a business flow sample: 0202B-PurchasesStandardFlow
This flow creates a purchase order, then creates a receipt by selecting the purchase order previously created.
Because the purchase order reference changes every time a new order is created, how can you make the test dynamic?
This requires using stored values.
To make this automated test fully dynamic, as soon as the purchase order document is created, the value of the purchase order reference dynamically generated is saved in a stored value.

Later, this stored value is reused during the receipt creation so that the created purchase order can be selected.

Recommendation
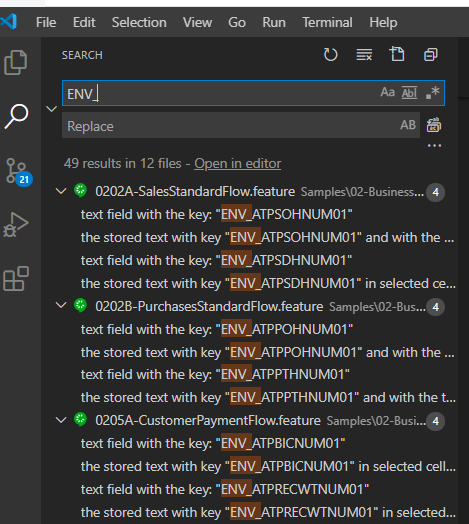
When you create a stored value, use a naming convention that makes easy to search from in your tests or in VS code. In this sample, the stored values are prefixed with ENV_ so they can be easily found in all the tests.
Since Sage X3 Automated Test Platform version 2.3.0, the stored values capability has been enhanced. You can use stored values directly to write or verify dynamic values in:
-
Text fields
-
Text editor fields
-
Text area fields
-
Password fields
-
Data table cells
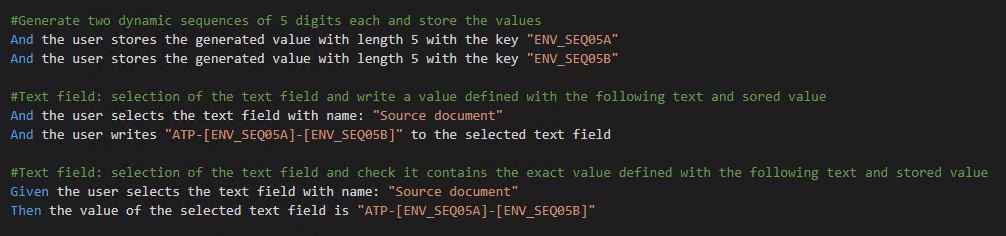
In these cases, stored values need to be between square brackets.
In addition to the new stored values management, a new step definition has also been implemented. It allows you to generate a dynamic sequence and store the result into a stored value.
For more information on how to use stored values, consult the Sage X3 Automated Test Platform - Step definitions guide.
Using user stored values
Thanks to the user stored values functionality available with Sage X3 Automated Test Platform version 2.4.0, you can create your own set of parameters with their respective values.
Contrary to stored values which are instantiated during the executing of your test, user stored values are specific parameters defined with their respecting values in a user-stored-values file which is loaded in memory before each test is executed.
To use the user stored values capability:
-
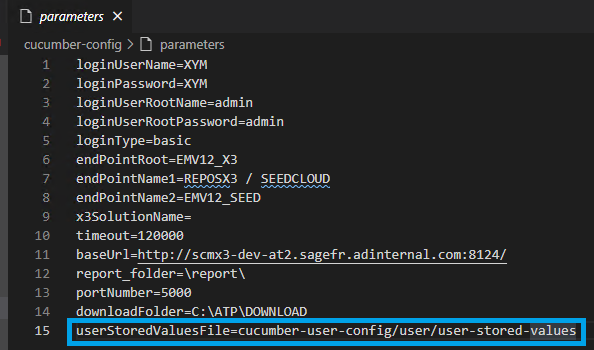
The userStoredValuesFile parameter can be defined in the parameters or parameter-cloud-chrome files.
-
This parameter contains the path of the specific user-stored-values file that contains the user parameters and their respective values.
-
This parameter is optional.
-
At the beginning of the execution, if the userStoredValuesFile parameter contains an incorrect path, no feature will be executed. The execution will directly stop with the following error message:
parameter userStoredValuesFile: cucumber-user-config/user/<FileName> file not found
-
If the parameter is not defined or left blank, no user-stored-values file is loaded.
-
-
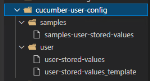
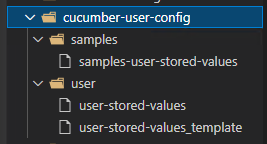
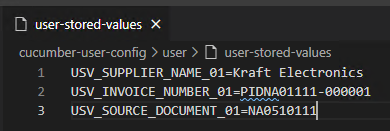
The user-stored-values file is located in the cucumber-user-config folder.
-
Like for static parameters defined in the parameters or parameters-cloud-chrome files, the user-stored-values file contains the list of parameters with their respective values.
-
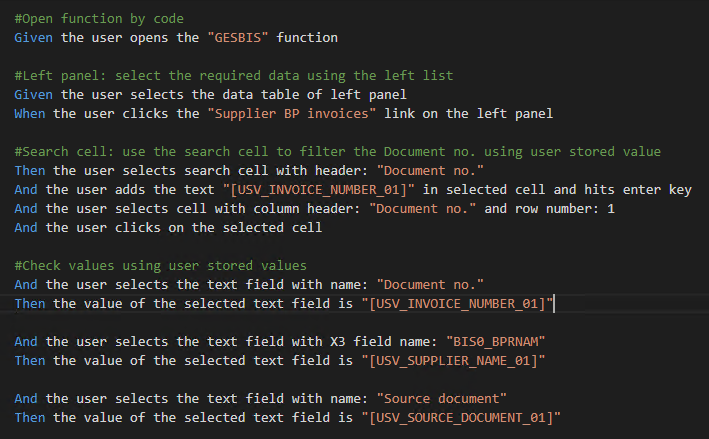
As for the stored values, you can use the user stored values to write and verify dynamic values in text fields, text area fields, text editor fields, password fields, or data table cells by encapsulating them between square brackets.
Recommendation
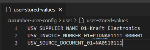
When you create a user stored value, use a naming convention that makes it easy to search from in your tests or in VS code. In this sample, the user stored values are prefixed with USV_ so they can easily be found in all the tests and the user-stored-values file.
-
It is possible to manage several user-stored-values files and to name them with your own naming convention. However, it is only possible to load one user-stored-values file per execution.
-
The user stored values are instantiated prior to each feature (test) execution and are active for each feature executed. The user stored value is deleted once the feature execution is completed.
-
If you modify its value during the feature execution, this will impact only the current feature executed and not the other feature that can use the same user stored value.
-
Like for stored values, it is not possible to move a user stored value from one feature to another. The user stored value is active during the entire feature execution and across all the scenarios of the current test executed.
-

Executing tests in parallel
Sage X3 Automated Test Platform version 3.0.0 allows to run automated tests in parallel.
-
The maximum number of executors depends on your configuration and can’t exceed the MAXATP value defined in your Sage X3.
-
This information can be found in Sage X3 / Warehousing in the following functionality Administration > Administration > Licenses > Licenses data
-
Click your license to display the license information.
-
Scroll to the parameters section and look for the parameter Number of ATP users parameters (MAXATP)
-
Default Sage X3 Automated Test License are sold with 5 users.
-
-
Refer to Running simultaneous tests in VS Code
-
Setup MAX_INSTANCES parameters
-
It recommended not to set MAX_INSTANCES with a value greater than MAXATP -1 and depending on the number of concurrent access your Sage X3 web server can support.
-
-
Setup timeoutLocks parameters.
-
Why run tests in parallel
Running tests in parallel, allows to decrease the time of tests executions. It also Allows to test concurrent executions of functionalities.
-
However, by running tests in parallel, tests can conflict with each other provoking lock in Sage X3.
-
With Sage X3 Automated Test Platform 3.0.0 new step definitions have been included to prevent locks from happening in Sage X3 when the tests are executed in parallel.
the user adds the lock entry "(.*)"
the user removes the lock entry "(.*)"
How to write tests to avoid locks in your SageX3
Let’s take the example of the following sample features which try to modify the same document.

-
In this example, two tests are trying to interact in the same function with the same record.
-
Note the tests should be independent of each other and not use the same document. However, this example has been done on purpose to explain how to avoid the tests to conflicts with each other.
-
The first thing to consider will be to make sure the tests are data independent: meaning the tests should use different data.
-
-
However, even doing so, it can happen in certain cases that one test locks very briefly a record and so the other test that need to interact with this record will fail.
-
To avoid this colliding issue, it is necessary to add additional step definitions to prevent the tests from conflicting with each other.
-
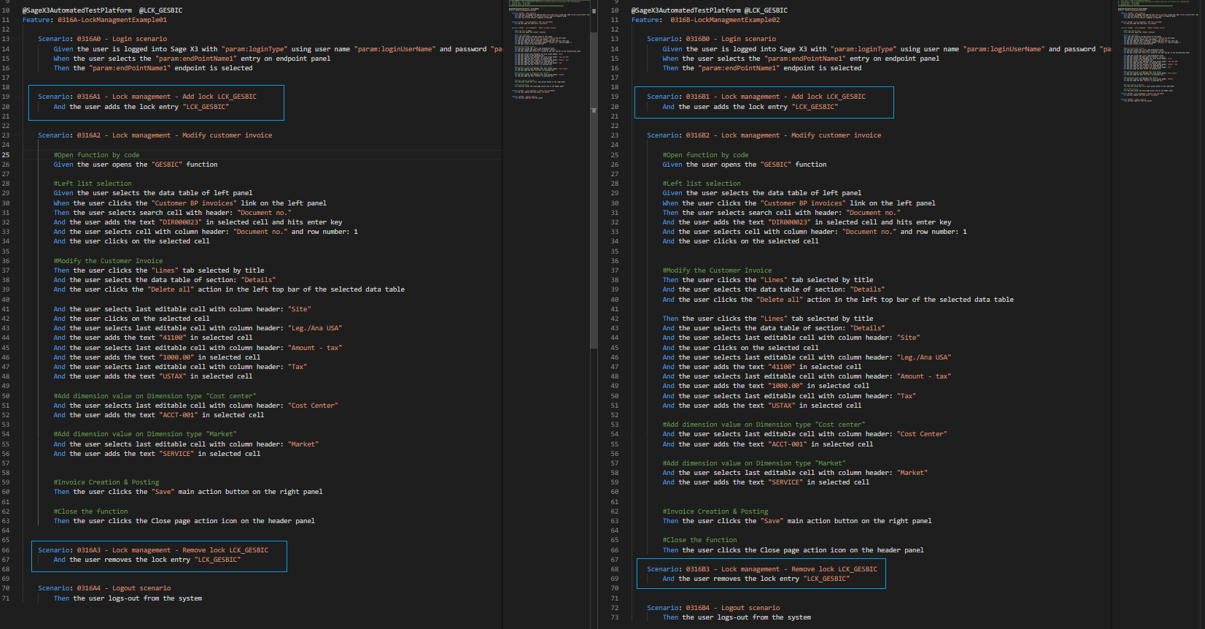
In the following example, the lock occurs on the GESBIC function. So, it is necessary to make sure the lock is activated before entering the function and remove it once all the interactions in this function is completed.
-
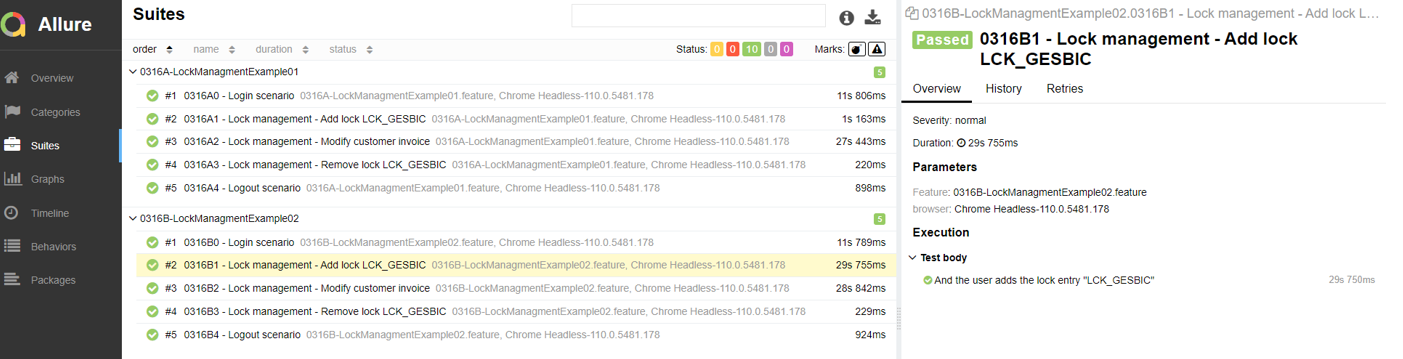
The same lock code is added and removed on both tests. (e.g. LCK_GESBIC) in a dedicated scenario.
-
-
In addition to the lock scenario, you can also add a tag on your test using the same naming convention as the one you use for the lock code.
This will allow you to execute again in parallel all the tests that are defined with the same tag (e.g. @LCK_GESBIC).

-
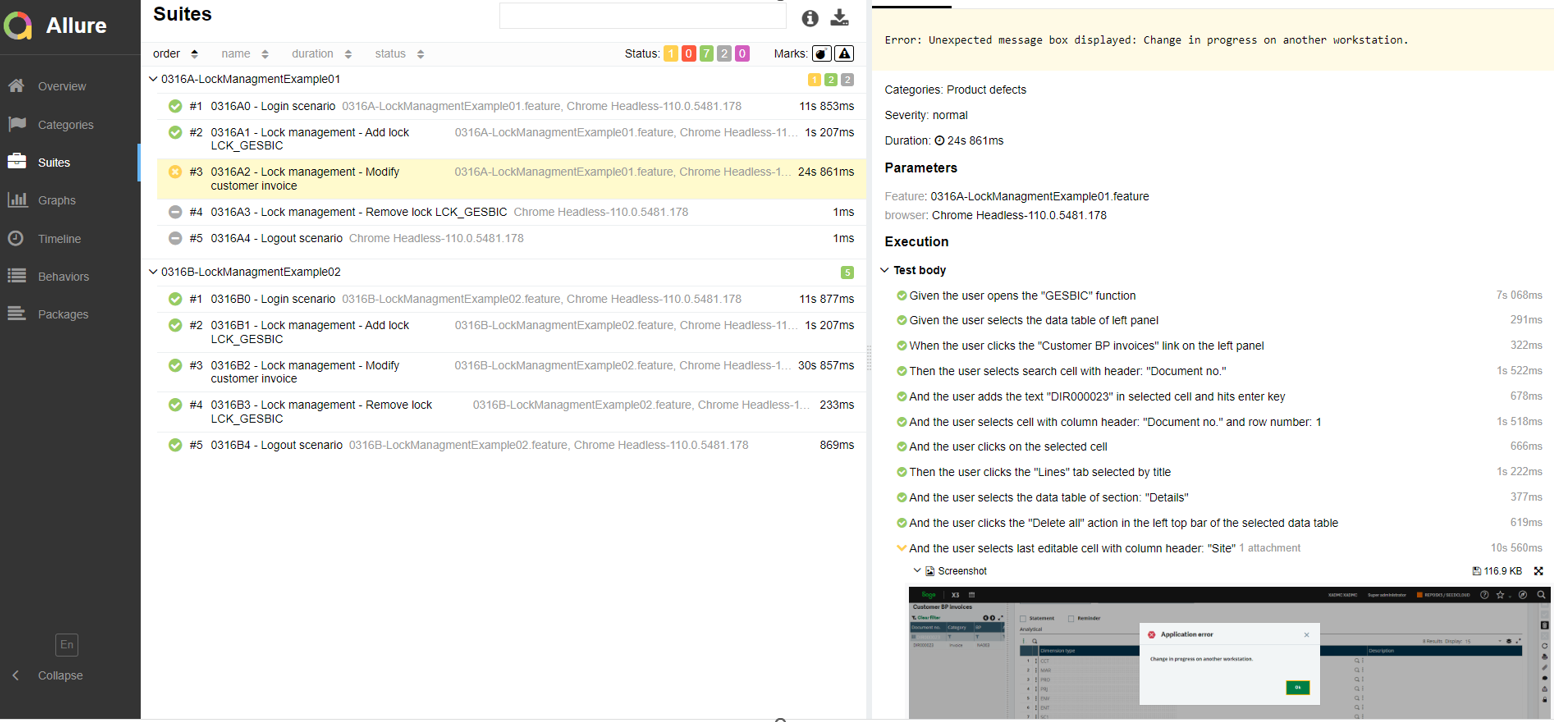
Let's verify the execution of the two tests in parallel.
-
Refer to: Running simultaneous tests in VS Code
-

-
Now, because of the lock mechanism is activated for those two tests and because they are sharing the same lock code, the second test has waited for the first one to remove the lock before continuing with the execution. Both tests passed without conflicting anymore with each other.
Recommendation to write test for parallel execution.
-
Executing tests in parallel can be difficult to manage. This should be done in a secondary step when your tests are already working well with a single instance.
-
All tests conflicting with each other’s, should share the same lock identifier.
-
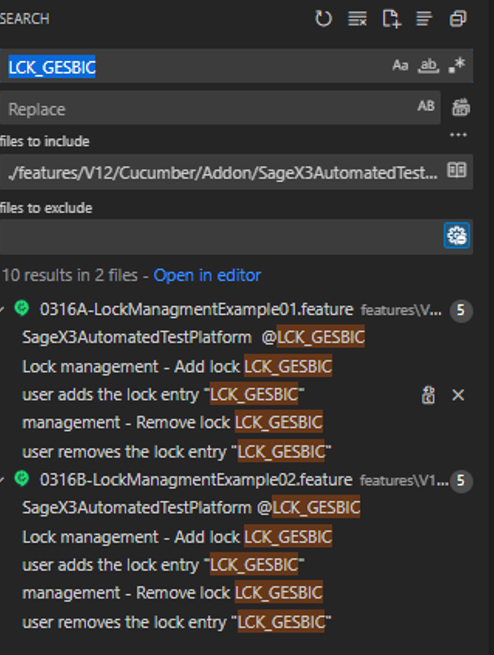
The lock code given should be a unique identifier that is easy to look for.
-
For instance, in the example above all the lock codes starts with the prefix “LCK_” which makes it easy to find them using visual studio code.
-
-
In the easiest case, adding a lock will consist in preventing several functions from being opened at the same time. Generally, you will create a specific scenario using the lock step definitions prior / after the business scenario that opens the specific business function. It is recommended to add the lock code to the scenario description, so you can quickly identify it in your test or in allure report.

-
It is not prohibited to add / remove a lock into a business scenario (for instance in the GESBIC modification scenario),
-
However, it can make the maintenance more difficult.
-
But for performance reasons, it can be interested to remove the lock before closing the function, especially if the current business scenario takes too much time.
-
Locking a scenario for too long will increase the tests execution time.
-
The maximum time the Robot is waiting for the lock to be removed corresponds to the value defined in the parameters timeoutLocks.
Note - warningWhen you add a lock in memory, don't forget to remove the lock from memory, otherwise the lock will be removed only once the tests execution is completed. For performance reason, and to avoid increasing the duration of the test executions, the lock should be removed when it is not anymore necessary in the test.
-
-
When you execute a test that pass with a single instance and fails when running multiple instances, it means you may have tests conflicting with each other’s.
-
use allure report timeline to identify, which tests were executing in parallel.
-
For instance with MAX_INSTANCE =4 , 4 tests executed in parallel.
-
-
Try to run those tests in parallel from vscode to identify from where the problem comes from.
-

Executing GraphQL queries & mutations (Extensibility)
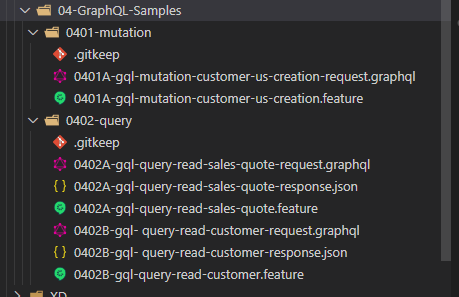
Since Sage X3 Automated Test Platform 3.2.0 it is possible to test GraphQL Queries and mutations. Samples can be found in Samples/04-GraphQL-Samples.
GraphQL tests structure
Tests are organized per type of tests: queries or mutations.
-
For the queries, you have 3 files:
-
the cucumber feature.
-
the GraphQL query.
-
the GraphQL response (if you want to validate the entire response).
-
-
For mutations, you have 2 files:
-
the cucumber test.
-
the GraphQL mutation.
(compared to GraphQL query,there is no file to compare the expected response with the actual response returned by Sage X3, as the values of the actual response can differ at each execution (e.g. timestamp))
-
GraphQL tests codification
-
It is recommended to differentiate cucumber GraphQL tests from regular cucumber tests (CRUD/FLOW).
-
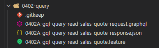
To easily differentiate queries and mutations, it is also suggested to separate them from each other and to add the type of GraphQL tests in the name of the test to facilitate the monitoring in allure report.
-
Example of codification:
Parameters and Parameters-cloud-chrome
By default, browserLanguage parameter is delivered with language en-US.
If you don't define the parameter browserLanguage, the browser will be displayed by default in en-US.
- Refer to Setting up your parameters
- Refer to Running simultaneous tests in VS Code
Step definitions
| Type | step definitions | Examples | |||||
| 1 | GraphQL - redirect the Robot to GraphQL query API page | the user opens the application on a desktop using the following link: \"(.*)\"
|
the user opens the application on a desktop using the following link: "/xtrem/explorer/" |
||||
| 2 | GraphQL - write the query / mutation | the user writes\"(.*)\"GraphQL request
|
the user writes "./0402B-gql- query-read-customer-request.graphql"
|
||||
| 3 | GraphQL - query / mutation execution | the user clicks the \"(.*)\" button in the GraphQL page header
|
the user clicks the
|
||||
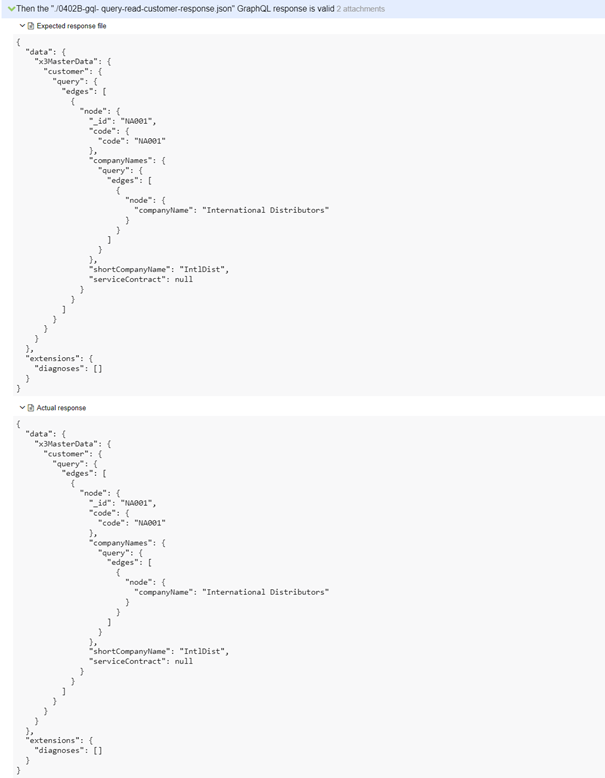
| 4 | GraphQL - response full validation |
|
the "./ 0402B-gql- query-read-customer-response.json" GraphQL response is valid
|
||||
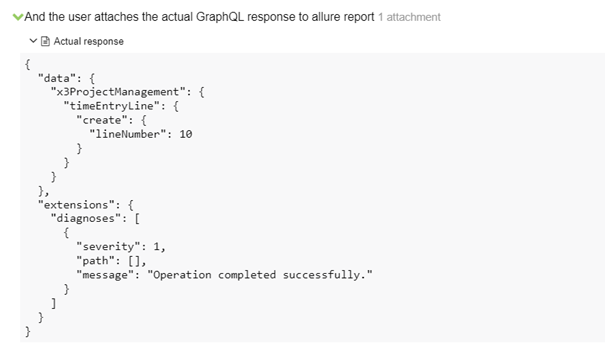
| 5 | GraphQL - attach the expected / actual response to allure report | the user attaches the actual GraphQL response to allure report
|
|||||
| 6 | GraphQL - response property selection | the user selects the\"(.*)\" GraphQL property
|
When the user selects the "data.xtremX3MasterData.customer.query.edges[1].node" GraphQL property
|
||||
| 7 | GraphQL - Extract the property value into a stored value | the user stores the selected the GraphQL property with the key: "(.*)"
|
the user stores the selected the GraphQL property with the key: "ENV_POHREF"
|
||||
| 8 | GraphQL - element of the response validation with exact match
json format is requested |
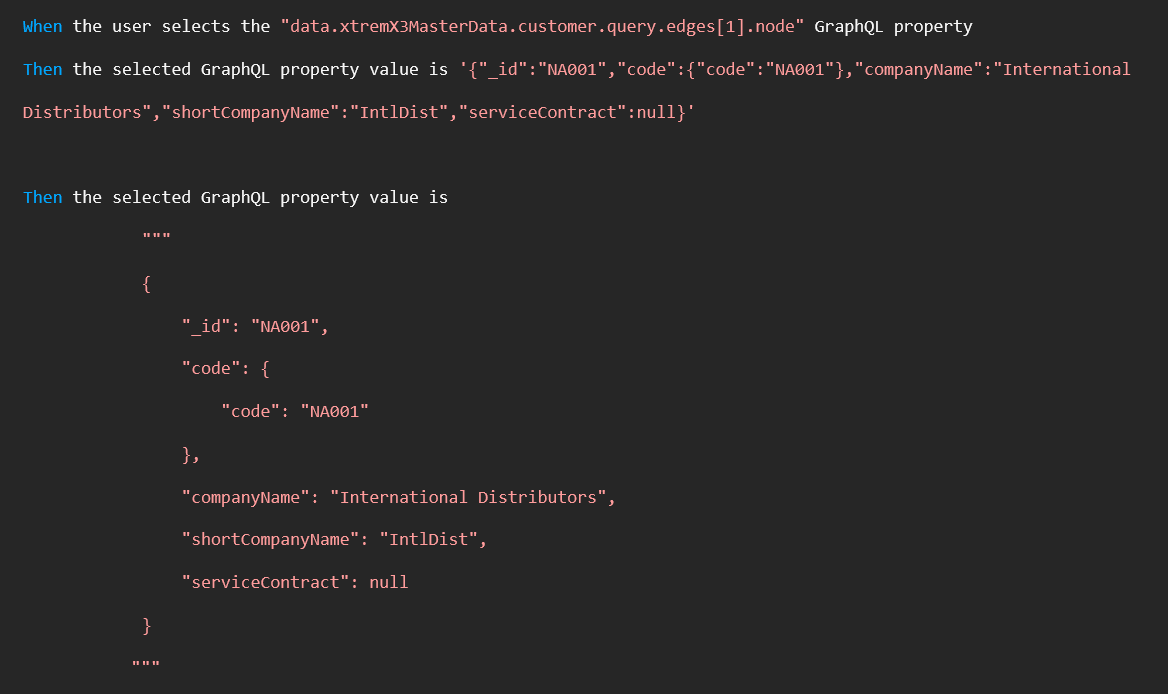
the selected GraphQL property value is '(.*)'
the selected GraphQL property value is
"""
"""
|
|
||||
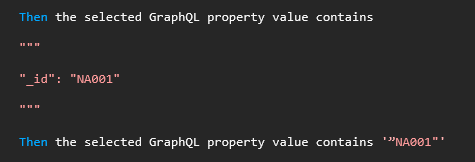
| 9 | GraphQL - element of the response validation by contains text format is requested |
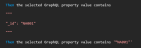
the selected GraphQL property value contains'(.*)'
|
|
||||
| 10 | GraphQL - element of the response - negative test case
json format is requested |
the selected GraphQL property value is not '(.*)'
the selected GraphQL property value is not
"""
"""
|
|
||||
| 11 | GraphQL - element of the response negative validation by contains |
|
|
||||
| 12 | GraphQL -Count the number of property | the number of "(.*)" in the selected GraphQL property is "(.*)" | the number of "node" in the selected GraphQL property is "3"
|
||||
| 13 | GraphQL tool – Select the tab | the user clicks the "(.*)" tab in the GraphQL page
|
|
||||
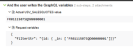
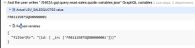
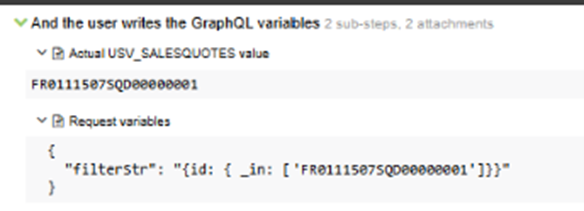
| 14 | GraphQL tool - write variables |
|
And the user writes the GraphQL variables
|
||||
| 15 | GraphQL tool - write headers | the selected writes the GraphQL headers
|
|||||
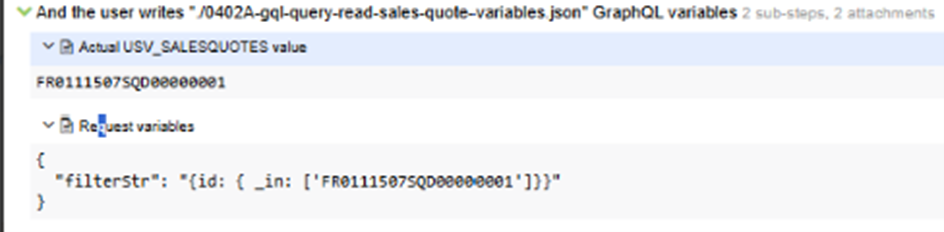
| 16 | GraphQL tool - write variables from json file | the user writes "(.*)" GraphQL variables
|
|
||||
| 17 | GraphQL tool - write headers from json file | the user writes "(.*)" GraphQL headers
|
And the user writes
|
Examples
-
Refer to the Step definitions guide – GraphQL step definitions
Additional information
Response property selection
When the property is returned several times in the GraphQL reponse, you can define the occurrence number, to select the required property or group of property.
Example:
data.x3MasterData.customer.query.edges[2].node
Element of the response validation
You can use the step definitions (7) to verify the content of the GraphQL response with exact match or step definition (9) to do a negative test.
- The information provided in parameter should be consistent with the json syntax.
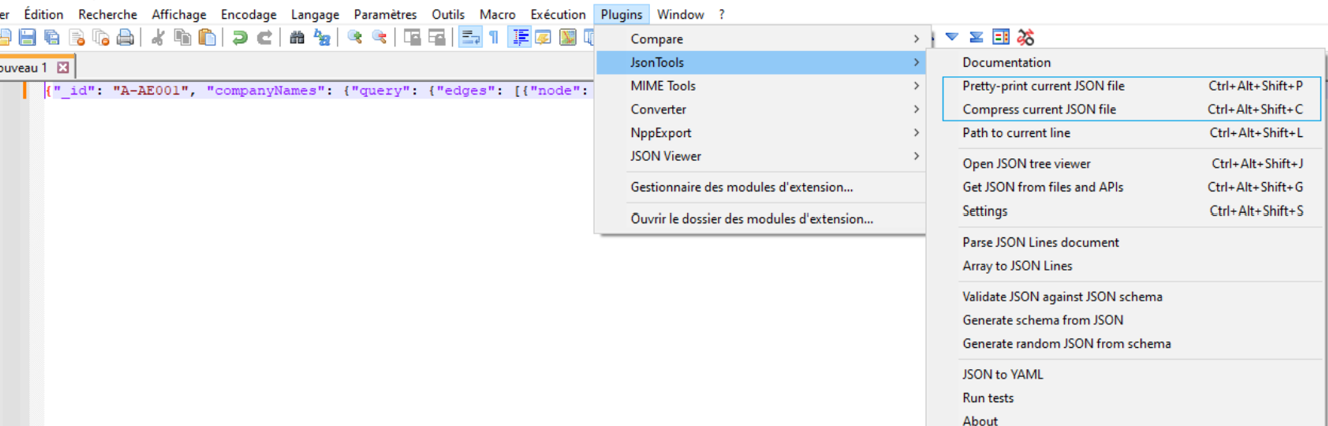
- To format the json “in line” or “in block”, you can use notepad++ plugin (e.g JsonTools) , to pretty or compress the json.
-
If you don't provide a correct json syntax, the following error will be returned at execution time:
SyntaxError: Unexpected end of JSON input -
Example for formatting:

When using the step definition (8 with contain), simple text format is expected (json format is not allowed).
-
Example:
-
In case multiple verifications are required, you have to repeat the step definition for each verification needed.
Allure report
In allure report you can find the different GraphQL attachments attached to the specific step definitions.
Query / Mutation attachment
-
Attachment corresponds to the query / mutation GraphQL file defined in the test.


Expected / Actual response attachment
-
Expected response attachment corresponds to the GraphQL response file defined in the test.
-
Actual attachment corresponds to the GraphQL response returned by SageX3 application.

Actual response attachment
-
Attachment of the actual response returned by Sage X3 application.
-
It is use for the mutation, where it is not possible to define a GraphQL response file in the test as some elements of the response are changing at each execution.

Variables / headers attachment
-
Attachment of variables or headers loaded by block of text
-
Attachment of variables or headers loaded by json files
Allure pdf report
When printing allure report in pdf that contains GraphQL tests, it is also possible to print in the pdf file the allure attachment.
-
Refer to Setting up Allure pdf functionality and make sure the file allure-config/allure-configuration.json contains the following properties.
-
You can copy past them from allure-config/allure-configuration_template
Properties to add in "PageLayout"
-
"DisplayTextAttachment": true
Properties to add in "TextFormat"
-
"TextAttachmentFont": "Helvetica", -
"TextAttachmentSize": 7, -
"TextAttachmentFormatOptions": {"Bold": false, "Italic": false, "Underline": false, "Color": "black"}
Verifying XML files and controlling E-Invoice / E-credit-note conformance validation
XML File content verification - step definitions
Those step definitions allows to control XML files content.
| Type | Step Definitions |
| Files - renaming |
the user renames the file
|
| XML - read files |
the user reads the
|
| XML – read XML from stored values | the user reads the XML file from the stored key "(.*)". |
| XML - select the XML path | the user selects the "(.*)" XML path and occurrence (.*) |
| XML - verifies value |
the value of the XML path is
|
| XML - count the number of occurences | the number of occurrences for XML path "(.*)" is (.*) |
| XML - verify the content (for less technical user) |
the XML files contains
|
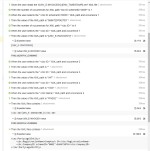
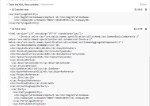
Extract from sample 0312D-ControlXMLFile
#E-Invoice: Renaming the XML file for archiving and concurrent execution purpose
Scenario: 0312D2 - Rename XML file
And the user stores the generated value with length 5 with the key "ENV_TIMESTAMP"
And the user renames the file "[USV_E-INVOICE01].xml" with name "[USV_E-INVOICE01]-[ENV_TIMESTAMP].xml"
#E-Invoice: Control the XML file structure
Scenario: 0312D3 - Control XML file
#E-Invoice: [USV_E-INVOICE01] = FR0110209FACLI000005
#E-Invoice: Read the XML file and load it in memory
Given the user read the "[USV_E-INVOICE01]-[ENV_TIMESTAMP].xml" XML file
#E-Invoice: control the number of occurrences
Then the number of occurrences for XML path "cbc:ID schemeID='0009'" is 1
#E-Invoice: select the XML path & control the value
When the user selects the "<cbc:ID schemeID='0009'>" XML path and occurrence 1
Then the value of the XML path is "56847207042703"
#E-Invoice: control the number of occurrences
Then the number of occurrences for XML path "<cbc:ID>" is 5
#E-Invoice: select the XML path & control the value
When the user selects the "<cbc:ID>" XML path and occurrence 1
Then the value of the XML path is "[USV_E-INVOICE01]"
#E-Invoice: Control the content of the XML file
Then the XML files contains
"""
<cbc:ID>[USV_E-INVOICE01]</cbc:ID>
"""
Then the XML files contains
"""
<cac:PartyLegalEntity>
<cbc:RegistrationName>Comptech SA</cbc:RegistrationName>
<cbc:CompanyID schemeID="0002">568472070</cbc:CompanyID>
</cac:PartyLegalEntity>
"""
Extract from sample 0202C-SalesE-invoiceFlow
Scenario: 0202C8 - Extract E-invoice XML
Given the user opens the "EINVOUTGEN" function
Then the "Customer e-invoice generation" screen is displayed
#Fill in the criteria
And the user clicks the "OK" button in the header
And the "Customer e-invoice generation" screen is displayed
And the user selects the data table with the x3 field name: "EINVOUTTV_ARRAY_NBLIG"
Given the user selects row that has the hierarchical cell with text:"INV - [ENV_ATPSIHNUM02]"
When the user selects cell with header: "Status" of selected row
Then the value of the selected cell is "Data snapshot"
And the user opens "Display XML" function on toolbox of the selected row
Then the "Display XML" screen is displayed
#E-Invoice: Store the XML of the E-Invoice into a stored value
And the user selects the text field with X3 field name: "EINVOUTCLB_CLOB"
And the user stores the value of the selected text field with the key: "ENV_E-INVOICE_XML"
Scenario: 0202C9 - Control the E-Invoice XML file structure
#E-Invoice: Read the XML file from the stored key "ENV_E-INVOICE_XML
Given the user reads the XML file from the stored key "ENV_E-INVOICE_XML"
#E-Invoice: control the number of occurrences
Given the user reads the XML file from the stored key "ENV_E-INVOICE_XML"
#E-Invoice: Control the content of the XML file
Then the number of occurrences for XML path "<cbc:ID>" is 18
#E-Invoice: Control the sales invoice number
When the user selects the "<cbc:ID>" XML path and occurrence 1
Then the value of the XML path is "[ENV_ATPSIHNUM02]"
XML Conformance validation - step definitions
Those step definitions allow to control the conformance validation of the E-invoice / E-credit-note
The following step definition execute an API provided by the following site https://www.itb.ec.europa.eu/invoice/upload.
| Type | Step definitions |
| E-Invoice / E-Credit note - run API | the user verifies the (e-invoice|e-credit-note) conformance |
| E-Invoice / E-Credit note - Control API response status | the (e-invoice|e-credit-note) conformance status is (SUCCESS|FAILURE)
|
| E-Invoice / E-Credit note - Control the Error or warning in the response |
|
| E-Invoice / E-Credit note - Control the response doesn't contain any error or warning or messages |
|
API Status code
| Status code | Status code description |
| 200 | Success (for successful validation)
|
| 404 | Not found (for an invalid domain value)
|
| 500 | Error (If a problem occurred with processing the request)
|
Extract from sample 0202C-SalesE-invoiceFlow
Scenario: 0202C8 - Control the E-Invoice XML file structure
#E-Invoice: Read the XML file and load it in memory
Given the user read the "[ENV_ATPSIHNUM02]-[ENV_TIMESTAMP].xml" XML file
Scenario: 0202C9 - Validate E-Invoice conformance
#E-Invoice: Control the E-Invoice conformance
When the user verifies the e-invoice conformance
#E-Invoice: Control the E-Invoice conformance status
Then the e-invoice conformance status is SUCCESS
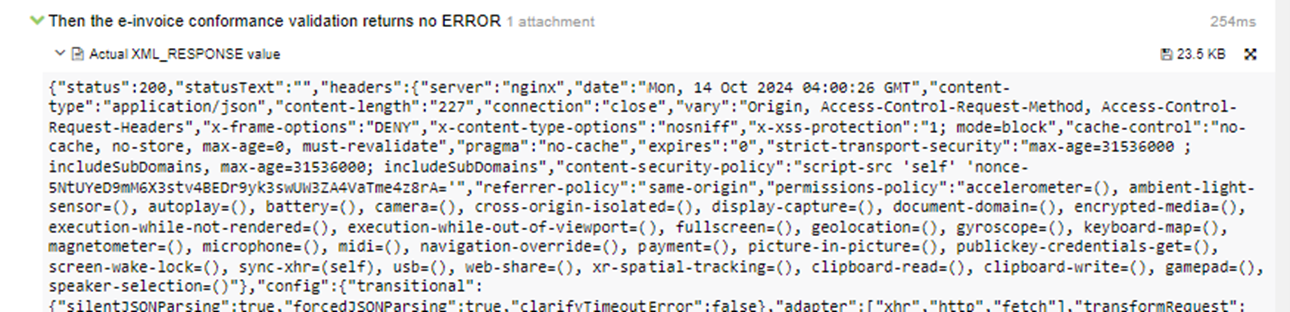
#E-Invoice: Control there is no error / warning
Then the e-invoice conformance validation returns no ERROR
Then the e-invoice conformance validation returns no WARNING
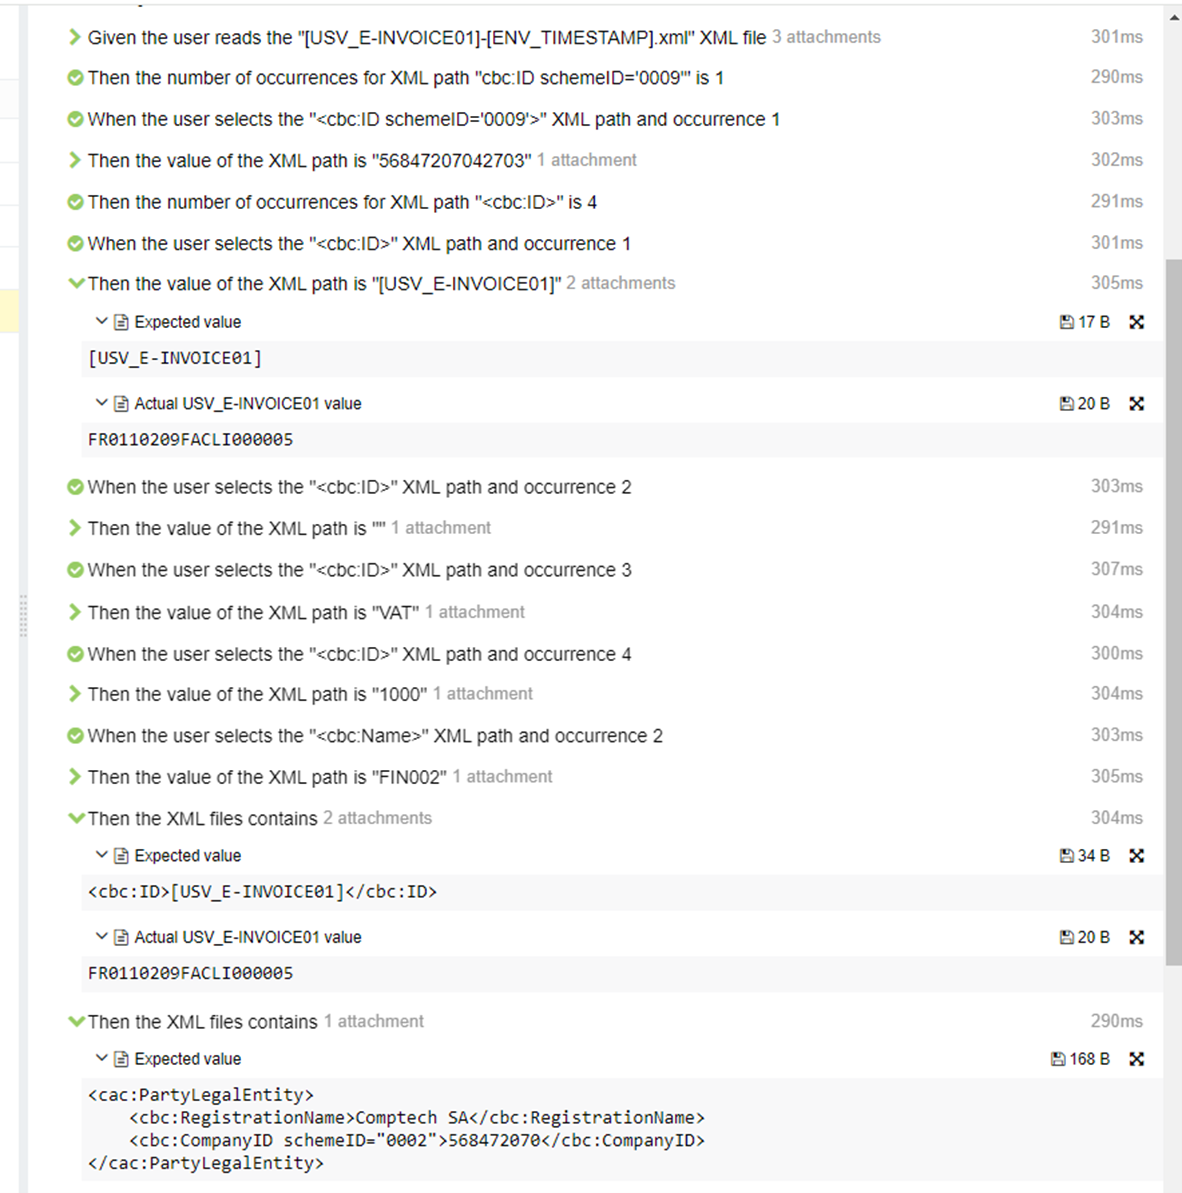
Allure report
In allure report you can find the different XML files attachments
XML read file attachment
When reading the XML file, the XML file is attached to the allure report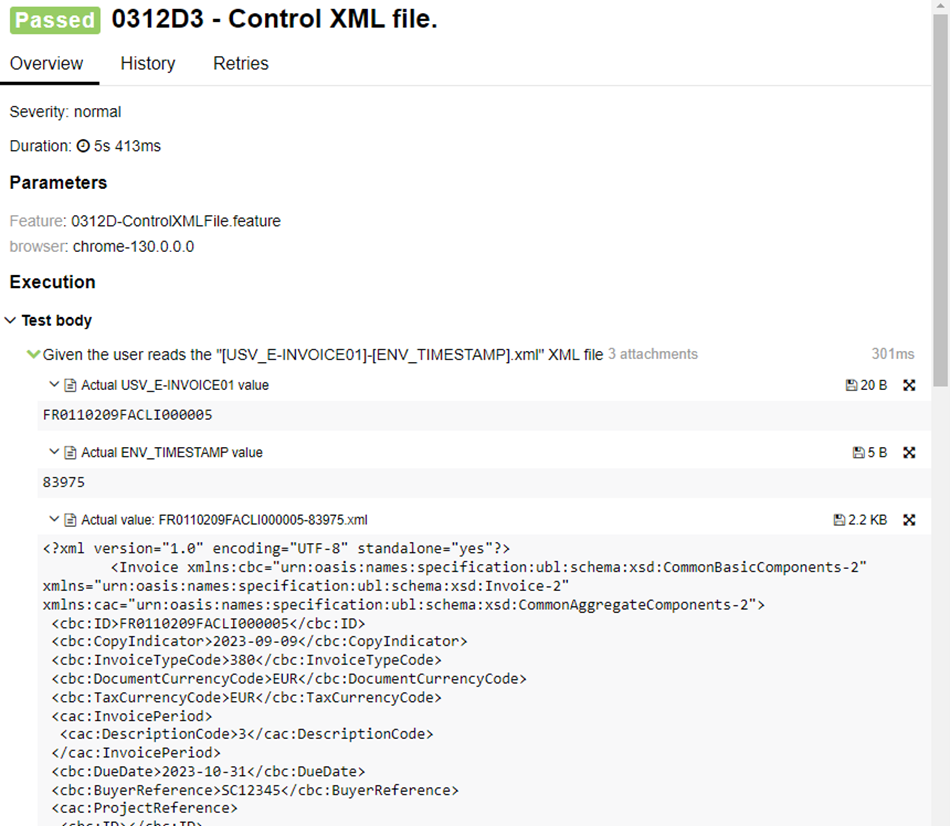
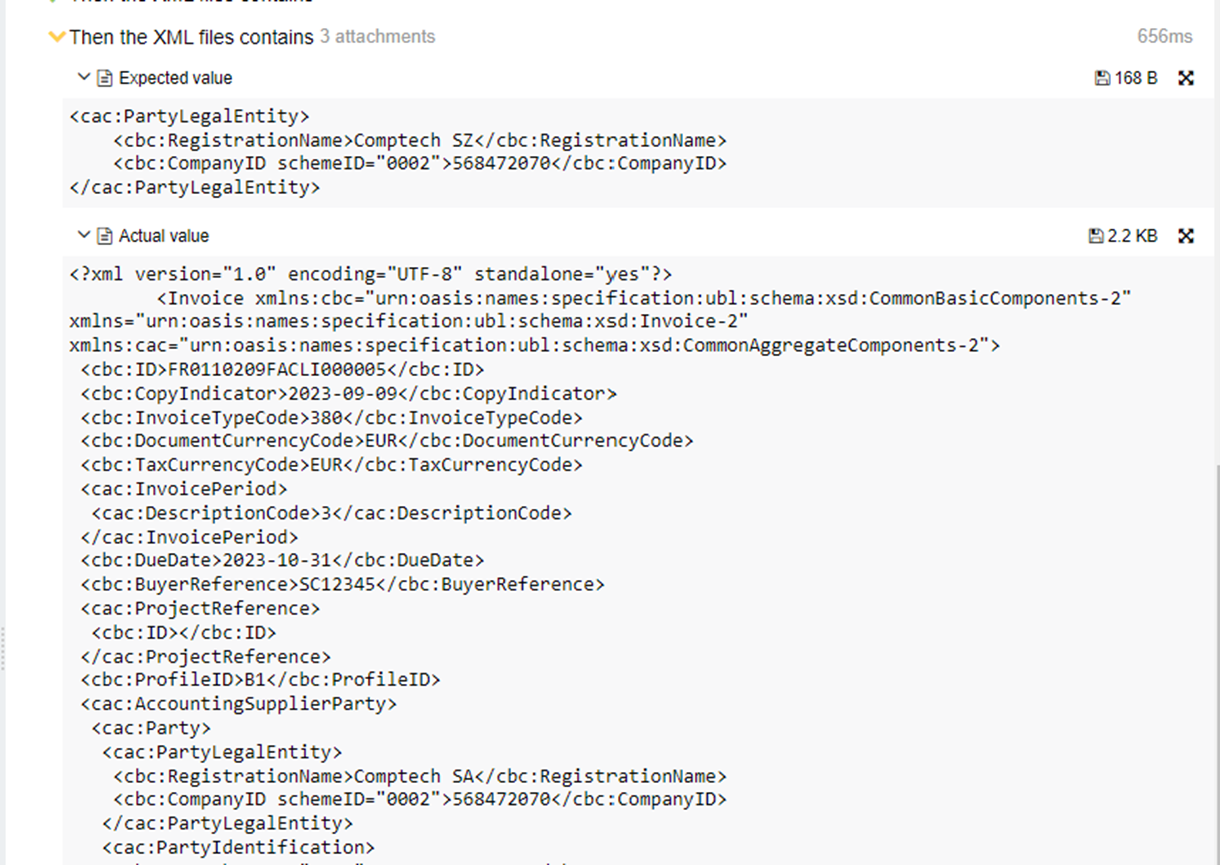
Expected / Actual response attachment
When controlling the content of the XML file
-
In case of success
-
In case of error
Conformance validation attachment
The XML information sent to API is attached to the allure report.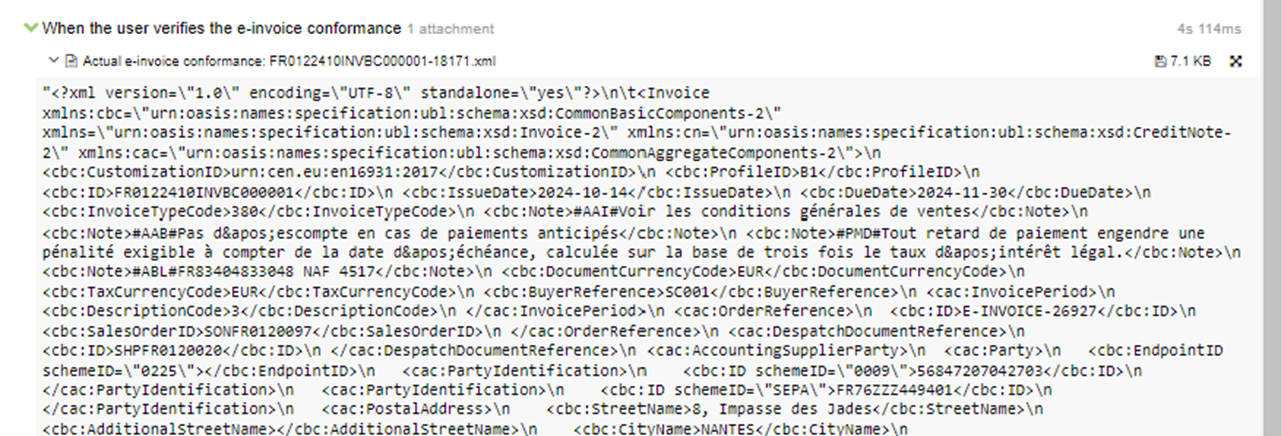
Conformance validation Actual API status attachment
The response provided by the API Is attached to the allure report.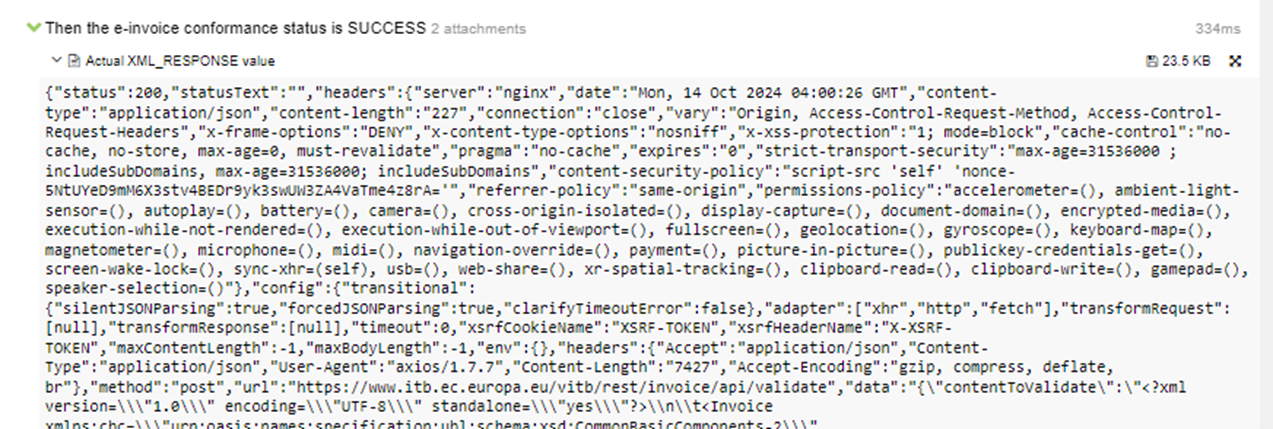
Controlling PDF file
PDF File content verification - step definitions
| Type | Step Definitions |
| Files - renaming | the user renames the file "(.*)" with name "(.*)"
|
Extract from sample 0312C-ReportPrintManagement
Scenario: 0312D2 - Rename PDF report file
And the user stores the generated value with length 5 with the key "ENV_TIMESTAMP"
And the user renames the file "BALGRP.pdf" with name "BALGRP-[ENV_TIMESTAMP].pdf"
| Type | Step Definitions |
| PDF- read file | the user reads the "(.*)" pdf file
|
| PDF - verify content |
|
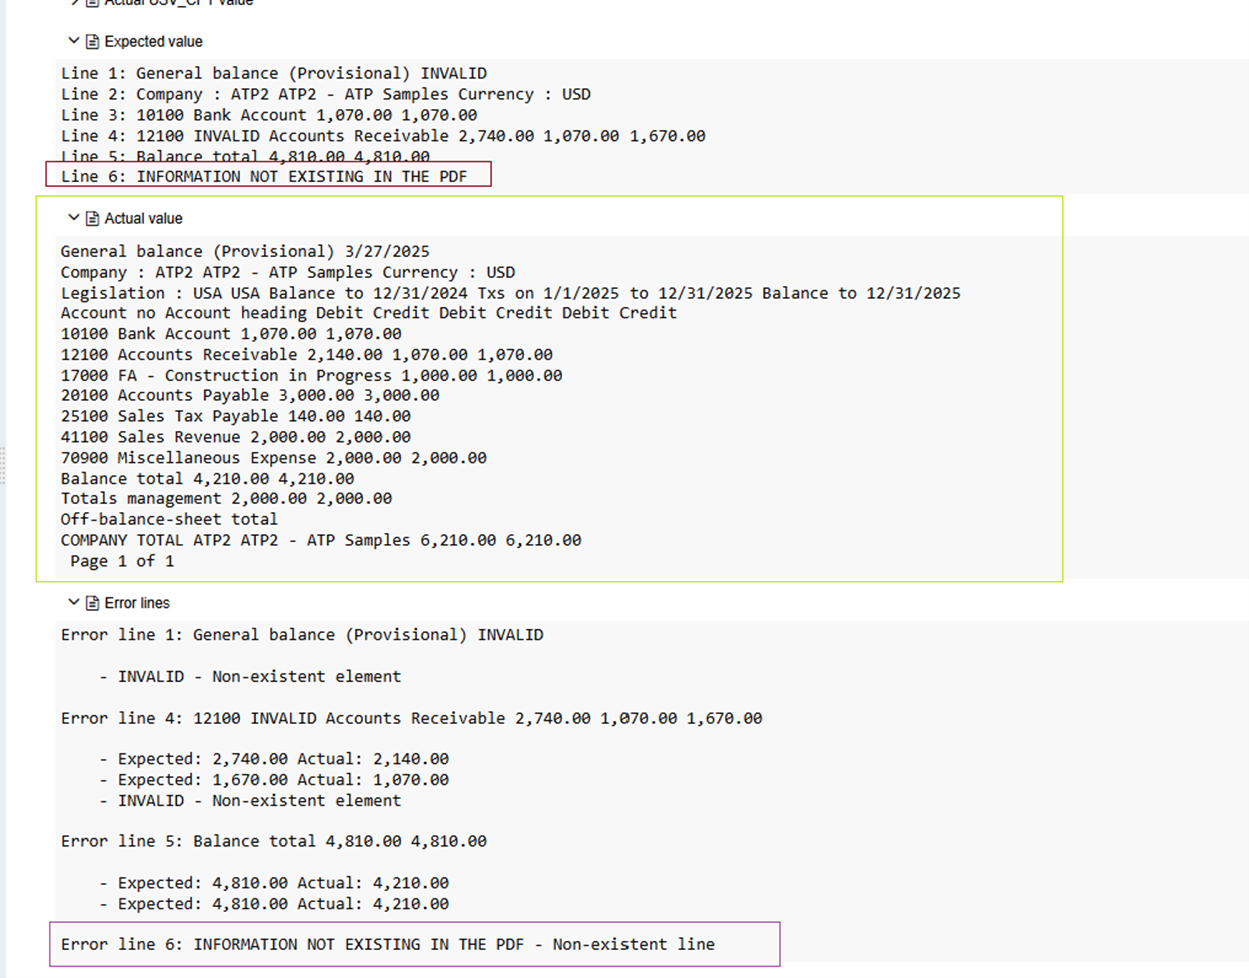
Extract from sample 0312C-ReportPrintManagement
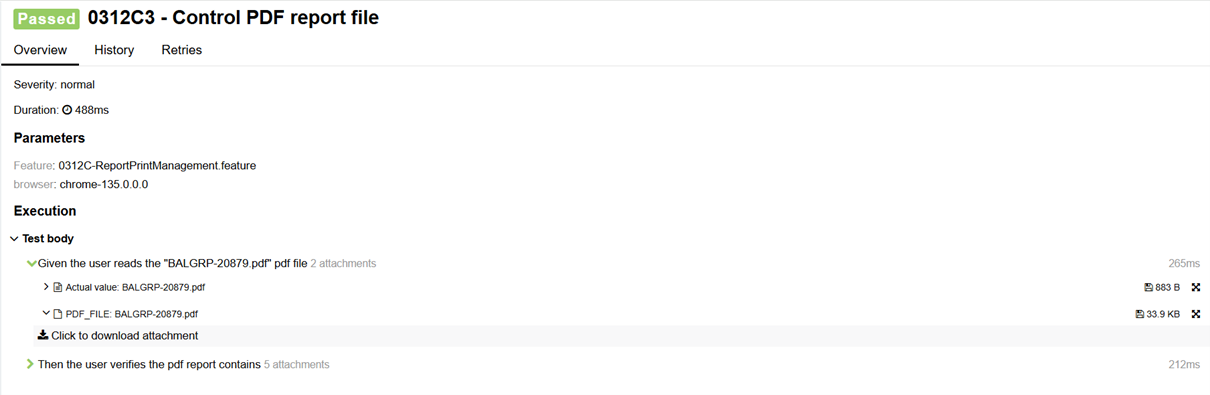
#PDF: Control the PDF report content
Scenario: 0312C3 - Control PDF report file
Given the user reads the "BALGRP-[ENV_TIMESTAMP].pdf" PDF file
Then the user verifies the pdf report contains
"""
General balance (Provisional)
Company : [USV_FCY] [USV_FCY] - [USV_CPY] Samples Currency : USD
10100 Bank Account 1,070.00 1,070.00
12100 Accounts Receivable 2,740.00 1,070.00 1,670.00
Balance total 4,810.00 4,810.00
"""
Allure report
In allure report you can find the different PDF files attachments.
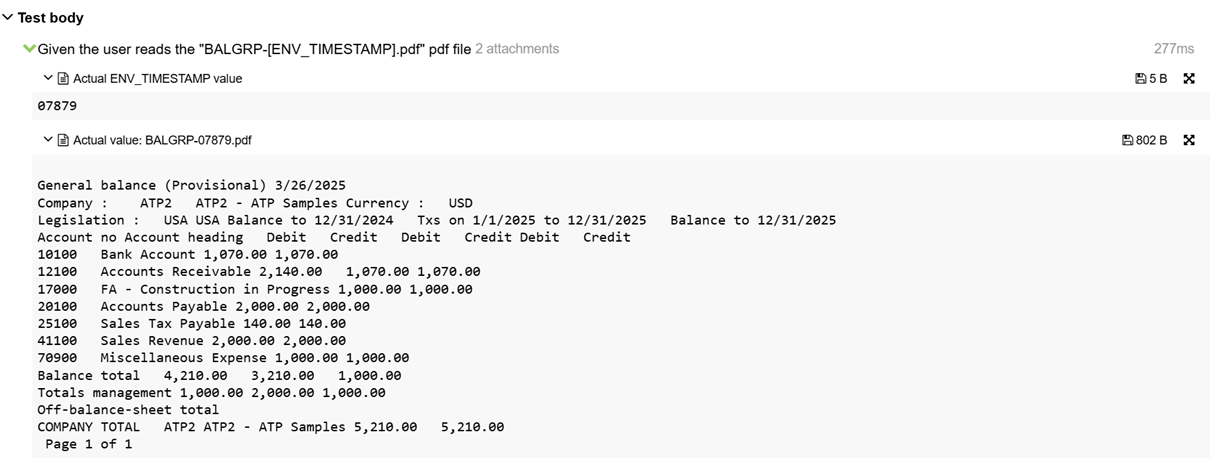
PDF file attachment
-
the pdf parsed is attached to allure report as parsed text
-
the pdf file generated from Sage X3 / Sage Warehousing is attached to allure report
Expected / Actual value attachment
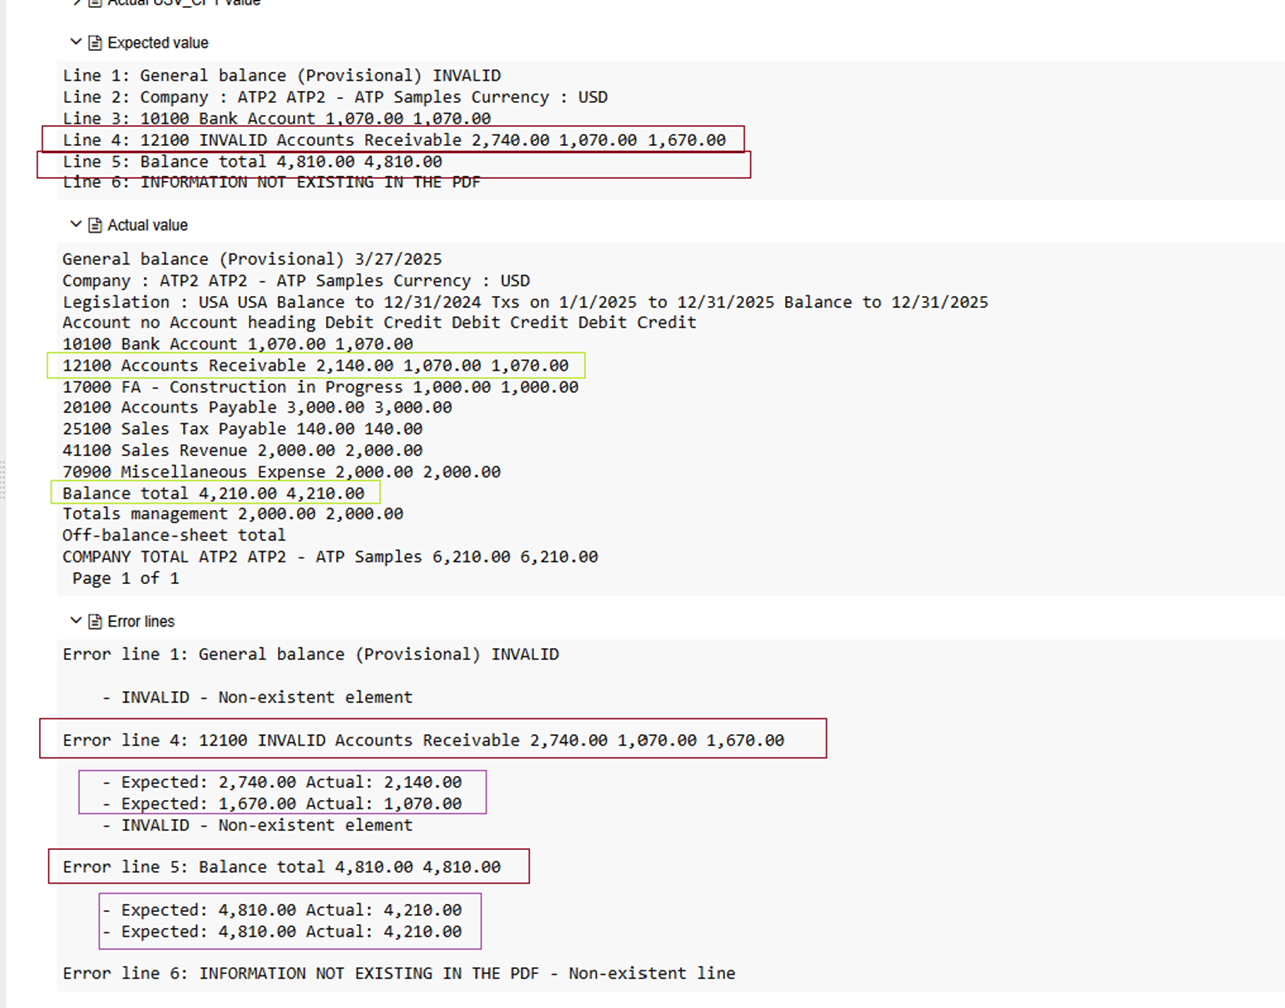
When controlling the content of the PDF file, in case of errors, allure report shows the value expected from the text and the actual value parsed from the pdf file.

Error line attachment
Each line is controlled independently.
For each line, the Robot will control if the sentence exists in the pdf by 'contains':
-
If a match is found, the line is considered valid.
-
For instance, if you search "My sentence" and the pdf contains "My sentence with some words" → the line is considered as valid.
-
For instance if you search "My sentence with some words" and the pdf contains "My sentence with some words" → the line is considered as valid.
-
-
If errors are found, the Robot will indicate to the user what type of error has been detected.
-
Example when differences are found:

-
Example when no existing elements are found:
-
Example when elements are missing or don't exist in the pdf:
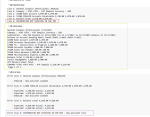
-
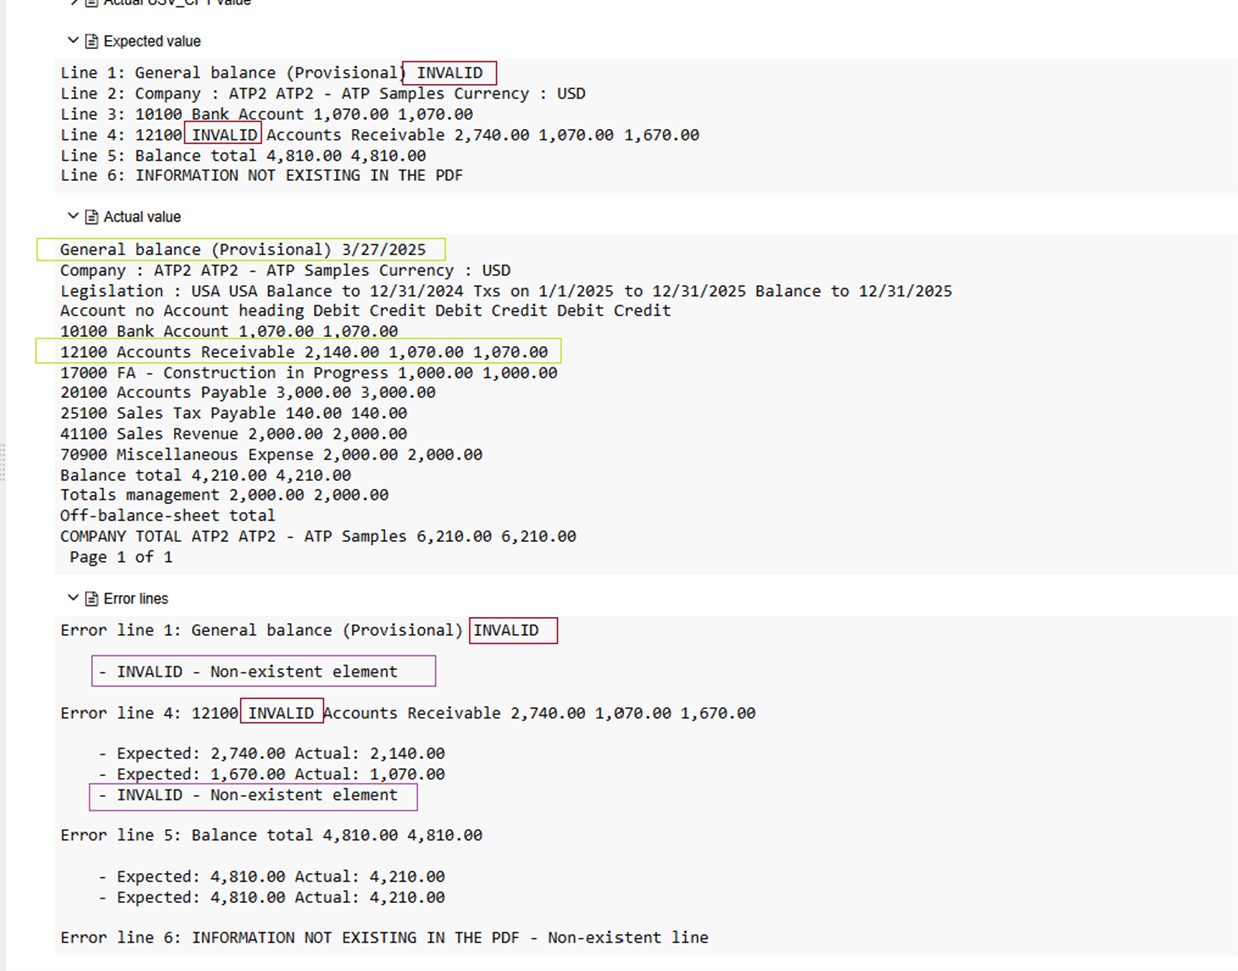
This error can also be returned if two many differences are found when comparing the expected text with the actual pdf content and none of them could be reconciled.
Controlling CSV/TXT Files
Step definitions
Renaming the CSV/TXT file
| Type | Step Definitions |
| File - File renaming | the user renames the file containing "(.*)" with name "(.*)"
|
Reading the CSV/TXT file
| Type | Step Definitions |
| File - Set csv separator | the user sets the csv separator to "(.*)"
|
| File - Read file |
the user reads the "(.*)" text file
|
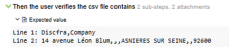
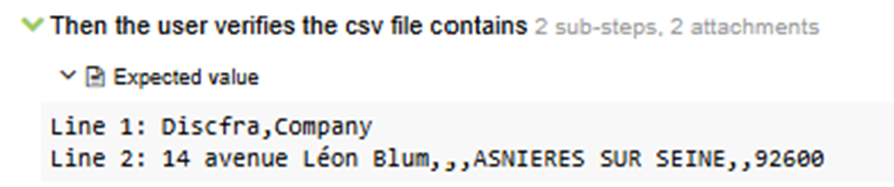
Controlling the file content
| Type | Step Definitions |
| File - Contain control |
|
| File - Comparison |
the txt file content matches the file "(.*)"
|
Example - Control the CSV/TXT file content
-
Refer to the Step definitions guide – CSV / TXT Files.
Allure report
In allure report you can find the different CSV / TXT file attachments.
File attachment
-
the actual file read is attached to allure report


Expected / Actual value attachment
-
the expected text is attached to allure report
-
the expected files (template/actual files) are attached to allure report


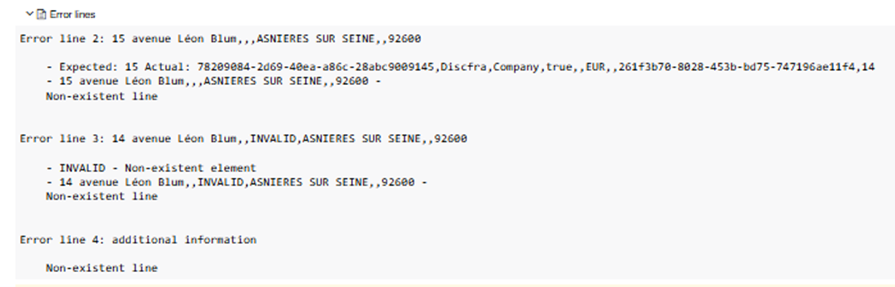
Error line attachment
The attachment is returned when the element does not match.
-
When controlling the file content:
-
Each line is controlled independently.
-
For each line, the robot will control if the sentence exists:
-
If a match is found, the line is considered valid
-
If errors are found, the robot will indicate to the user what type of error has been detected
-
Example:
-
-
-
When comparing files:
-
The robot will compare the number of lines between the expected (template file) and the actual files (generated from Sage X3 or Sage Warehousing)
-
For each line the robot looks for differences and returns them when they are found

-

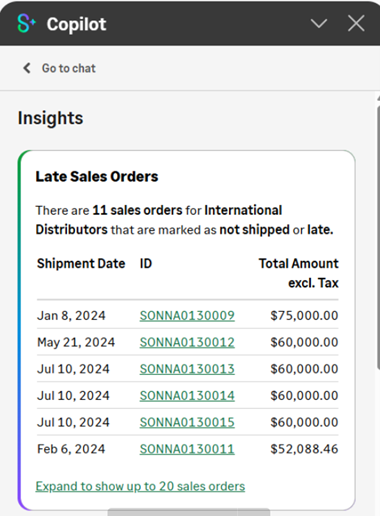
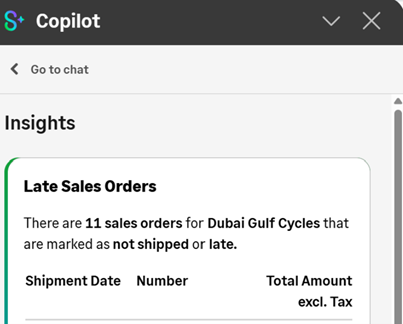
Interacting with Sage Copilot Chatbot and Insights
Since Sage X3 Automated Test Platform version 4.1.0 it is possible to interact with Sage Copilot Chatbot and Insights.
Samples can be found in Samples/05-SageCopilot-Samples.
This functionality is delivered in beta version and subjected to change according to the modifications done on Sage X3 or Sage Warehousing side.
Step definitions
| Type | Step Definitions |
| Sage Copilot - Open Sage Copilot
|
the user clicks the "(.*)" icon in the navigation bar
|
| Sage Copilot - Close the Sage Copilot panel
|
|
|
Sage Copilot - Control the Sage Copilot panel display
|
the sage copilot panel is (displayed|hidden)
|
|
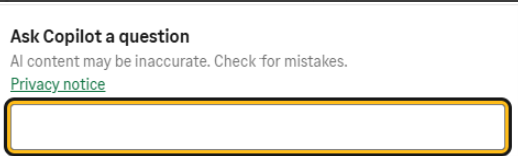
Sage Copilot - Write a question
|
|
| Sage Copilot - Click action
|
the user clicks the "(.*)" action in the sage copilot panel
|
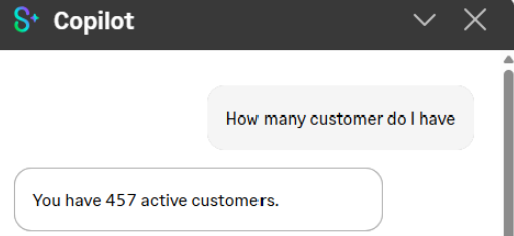
| Sage Copilot - Value verification by content
|
|
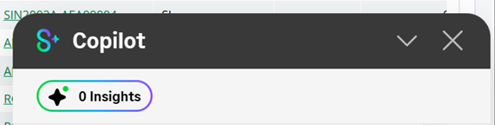
| Sage Copilot - Check the number of Insights in the Sage Copilot panel
|
the number of insights in the sage copilot panel is "(.*)"
|
| Sage Copilot - Click the Insights button in the Sage Copilot panel
|
the user clicks the sage copilot insights button in the sage copilot panel
|
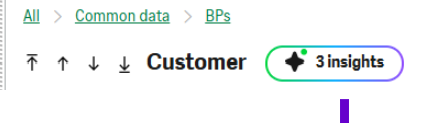
| Sage Copilot - Check the number of Insights
|
the number of insights is "(.*)"
|
| Sage Copilot - Click the Insights button
|
the user clicks the sage copilot insights button
|
| Sage Copilot - Control the card display
|
the card "(.*)" in the sage copilot panel is (displayed |hidden) |
| Sage Copilot - Select the card
|
the user selects the card with title "(.*)" in the sage copilot panel
|
| Sage Copilot - Select a cell for a specific row with column header and control that the value is the correct one
|
|
| Sage Copilot - Select a cell for a specific row with column header and click the value
|
|
| Sage Copilot - Control the text in the card
|
|
| Sage Copilot - Click the Expand detail link
|
the user clicks the Expand detail link in the sage copilot panel
|


Examples
Logging out of Sage X3
To close the X3 session properly, you need to add a log out scenario using the log out step definition.

When the automated tests are executed without any error and a log out is done, the Sage X3 session opened by Sage X3 Automated Test Platform is closed immediately after the test ends.
If the test fails or ends without any error and any log out, the Sage X3 session opened by Sage X3 Automated Test Platform is closed after few minutes.
Version compatibility
Sage X3 Automated Test Platform versions are delivered with the same release cadence as Sage X3.
For that reason, it is recommended to use a Sage X3 Automated Test Platform version compliant with the version of Sage X3 you are using.
If you update Sage X3 Automated Test Platform, it is highly recommended to update Sage X3 at the same time to ensure their compatibility.